
How To Make Challah With Fresh Milled Flour
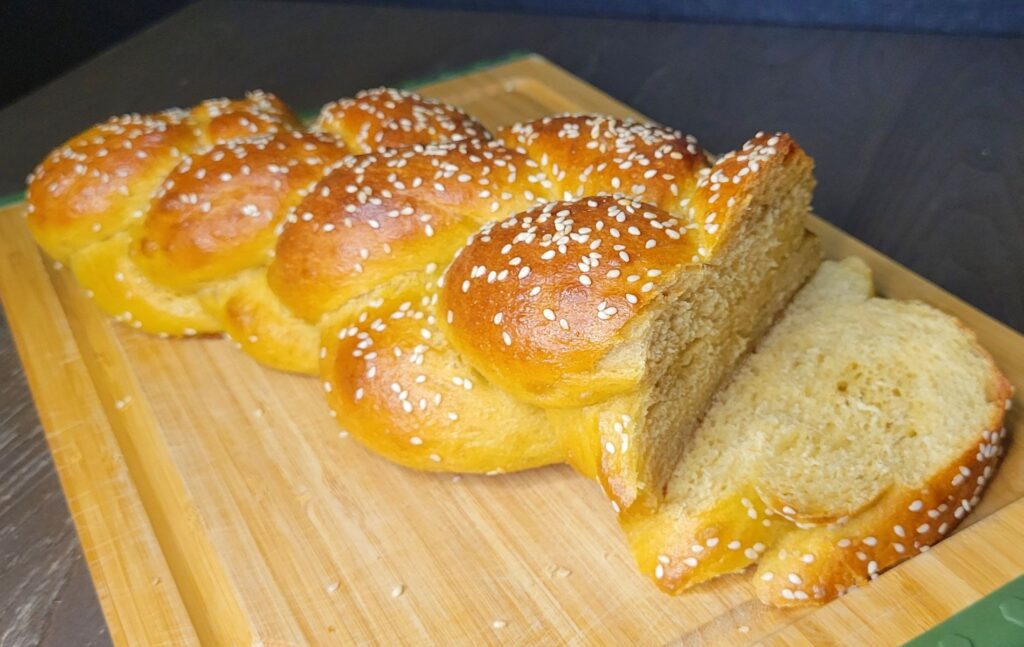
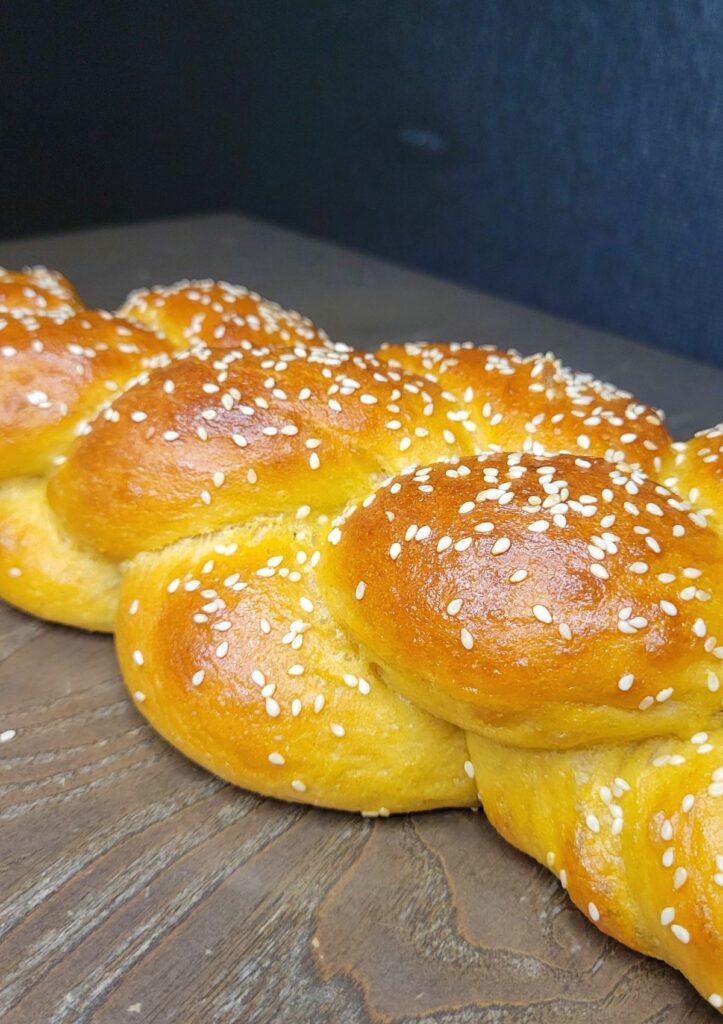
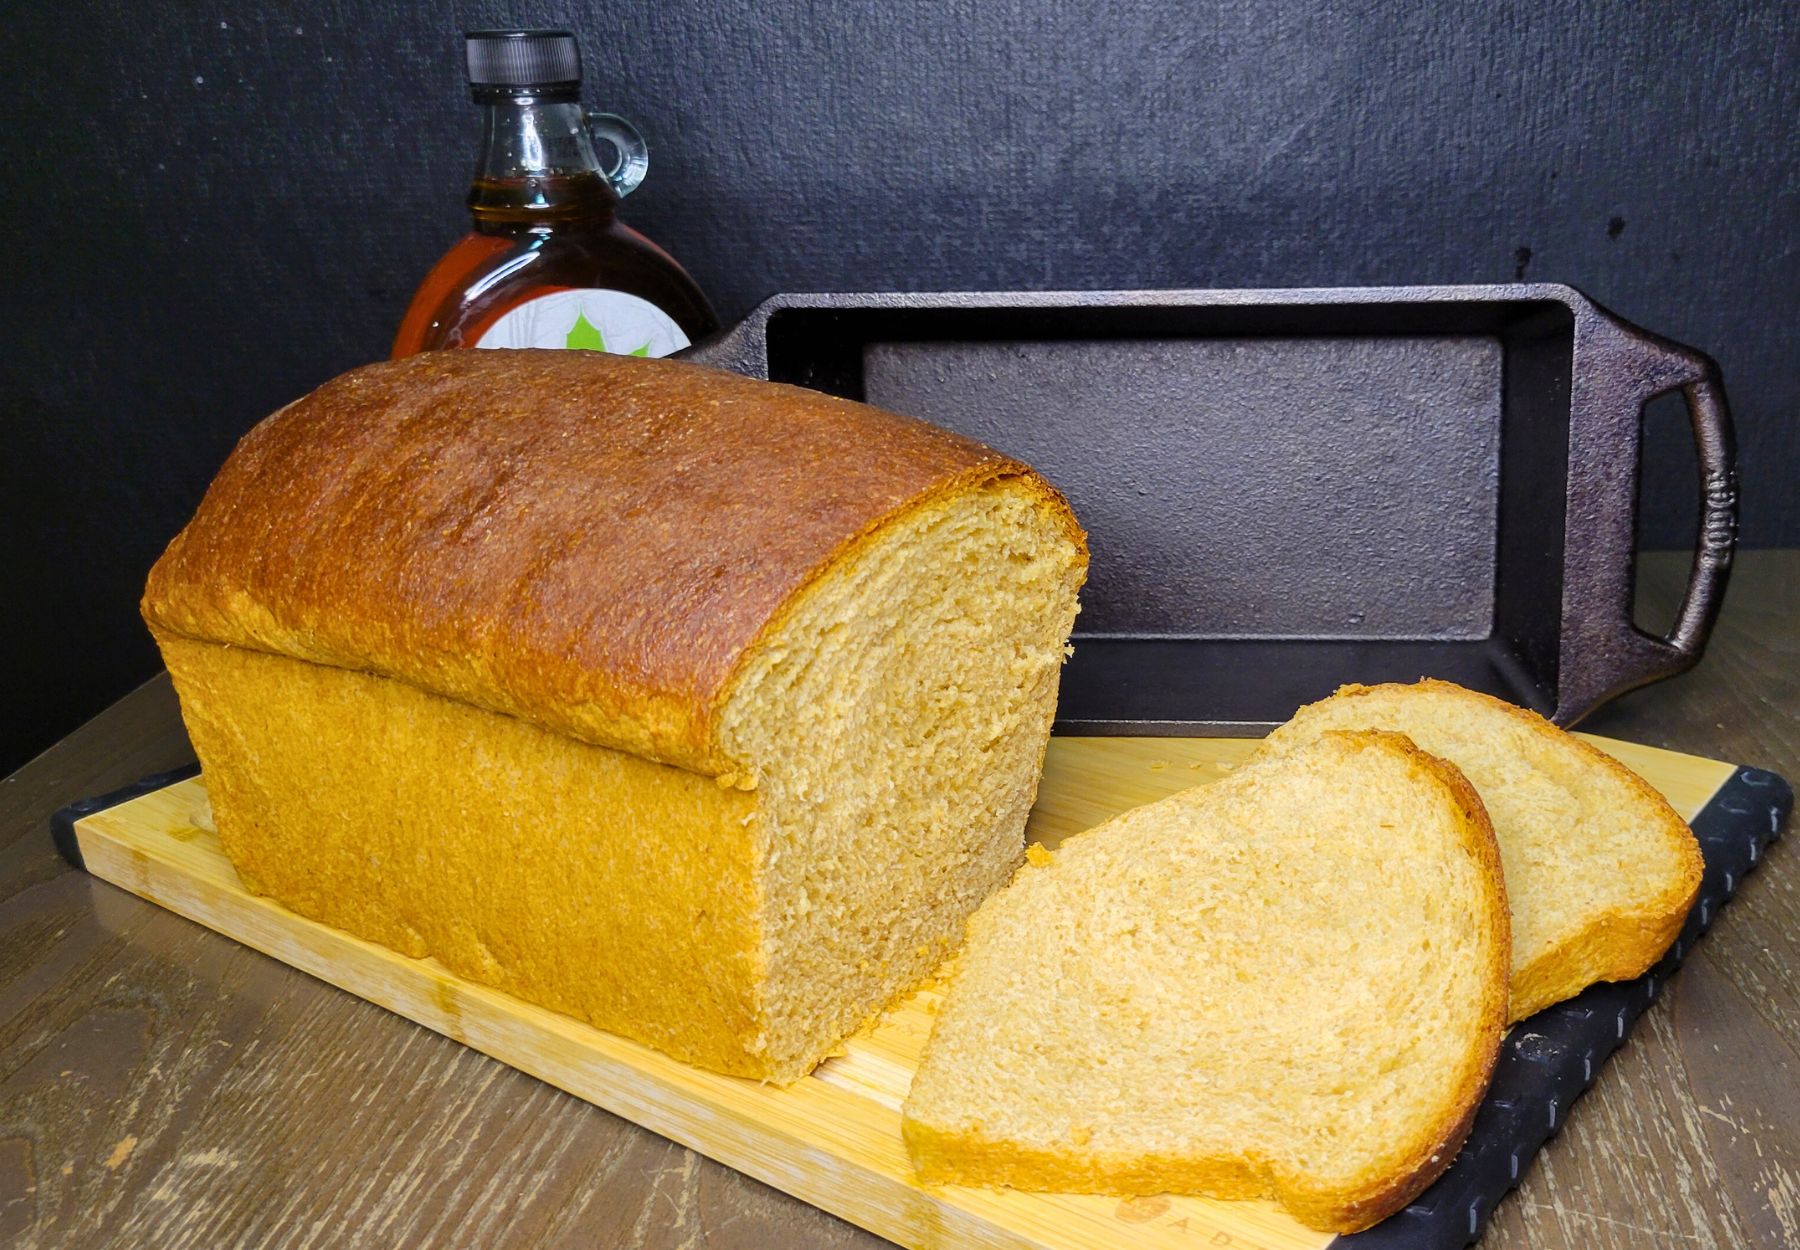
This Challah made with fresh milled flour is so surprisingly flavorful with a soft and tender crumb. Challah has a subtly sweet flavor, which is perfect for tearing into. I just love the beautiful crust, because it is fluffy, shiny, golden, and braided so adorably. And did I mention, oh so so appetizing, just a perfect loaf for any meal! This bread just earned a spot on my list of favorites!

What Is Challah?
Challah is a traditional Jewish bread that is known for its rich, slightly sweet flavor and soft, eggy texture. It’s typically braided and often enjoyed on Shabbat and other Jewish holidays. The shiny, golden crust adds to its appeal, making it a beloved staple in Jewish cuisine. But, it can be enjoyed all year as well!
What To Serve With Fresh Milled Flour Challah
Although, we enjoyed this bread plain with some softened fresh butter. Freshly milled flour challah also pairs well with a variety of accompaniments. Here are some ideas:
- Honey Butter: A combination of softened butter and honey makes a delightful spread for warm slices of challah.
- Cheese Platter: Serve slices of challah alongside a selection of cheeses such as brie, camembert, or aged cheddar for a delicious contrast of flavors and textures.
- Avocado Mash: Spread mashed avocado seasoned with salt, pepper, and a squeeze of lemon on slices of challah for a simple and satisfying snack or light meal.
- Soup: Serve fresh milled flour challah alongside a warm bowl of soup such as tomato basil, butternut squash, or chicken noodle for a comforting and complete meal.
- Fruit Jam: Spread slices of challah with your favorite fruit jam or preserves for a sweet and tangy treat that complements the bread’s flavor.
- Nut Butter: Spread almond butter, peanut butter, or cashew butter on slices of challah for a protein-rich snack or breakfast option.
These pairings enhance the flavor and texture of the challah while offering a variety of tastes to suit different preferences and occasions.
The Best Bread For French Toast!
So, I shared some wonderful pairings above to top your Challah with. But, if you want to make the most scrumptious French toast ever, then try making it with Challah! Because of its rich flavor and soft texture, it is one of the best bread choices for French toast!
The soft and slightly sweet interior of challah absorbs the egg mixture beautifully, resulting in French toast with a rich, custardy center. The bread’s sturdy structure allows it to hold up well to soaking without becoming overly soggy, while its crust caramelizes beautifully when cooked, adding a delightful contrast of textures.
Additionally, the rich flavor of challah, often characterized by its subtle sweetness and hints of egg, elevates the taste of French toast, making it more indulgent and flavorful compared to using regular sandwich bread. And, now I want some French toast…. Excuse me while I get started making another loaf.
What To Top My Fresh Milled Flour Challah With?
Sprinkling toppings on top of your challah loaf can add both flavor and visual appeal. Here are some great options:
- Sesame Seeds: Sprinkle sesame seeds over the top of your challah loaf before baking for a classic and nutty flavor.
- Poppy Seeds: Poppy seeds add a subtle crunch and a hint of nuttiness to your challah loaf, as well as a striking visual contrast.
- Everything Bagel Seasoning: For a unique twist, sprinkle everything bagel seasoning over your challah loaf before baking. This seasoning blend typically includes sesame seeds, poppy seeds, dried garlic, dried onion, and salt.
- Coarse Salt: A sprinkle of coarse salt on top of your challah loaf can enhance its flavor and provide a satisfying contrast to the sweetness of the bread.
- Cinnamon Sugar: Mix together cinnamon and sugar and sprinkle it over the top of your challah loaf before baking for a sweet and aromatic twist.
- Herbs: Fresh or dried herbs such as rosemary, thyme, or parsley can add a savory flavor and aroma to your challah loaf. Simply sprinkle them over the top before baking.
Choose one or a combination of these toppings to customize your challah loaf to your taste preferences and enjoy the delicious results!
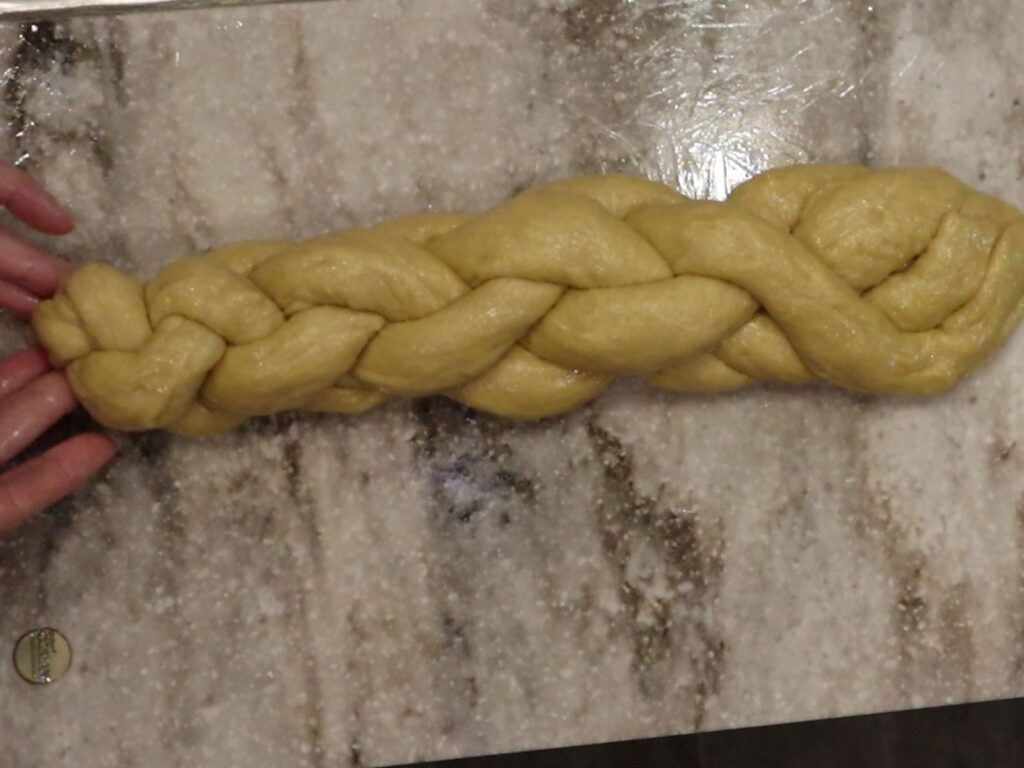
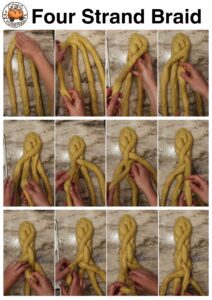
Braiding Challah
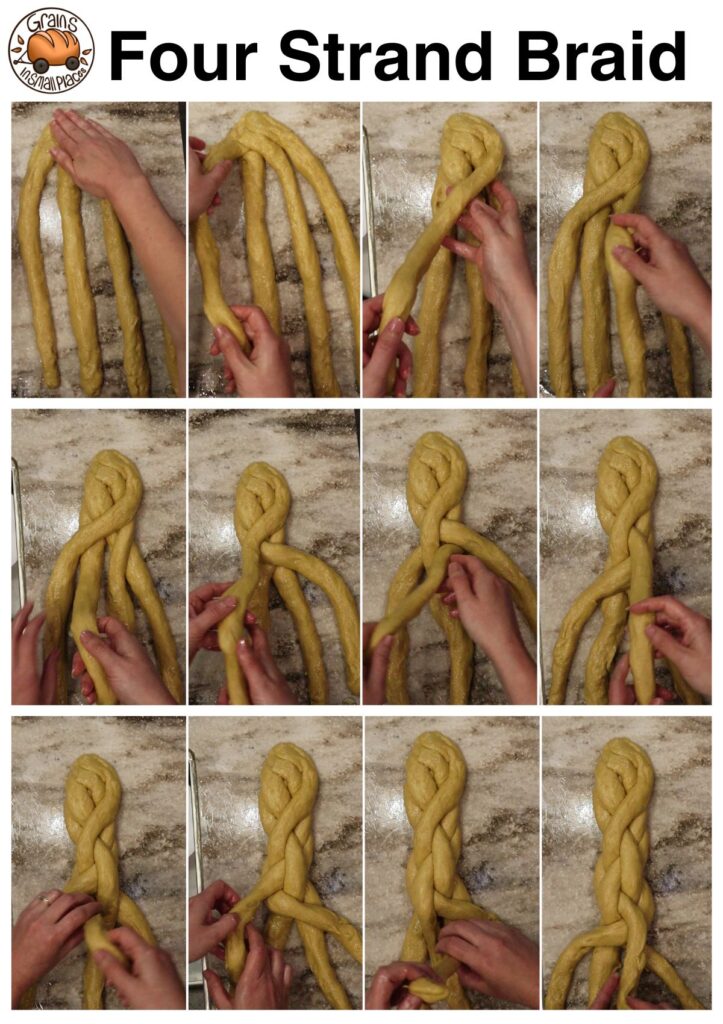
There are several ways to braid Challah, and so many videos out there. I am going to focus on the Four strand braid for this loaf. I chose this braid method, because I think it looks beautiful, it compliments the bread, and it a little less complicated than the six strand or braided ball. But, it is a little more complex than the traditional braid with three strands.
Four Strand Braid Bread – Fresh Milled Flour Challah Edition
I will try my best to explain the four strand braid process, but I suggest watching the video, and looking at the photos I took as well to help. So, rather you are a visual, auditory, or kinesthetic learner, I have a resource for you!
It is important to note that when you are braiding your dough, try not to pull too tight, you don’t want t super taunt braid, because we want to leave room for expansion and rise!
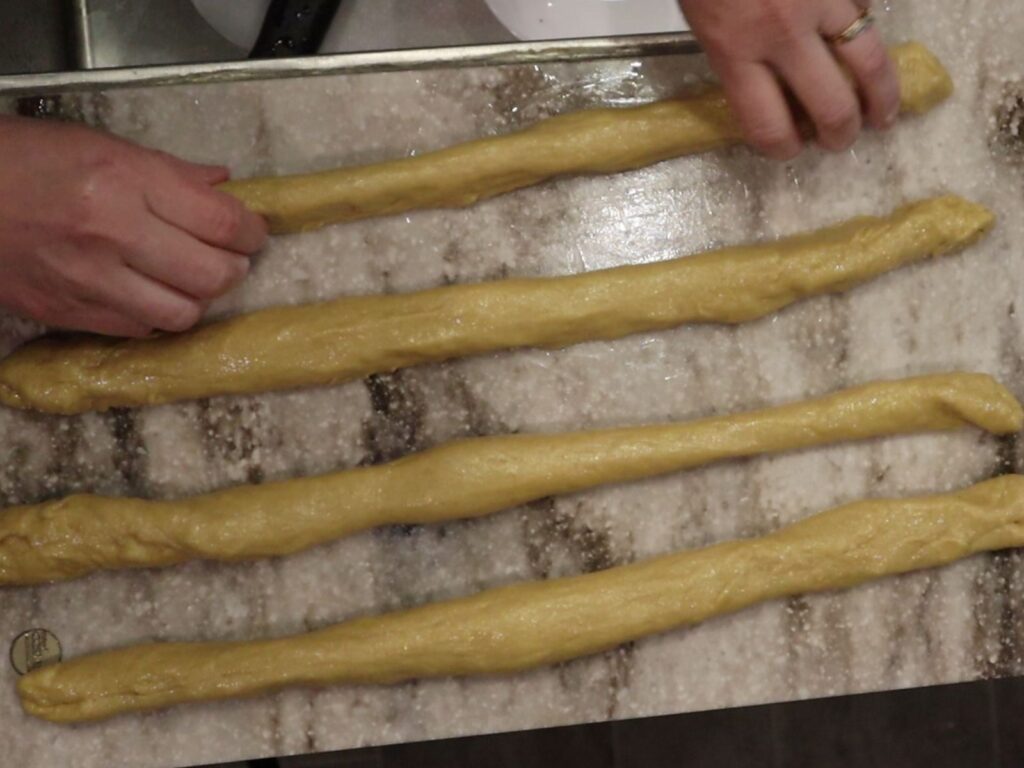
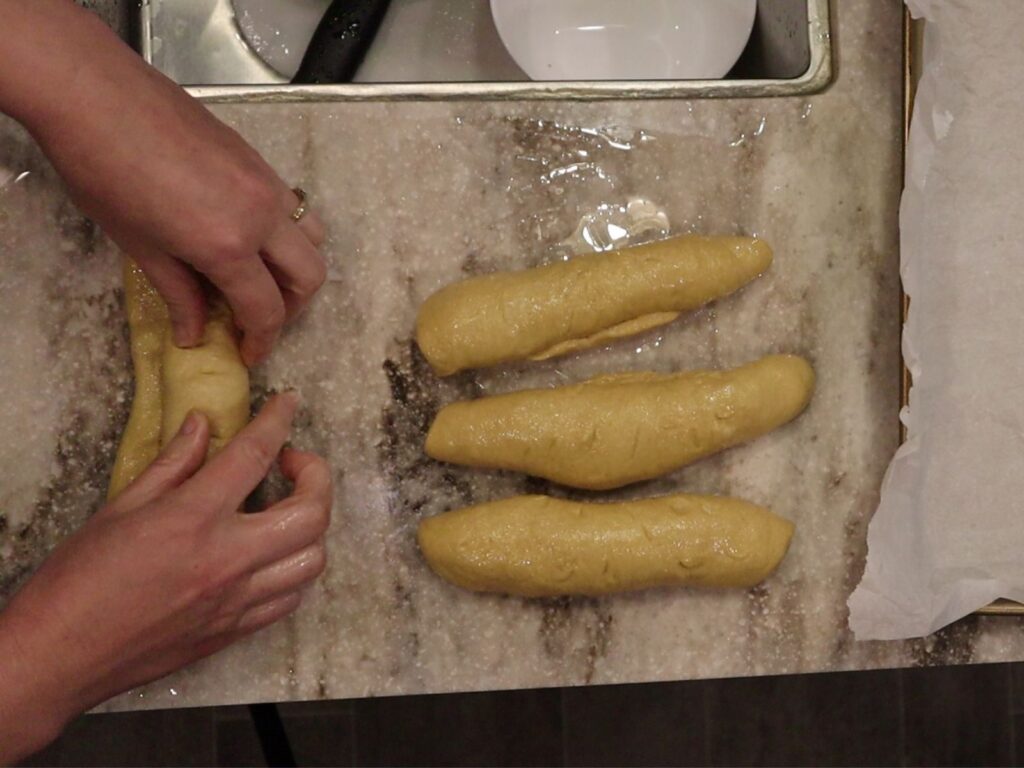
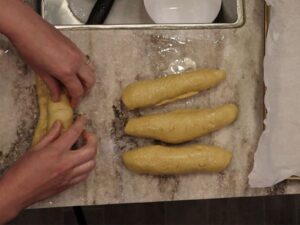
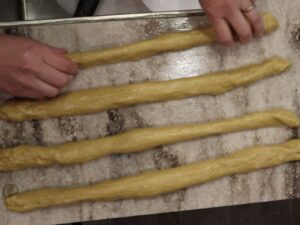
Firstly, start out with four equal rolled out pieces of dough to make long 12-14 inch strands. Roll from the middle outwards so that the center is slightly larger than the ends. This will make your loaf more even, and make it easier to attach the ends.
Directions To Braid Four Strands Of Bread Dough
Take the outer left and bring it to the center. Then, take take the outer right and take it all the way to the left. Now, there is a new outer right strand, take it to the middle. you are left with one strand you have not moved yet, and that is the second to the left now. That strand goes all the way to the outside right.
Now each strand has been moved. Let’s start the next set of moves. This is kind of like chess right? LOL That outer left strand that is on the top, that one now goes to the center. Then, the strand on the right of it (the second from the right strand) moves all the way to the outer left. Then the outer right strand goes to the center. And the second from the left goes all the way to the outside right.
Ok, take a deep breath, are you still with me? Alright now take the outer left strand and bring it to the center. Then, the second to the right strand goes all the way to the outside left. Then the outer right strand goes to the center. And the second from the left goes all the way to the outside right.
Are you seeing a pattern yet? You will continue these moves until you get to the end of the loaf. Then, pinch all the ends together to keep them from unraveling. Now, tuck both ends under the loaf.
Ingredients To Make Fresh Milled Flour Challah
Ingredients For Challah Dough
- 2&2/3 cup Fresh Milled Flour 320g (I used 270g of Hard White Wheat and 50g of Kamut)
- 3 whole eggs 150g
- 1/2 cup of room temperature water 120g
- 1 TBSP honey 21g
- 1/8 cup olive oil 30g
- 1 tsp salt 4g
- 2 tsp instant yeast 6g
Toppings & Egg Wash Ingredients
- 1 egg for egg wash
- 1 tsp water
- 1 TBSP sesame seeds *Optional – could use any topping, or keep plain

Instructions To Make Fresh Milled Flour Challah
Make The Dough
- Firstly, mill the flour.
- In a stand mixer, add water, eggs, honey, olive oil, and salt. Mix these together until combined.
- Add the flour into the water & egg mixture, mix until incorporated, and there is no dry flour left.
- Cover the dough, and let it rest (Autolyse) at room temperature for 15-20 minutes.
- After the rest period, add the yeast and then start the kneading process.
- Knead dough until it is nice and stretchy. Lightly oil the dough ball and bowl.
- Cover the dough and let it rise for 1-2 hours at room temperature until the dough has doubled.

Pre-shaping & Shaping The Dough
- After the dough has doubled, lightly oil your work surface and hands. Remove dough and divide into 4 equal parts.
- Pre-shape each piece by pressing each one into a flat rectangle, and fold the long edge to the center of the dough, then the other half on top of the first half. Press to seal the dough, they should be cylinders now. Repeat with each piece, then cover and let rest for 15 minutes.
- Once the dough cylinders have had a chance to rest, then it is time to roll them out into long 12-14 inch strands. If the dough keeps shrinking on you, then cover and let it rest for 10 more minutes.
- To shape the cylinders into the strands, on the lightly oiled surface, roll each piece from the middle outwards so that the center is slightly larger than the ends. This will make your loaf more even, and make it easier to attach the ends.
- It is important to note that when you are braiding your dough, try not to pull too tight, you don’t want t super taunt braid, because we want to leave room for expansion and rise!
- Now braid the dough strands with a Four strand braid. *See above in the post, notes, or video for braiding instructions.
Finishing The Challah Loaf
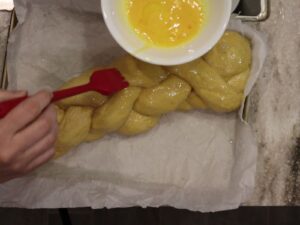
- Make the egg wash.
- Place the braided loaf onto a parchment paper lined baking sheet, brush all over with the egg wash, cover, and then let the loaf rise for 1-2 hours.
- Be sure to check on the dough so that it does not over-proof. To test, wet or oil your finger, and lightly press the dough. If the indent springs back quickly, then the dough still needs to proof longer. If the dough springs back slowly, then it is ready to bake. (Even if the indent doesn’t fill back in all the way, you are looking for the speed that it springs back.)
- Near the end of this second rise, preheat the oven to 350*F.
- Once the dough has risen, it will look puffy and soft. Gently do a second egg wash on the loaf, and sprinkle with sesame seeds or any toppings you desire.
- Bake loaf for 20-25 minutes, or until the center of the loaf reaches 190*F. The loaf should look golden brown.
- Let the loaf cool on the pan for 10 minutes, then move the loaf to a metal cooling rack.
- Enjoy!
Storing Fresh Milled Flour Challah
While Challah is best enjoyed warm and fresh, you can cover and leave at room temperature for 2-3 days. For longer storage, I recommend letting the loaf cool completely, then put in a freezer bag, and freeze for up to 3 months.
Shop This Post
Grain mill Nutrimill (Use Coupon Code: Grainy for $20 Off yours)
Hard White Wheat (Small Amount)
Kamut (Small Amount)
Bulk Grain Purchases at Azure Standard
Check Out Some Of My Other Fresh Milled Flour Recipes
Fresh Milled Flour Recipe Index
The GISP Method – The Secret To The BEST Fresh Milled Flour Bread

Challah Made With Fresh Milled Flour Printable Recipe

Challah Made With Fresh Milled Flour
Ingredients
Dough Ingredients
- 2&2/3 cup Fresh Milled Flour 320g I used 270g of Hard White Wheat and 50g of Kamut
- 3 whole eggs 150g
- 1/2 cup Room temperature water 120g
- 1 TBSP honey 21g
- 1/8 cup olive oil 30g
- 1 tsp salt 4g
- 2 tsp instant yeast 6g
Egg Wash & Topping
- 1 egg for egg wash
- 1 tsp water
- 1 TBSP sesame seeds *Optional could use any topping or keep plain
Instructions
- Firstly, mill the flour.
- In a stand mixer, add water, eggs, honey, olive oil, and salt. Mix these together until combined.
- Add the flour into the water & egg mixture, mix until incorporated, and there is no dry flour left.
- Cover the dough, and let it rest (Autolyse) at room temperature for 15-20 minutes.
- After the rest period, add the yeast and then start the kneading process.
- Knead dough until it is nice and stretchy. Lightly oil the dough ball and bowl.
- Cover the dough and let it rise for 1-2 hours at room temperature until the dough has doubled.
- After the dough has doubled, lightly oil your work surface and hands. Remove dough and divide into 4 equal parts.
- Pre-shape each piece by pressing each one into a flat rectangle, and fold the long edge to the center of the dough, then the other half on top of the first half. Press to seal the dough, they should be cylinders now. Repeat with each piece, then cover and let rest for 15 minutes.
- Once the dough cylinders have had a chance to rest, then it is time to roll them out into long 12-14 inch strands. If the dough keeps shrinking on you, then cover and let it rest for 10 more minutes.
- To shape the cylinders into the strands, on the lightly oiled surface, roll each piece from the middle outwards so that the center is slightly larger than the ends. This will make your loaf more even, and make it easier to attach the ends.
- It is important to note that when you are braiding your dough, try not to pull too tight, you don’t want t super taunt braid, because we want to leave room for expansion and rise!

- Now braid the dough strands with a Four strand braid. *See above in the post, notes, or video for braiding instructions.
- Make the egg wash.
- Place the braided loaf onto a parchment paper lined baking sheet, brush all over with the egg wash, cover, and then let the loaf rise for 1-2 hours.
- Be sure to check on the dough so that it does not over-proof. To test, wet or oil your finger, and lightly press the dough. If the indent springs back quickly, then the dough still needs to proof longer. If the dough springs back slowly, then it is ready to bake. (Even if the indent doesn’t fill back in all the way, you are looking for the speed that it springs back.)
- Near the end of this second rise, preheat the oven to 350*F.
- Once the dough has risen, it will look puffy and soft. Gently do a second egg wash on the loaf, and sprinkle with sesame seeds or any toppings you desire.
- Bake loaf for 20-25 minutes, or until the center of the loaf reaches 190*F. The loaf should look golden brown.
- Let the loaf cool on the pan for 10 minutes, then move the loaf to a metal cooling rack.

- Enjoy!
Video
Notes
*This post contains affiliate links, which means I make a small commission at no extra cost to you! As an Amazon Associate I earn from qualifying purchases. But, I will only suggest items I actually Love and Have Used!


Thank you Kara,
Watched you make it yesterday and got up and made it today!
It is perfect!
I’ll make a double batch on Friday! With raisins!
Thank you, thank you, thank you!!!
Yay! I am so happy to hear that! Nice job! Thanks so much! Happy Baking!
Hello,
I made this yesterday!
So delicious and it looks like I purchased in in a bakery…just beautiful.
Thank you so much for your very helpful recipes/videos/tips. I discovered Miss Sue Becker this past fall and jumped at the opportunity to feed our family more nutritiously. It has been a whirlwind of information. I have made many of your recipes and due to your detailed directions, I have been very successful.
Blessings
Yay! Nice job! I am so happy to hear that! Sue Becker is a wonderful resource! She has taught me so much! Thank you so much!
I substituted Einkorn for the Kamut and it tasted great. This is the first time I’ve ever made Challah bread and it won’t be the last. Loaf turned out so springy and light. I used Italian seasoning instead of sesame seeds.
I am so happy to hear it was a hit! Yum! Italian seasoning sounds delicious! Thanks so much!
Can you use soft white wheat instead of hard wheat as well?
No, unfortunately, soft white wheat does not form gluten. So, you need a hard wheat to get that nice stretchy dough.
Thank you so much! That is super helpful. Good to know
Welcome!
Thank you Kara. Great recipe. I made it for my granddaughters and they loved it. It was very tasty. Only thing I felt my dough was very wet and one strand seemed to tear easily when braiding. It also spread out more than rising. It looked a little flat but braid was pretty n tasted good. Any idea or tips for troubleshooting? I never baked before and found Sue Beckers videos n now on my journey. So glad I found your videos with great instructions and recipes. Thank you
What kind of wheat did you end up using? If the dough was tearing it sounds like it wasn’t quite kneaded long enough, or the wheat didn’t develop enough gluten. I have lots of video tutorials that may help as well. Sounds like you did a pretty nice bake for your first time! Keep going, the more you bake with it the easier it becomes! My videos can all be found on my YouTube channel. https://www.youtube.com/c/GrainsInSmallPlaces
I notice that you knead for a very long time to develop the gluten with your yeast breads. Do you want to do the same with the sourdough, or does that develop as it ferments?
I just do stretch and folds, and time for my traditional sourdough boule loafs, but if I am making sourdough sandwich bread, or something like that, I will knead until I get nice stretchy dough. 🙂
Is it important to use two different flours? I only buy hard red for bread and soft white for pastries and cookies.
You don’t have to use 2 flours, you can use all hard red, you may need to increase the flour just a tiny bit. I just really like the yellow color, buttery taste, and soft texture the Kamut brings to the bread.
I love your recipes and thank you for your generosity in sharing all your wonderful knowledge. I want to make 2 loaves of this Challah bread. If I double the recipe, do you think it would fit in my Kitchen Aid mixer without a problem? Thank you in advance.
Thank you so much! I love to hear other people enjoying my recipes! 🙂 Yes, you can double this to make 2 Challah loaves in your mixer. I would say to knead for a few minutes, then let it rest a bit in between until you get nice stretchy dough. Let me know how it goes! Happy Baking. 🙂
Question:
Challah- may I make the dough for this bread on Friday evening & store in the fridge until Sunday morning to bake? Let rise an hour outside prior to baking?
I have done this with many of my other breads with great success, but I have not tried it with he Challah. I would think it would work fine. I have made my bread, rolls, etc and left them in the fridge for up to 3 days. Let me know how it goes! 🙂
Did you mean to have 80 g of water in your video and 120g in the written part?
I can update the amounts in the written recipe, but not the video. So, I always go with the written recipe. You can always start out with the lower amount of water, and always add a bit more if the dough seems too dry.
Can I use einkorn instead of the hard wheat Bertie for this recipe?tia
I find that Einkorn does not do well in bread type doughs that you need a nice stretchy dough for. It doesn’t not like to be kneaded, and doesn’t develop nice stretchy dough.
Planning to make this today! I make challah every Christmas season but this is my first time making it with freshly milled! I don’t have Kamut- would soft white be a sufficient substitute?
I don’t recommend soft white for breads, as it doesn’t develop gluten. If you don’t have Kamut, you can use all hard white wheat and hold back some of the liquid. Then, if the dough seems too dry, you can always add that liquid back in.
Loving your recipes. If I wanted to do this as a marble rye challah, could I just sub rye grain for kamut, add caraway seeds, and add cocoa powder and molasses to half of the dough to color it and then do the rest the same way you did this one?
You could give that a try. I haven’t tried that with this recipe. But I would add extra hard wheat to offset the missing Kamut (as Kamut is a very thirsty grain and can take on A LOT of liquid. Unlike Rye which doesn’t need as much liquid)
I’ve been baking challah for lots of years. I didn’t find this recipe to good actually. My yeast is alive and I followed directions to a T. Didn’t rise well, hardly at all.
Don’t know how it’s tastes, but that should be ok. 🤷♀️
Well maybe this comment won’t be deleted.
I didn’t like how the first loafI was turning out. Followed recipe to a T. I know that fresh wheat acts different.
The first loaf I made wasn’t even rising good and my yeast is good. I put it in my warm car and it rose a little. It rose a little more in the oven.
My husband loves it more than the regular all purpose challah , so I have to make more today😂😂.
Has anyone made this recipe and needed more flour than the 320g it calls for? I’m working on it now and my husband swears there’s not enough flour in my mixture. He’s made more bread than me over the years, but neither of us have ever made this recipe or challah before.
It can vary a bit for everyone, but this is a soft wet dough, not a stiff dough. If you try again, try holding back some of the liquid next time, and only add it in if the dough seems stiff or dry later. This is always a better option than adding more flour with freshly milled flour.
Love your recipes! Can I make this with sourdough starter instead of yeast? Thanks
Yes, you can omit the yeast and add about 1/2 cup sourdough starter 115g decrease the liquid in the recipe and watch the rise times, they will likely be about double or so.
Can we freeze this bread whole? If so, how would you recommend we thaw and eat it? Does this take away the taste and freshness? Thanks so much. It is delicious. My 14 yo daughter is making it and loves it!
We like to slice after the loaf cools, then freeze, that way we can grab whoever many slices we want to thaw at that time. We just place it in a sealed container on the counter to thaw. If you freeze it while it is still fresh (but cooled) It stays fresh. (as long as it’s not in the freezer for a super long time, like more than a few months)
Hi Kara, thank you so much for all the info. Today I baked my first bread with fresh milled flour, actually I never made a bread before so I could not compare, lots of mistakes occur on the process, still the bread tastes good, and the smell was wonderful.
Thank you Cleo
You got this! So happy to hear that! Thanks! 🙂