
NY Style Bagels – How To Make With Fresh Milled Flour
How To Make NY Style Bagels with fresh milled flour. As well as achieving the perfect chewy texture and distinctive flavor that have made New York bagels a worldwide sensation. There are a few tricks I want to share with you. So, let’s go through the step-by-step process of creating these beloved bagels from the comfort of your home.

Do I Have To Overnight Ferment My Bagels?
The overnight ferment step is not required, you can proceed with the recipe without it. However, I highly recommend trying it at least once. Plus, this step actually makes it so much more convenient for fresh bagels in the morning. I do all the kneading, rising, shaping the evening before. Then, they rest in the fridge overnight. The next morning all I have to do is boil and bake them! I am no necessarily a morning person, so this little trick is such a wonderful one for me!

Also, the overnight ferment will allow the bagel flavor to intensify and get that slight tang flavor, even without sourdough. And that beautiful blistering the skin of the bagels have, yep, that is also intensified by the overnight rise in the fridge. So, even though this recipe is a yeast recipe, and not a sourdough one, the overnight ferment time dramatically enhances these bagels tremendously. If you are looking for a sourdough bagel recipe instead, HERE is one that is yummy from Lisa at Farmhouse on Boone.
How Long Do I Boil The Bagels For?
Although in my video I only boiled the bagels for 20 second on each side. Since then, I have realized the bagels benefit from a slightly longer boiling time. So, I would recommend boiling the bagels for about 40 second on each side for a total of close to a minute and a half. Then, they are ready to be baked. I recommend you bake these at a high temperature, I will go over that in the baking instructions down below.
Do I Have To Use Malt?
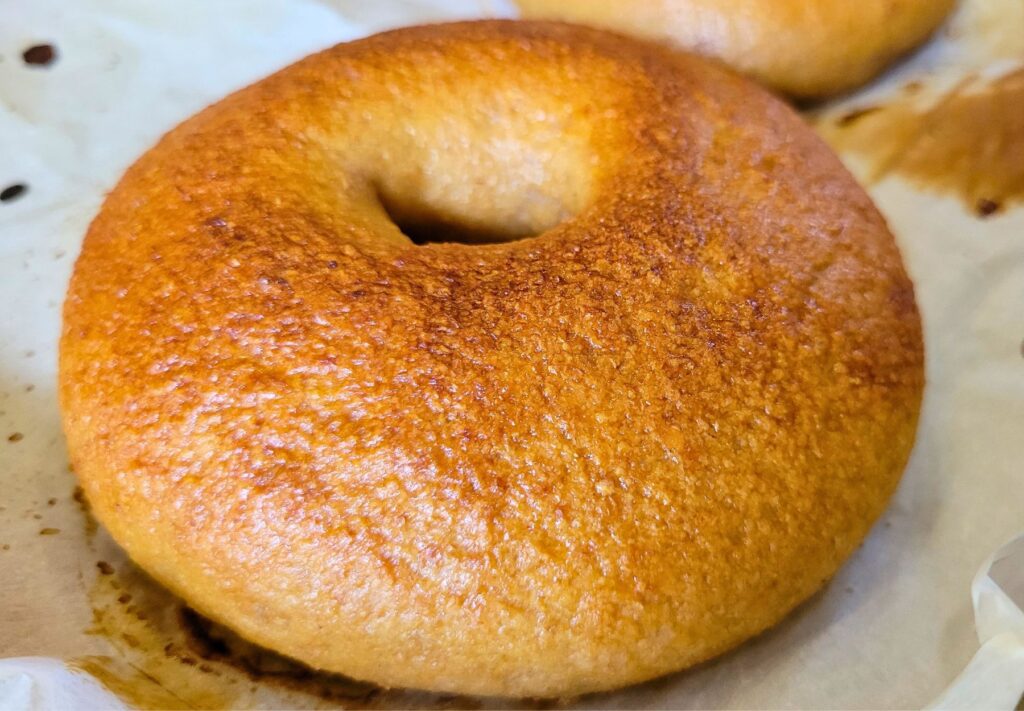
In the realm of NY Style Bagel perfection, one key ingredient reigns supreme: malt. The secret to achieving that signature chewiness and golden-brown blistery crust lies in the incorporation of malt into your bagel recipe. Malt extract, whether in syrup or powder form, holds the power to transform ordinary dough into an extraordinary culinary experience. Its natural sugars not only enhance the bagels’ crust color but also play a crucial role in developing that distinctive depth of flavor we associate with the classic New York bagel. HERE is the kind I use.
However, if you do not have malt, and don’t have time to get any there are a couple substitutions that will work, just not ‘quite’ the same. Here are some alternatives, but do make note, I recommend you try the malt at some point and see the difference, and which you prefer:
- Molasses
- Brown Sugar
- Sucanat
- Honey

What Are Some Good Flavors To Add To My Bagels Made With Fresh Milled Flour?
There are so many flavor options you could choose to make these bagels even more flavorful! Try one of your own or here are a few ideas to start with:
- Everything Bagel: A timeless favorite, this bagel is generously coated with a blend of poppy seeds, sesame seeds, dried garlic, dried onion, and coarse salt, delivering a harmonious symphony of savory flavors. Many stores now carry this delicious concoction already mixed too for convenience sake!
- Cinnamon Raisin: Embrace a touch of sweetness with a dash of ground cinnamon and a scattering of plump raisins within the dough. Perfect toasted with cream cheese or butter.
- Sesame Seed: Keep it simple and elegant by generously coating the bagel with nutty sesame seeds. The toasted seeds provide a delightful crunch and a subtle, earthy flavor.
- Garlic Parmesan: Infuse your bagel with rich, roasted garlic and a sprinkle of grated Parmesan cheese for an indulgent and aromatic twist on the classic.
- Blueberry: Transform your bagel into a breakfast delight by gently folding in fresh or dried blueberries into the dough. A drizzle of honey or a smear of cream cheese complements the fruity essence.
- Jalapeño Cheddar: Add a hint of heat with finely chopped jalapeños and a generous sprinkling of sharp cheddar cheese. This bagel packs a flavorful punch and is perfect for those who crave a little kick.
- Asiago Cheese: Top your bagel with Asiago cheese, and experience with the robust and nutty notes of Asiago cheese
Ingredients To Make Bagels With Fresh Milled Flour
- 4 Cups of fresh milled flour 480g (I milled 400g of hard white wheat berries & 80g of Kamut berries to get this amount.)
- 2 tsp salt
- 1 TBSP Malt syrup (you could use molasses or brown sugar if needed instead)
- 1&1/4 cup warm water 295g
- 1&1/2 tsp instant yeast
Water Bath Ingredients (the next morning)
- 2 quarts of water 2000g
- 2 TBSP malt syrup (you could use molasses or brown sugar if needed instead)
- 1 TBSP sugar
Optional Toppings – you could top with different seeds, everything seasoning, cheese, etc.
Instructions To Make Fresh Milled Flour Bagels
- Firstly, mill the flour.
- Combine the flour, warm water, salt, and malt, mix until no dry flour is left. This should be a stiff dough.
- Cover and let sit at room temperature for at least 30 minutes or up to 2 hours.
- After the dough has sat, then add the yeast. Mix yeast in until incorporated.
- Knead the dough for at least 15 minutes. It will be very tough on a mixer, so if you want to knead by hand you can, or knead half with the mixer and half with your hands.
- Cover the dough again, and let it rise until it looks puffy. (We aren’t looking for it to double in size like bread, so it may only take 30-40 minutes.)
Shaping The Dough
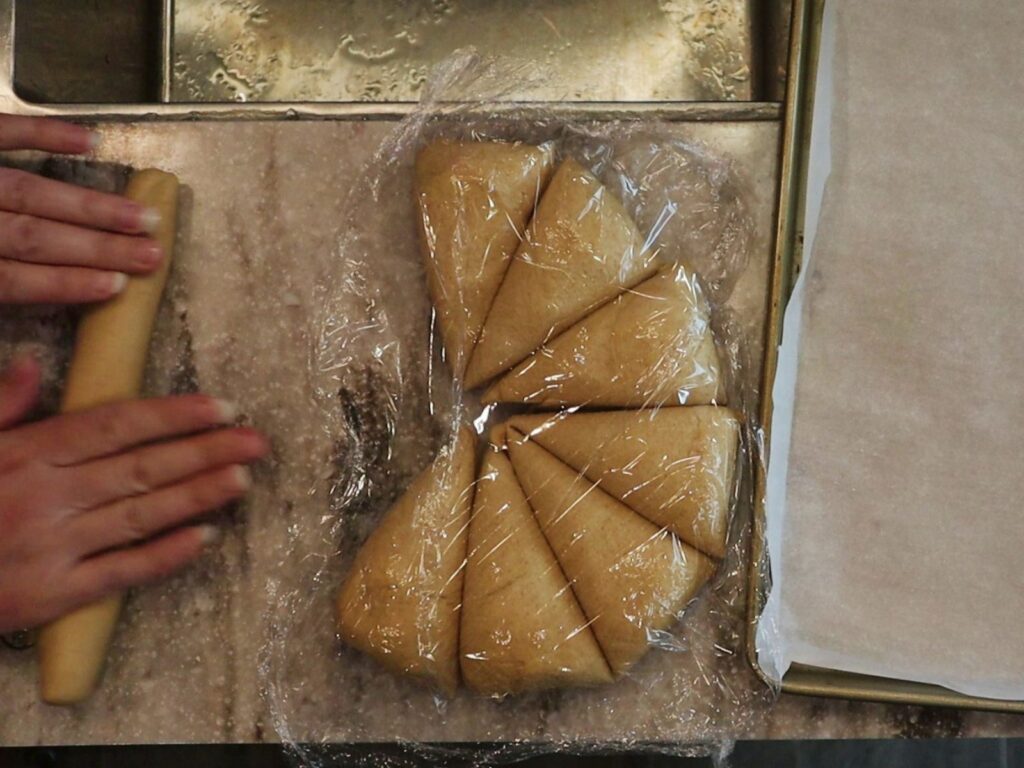
- After the dough looks puffy, divide the dough into 8 pieces (the dough should be stiff enough that you don’t need oil or flour for your work surface.)
- Press each dough piece to get some of the air out, then roll each piece into an 8 inch cylinder. Make sure to keep all the other pieces covered that you are not working with so the dough pieces don’t dry out. Cover all the cylinders and let sit for 15 minutes.
- After this second rest, take each cylinder and wrap it around your hand with the ends of the dough under your hand. push the ends on the table in a rolling motion to “lock” the two ends together. Make sure the ends are securely sealed. (keep dough pieces covered when not working with them.)
- ALTERNATIVE SHAPING METHOD- rather than making the cylinders and wrapping around your hand, you could make a dough disk, and press two fingers in the middle of the dough all the way through. making the center hole larger than the two fingers.
- Place all shaped bagels on a parchment paper lined baking sheet, and cover securely with plastic wrap. Place the covered baking sheet in the fridge overnight. (6-24 hours)

The Next Morning
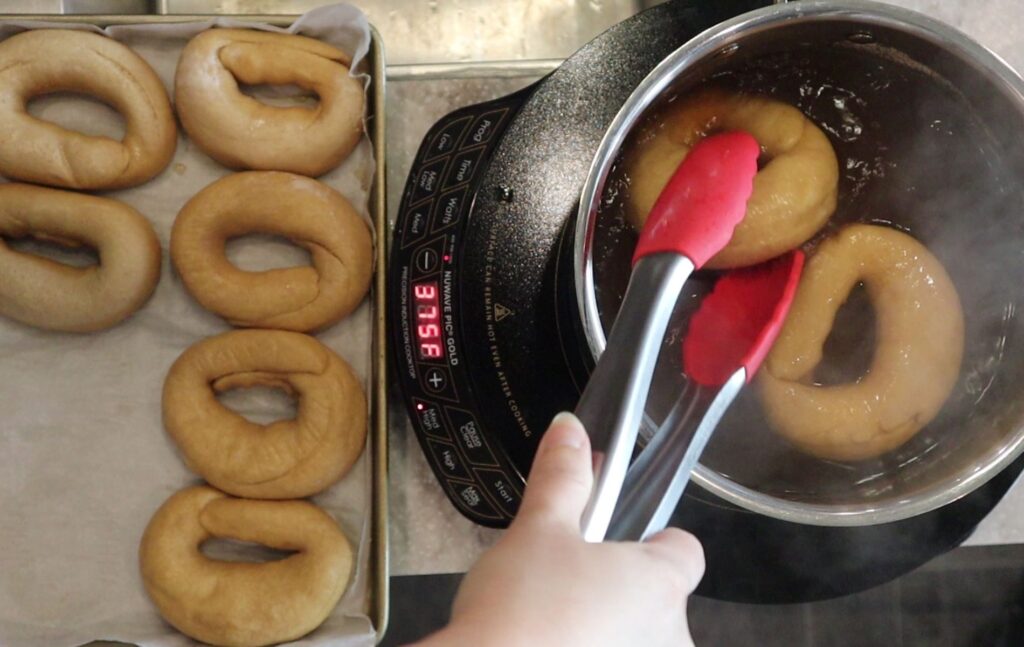
- The next morning it is time to get the water bath started.
- Pour the water, malt, and sugar into a large pot, and bring to a boil.
- If you are adding toppings, you would get those ready at this time.
- Preheat oven to 425*F.
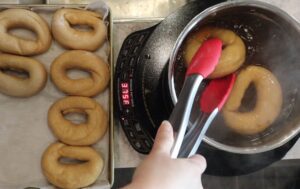
- Once the water is boiling, carefully place the bagel dough into the boiling water. Don’t overcrowd your pot. Once you place the bagels into the boiling water, it will slow to a heavy simmer.
- Simmer the bagels for 40 seconds on one side, then flip them in the water. Simmer for 40 seconds on the other side. (I used a pair of tongs and gently flipped them.)
- Once boiled, if adding toppings, add them now while they are still wet.
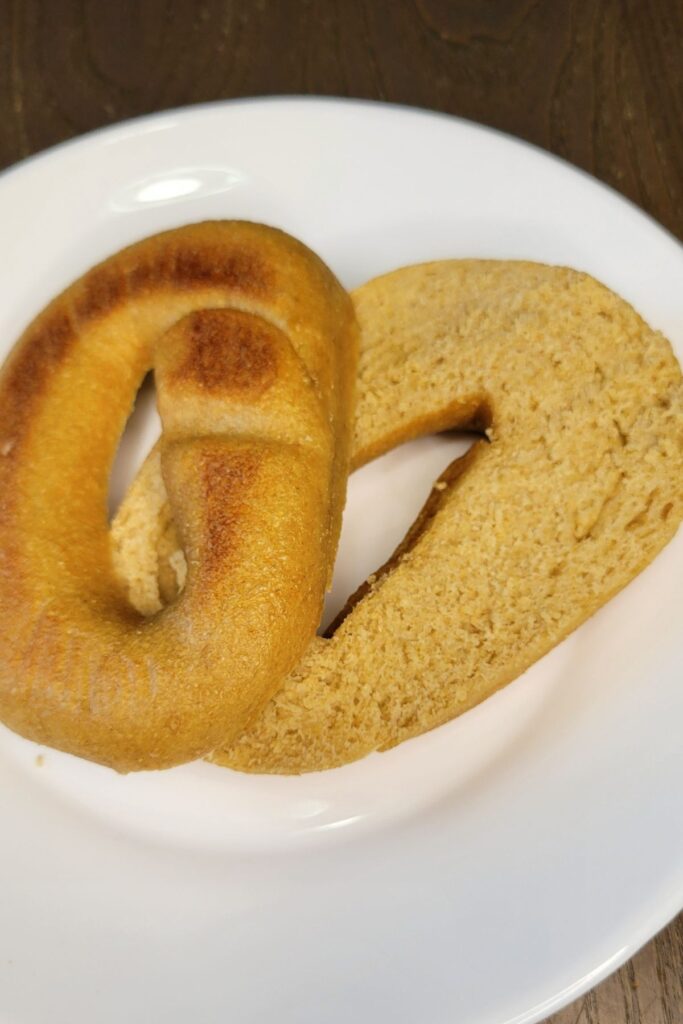
- Then, when all bagels are done boiling, and on the lined baking sheet bake for 20-25 minutes, until they are a deep golden brown.
How To Store Fresh Milled Flour Bagels
To Store the fresh milled flour bagels, I recommend to slice and freeze them. They are wonderful the first day, and if unsliced they will keep for a couple days. But, if you let them cool completely, then slice them, and then freeze them in a freezer safe bag or container. Then, when you go to thaw them, they taste just like they were baked the same day!
Shop This Post
Checkout Some Of My Other Fresh Milled Flour Recipes
Fresh Milled Flour Recipe Index

Bagels Made With Fresh Milled Flour Printable Recipe

NY Style Bagels made with Fresh Milled Flour
Ingredients
Bagel Dough
- 4 Cups fresh milled flour 480g I milled 400g of hard white wheat berries & 80g of Kamut berries to get this amount.
- 2 tsp salt
- 1 TBSP Malt syrup you could use molasses or brown sugar if needed instead
- 1&1/4 cup warm water 295g
- 1&1/2 tsp instant yeast
Water Bath Ingredients
- 2 quarts water 2000g
- 2 TBSP malt syrup you could use molasses or brown sugar if needed instead
- 1 TBSP sugar
Optional Toppings – you could top with different seeds, everything seasoning, cheese, etc.
Instructions
- Mill the flour.
- Combine the flour, warm water, salt, and malt, mix until no dry flour is left. This should be a stiff dough.
- Cover and let sit at room temperature for at least 30 minutes or up to 2 hours.
- After the dough has sat, then add the yeast. Mix yeast in until incorporated.
- Knead the dough for at least 15 minutes. It will be very tough on a mixer, so if you want to knead by hand you can, or knead half with the mixer and half with your hands.
- Cover the dough again, and let it rise until it looks puffy. (We aren’t looking for it to double in size like bread, so it may only take 30-40 minutes.)
- After the dough looks puffy, divide the dough into 8 pieces (the dough should be stiff enough that you don’t need oil or flour for your work surface.)
- Press each dough piece to get some of the air out, then roll each piece into an 8 inch cylinder. Make sure to keep all the other pieces covered that you are not working with so the dough pieces don’t dry out. Cover all the cylinders and let sit for 15 minutes.

- After this second rest, take each cylinder and wrap it around your hand with the ends of the dough under your hand. push the ends on the table in a rolling motion to “lock” the two ends together. Make sure the ends are securely sealed. (keep dough pieces covered when not working with them.)

- ALTERNATIVE SHAPING METHOD- rather than making the cylinders and wrapping around your hand, you could make a dough disk, and press two fingers in the middle of the dough all the way through. making the center hole larger than the two fingers.
- Place all shaped bagels on a parchment paper lined baking sheet, and cover securely with plastic wrap. Place the covered baking sheet in the fridge overnight. (6-24 hours)

The Next Morning
- The next morning it is time to get the water bath started.
- Pour the water, malt, and sugar into a large pot, and bring to a boil.
- If you are adding toppings, you would get those ready at this time.
- Preheat oven to 425*F.
- Once the water is boiling, carefully place the bagel dough into the boiling water. Don't overcrowd your pot. Once you place the bagels into the boiling water, it will slow to a heavy simmer.
- Simmer the bagels for 40 seconds on one side, then flip them in the water. Simmer for 40 seconds on the other side. (I used a pair of tongs and gently flipped them.)
- Once boiled, if adding toppings, add them now while they are still wet.
- Then, when all bagels are done boiling, and on the lined baking sheet bake for 20-25 minutes, until they are a deep golden brown.

Video
Notes
*This post contains affiliate links, which means I make a small commission at no extra cost to you! As an Amazon Associate I earn from qualifying purchases. But, I will only suggest items I actually Love and Have Used!


Does this need to get to windowpane?
No, this dough is too stiff to get to a window pane. Just knead until soft, smooth, and cohesive dough forms about 10 minutes. I recommend to checkout the video too! https://youtu.be/8bEgrRtkmcQ
At what point can I successfully freeze this dough?
You can freeze it at the point when you would put it in the fridge after the first rise & shaping.
This will probably be my go to bagel recipe now after trying a few different ones. I’ve made this 3 times now. The dough is easy to work with by hand because it’s stiff and they come out soft and chewy every time. I haven’t tried letting them rest overnight yet, but will! Thank you!
I am so happy to hear that! Yes, I like to keep them made on hand in the freezer, so we can grab one whenever we want. Experimenting with different flavors is fun too! Thanks so much! Happy Baking!
These bagels are excellent. They are on par with (actually, in my opinion, even better than) the bagels my dad used to buy us on Long Island after church on Sundays. Pumpernickel variants are nice too; I used your pumpernickel recipe for those.
One comment- the bagels from up there are about twice the size of this recipe, so I doubled the ingredients and got exactly what I had in my childhood in the 70s and 80s. The larger bagels are easier to cut as well.
Thanks for another great recipe!
Thank you so much, that is so wonderful to hear! I am so happy they were so yummy! And thanks for sharing a Great tip!
Hi Craig, did you have to increase the bake time? Thanks!
Lol, sorry, forgot to add the star rating.
Thanks!
Do you guys let them puff up after they come out of the fridge? Or just straight into the pot still cold?
I boil them right from the fridge, I think they hold their shape better, then they rise in the oven. Hope that helps! Happy Baking!
These turned out wonderful!! So delicious and just what a bagel should taste like. Thank you for another great recipe!
Yay! I am so happy to hear that! Thanks so much!
Do we start out with 4 cups or end up with 4 cups after milling?
4 cups of the milled flour. I hope you love them! Happy Baking!
I don’t have the barley malt, but I do have the diastolic malt powder, which I’ve never used before. Would I just substitute the same amount?
I’m looking forward to trying your recipe. Thanks!
Yes, you can substitute the powder in the dough for the same amount. Let me know what you think! Happy Baking!
Thanks for this recipe Kara – spent this weekend trying these out for the first time. The dough was so satisfying to work with as I hand kneaded to avoid concerns with my kitchen aid mixer. The skin is definitely traditional bagel-like unique given the boil wing water bath – so cool! The one issue I had is my dough didn’t seem to rise much, if at all, in the oven and they seem too dense, losing some of the potential chewyness – seems more like a dense bread. I followed your recipe exactly and my instant yeast is pretty newly opened (which is what I’d otherwise consider to be the culprit). Do you have suggestions on how I can increase the rise to get a less dense and more chewy texture? My hubs and I like them and think this batch was just so close. Thanks for any advice!
If it was dense, and didn’t rise. There are typically 2 main issues that cause this, the first is if the yeast is no good, but if that is not the issue. The next problem is too much flour added. This is a stiff dough, but it should still have some give and some rise. If it was cold in your kitchen, it could need a bit longer first rise before the fridge.
I had the same issue as the person above. If I’m fairly certain about my yeast, how much flour would you decrease by?
Just maybe 1/4 cup and go from there. (You can always add a bit more moisture. But this should be a pretty stiff dough)
Hey, I am a sourdough baker. How would you alter this recipe to use sourdough starter instead of yeast?
Thank you!
I would omit the yeast, use about 1/4 cup sourdough starter 55g. Then, let the dough rise until about 20-30%. Place in the fridge for about 6 hours, then boil. Fresh milled flour ferments pretty quick with sourdough, so the fridge time may end up needing shortened if they seme to be over fermenting. Everyone’s sourdough starter is a bit different.
Thanks for this recipe! The bottoms of my bagels burned with the oven rack in the center, and 22 minutes of bake time at 425. What would you suggest to solve this issue?
If they got too dark on the bottom, you can try adding another baking sheet on the next rack under the bagels
I love these bagels – great texture and taste and I love that I can leave them overnight and have them fresh in the morning. My only question is that mine don’t get the nice rounded shape like yours. Mine rise great before shaping and even afterwards, but it seems like in the water and in the oven, I don’t get any more rise. Any thoughts on what I might be doing wrong? Thanks
Maybe try shortening their rise just a bit before the water bath, it may be that the yeast has exhausted all their resources, and can’t rise anymore in the oven. OR try shortening the time in the water bath, it could be that the bagel dough gets too hot in the water, and this kills off most of the yeast, so they are unable to rise more in the oven. Let me know how it goes!
Hello! I am excited to try this recipe this weekend. I have an ankarsrum miker- would you recommend using the dough hook or dough roller for this recipe?
Thank you for your all your help and advice on FMF recipes!
I like to just use the roller, let me know how it goes! Happy Baking! 😊
I ended up using the dough roller and it worked great! The bagels turned out perfect! I don’t think I was patient enough with the first rise because I wanted to go to sleep but they are delicious.
Awesome! I am so happy to hear they were a hit! Thanks!
Can you make these with einkorn flour?
I have not tried with pure Einkorn, I find it doesn’t like to be kneaded much, and it can be hard to work with in bread type applications. But, a blend of most hard wheat and some Einkorn would be good! 😊
Delicious; this recipe is perfect! Thank you for sharing so many wonderful recipes.
Awesome! I am so happy to hear these were a hit! Thanks so much! 😊
Best fresh milled bagels I’ve come across! Thanks so much for sharing your recipes with us
Awesome! I am so happy to hear that! Thanks! 😊
Wow. These were amazing and so easy! Thank you!
Awesome! I am so happy to hear that! Thanks! 😊
I recently made a cinnamon raisin version that turned out great! I do feel though that they would be even better if the dough had just a touch more sweetness. Is there anything you would recommend to add/subtract (and how much) to get it a tiny bit sweeter?
Yum! That sounds delicious! Yes, for a cinnamon raisin I would increase the sweetness as well. I would add 3 TBSP of sugar or brown sugar, and maybe a dash of vanilla. Let me know how it goes next time! 🙂
Favorite recipe right now! Nice and chewy. 🙂
Only problem is it is WAY too salty.
Happy to hear you enjoy them, you can decrease the salt to your preference. 🙂
Best bagels ever! Thank you for this tutorial
Yay! So happy to hear that! My pleasure! 🙂
I only have active dry yeast. Would I add that in the same step or at a different time?
Yes, you can use active dry yeast, just use some of the liquid from the recipe, and a pinch of sugar in a small bowl, then stir in the active dry yeast. Let it sit for about 10-15 minutes (it should get nice and foamy), during that first rest period in the recipe before the yeast goes in. Then, when the recipe calls to put the instant yeast in, put that mixture in, and continue the recipe.