The BEST Pizza Dough Made With Fresh Milled Flour Recipe
I have to share The BEST Pizza Dough Recipe Made With Fresh Milled Flour! This is the perfect pizza dough that has that chew to it, you know what I am talking about, right? It is flawlessly crispy on the bottom, but yet, still pliable, like New York! Just pick it up and fold it in half if you wish! Also, that pizza dough that makes that beautiful bubbly crust, those air filled pockets of deliciously goodness!

Look at that beautiful bubbly crust! Oh, that pizza dough…sigh… It’s so hard to pass up. And, now I want pizza for dinner… again…
If you are looking to make this FMF pizza dough, but with sourdough to have a delicious Sourdough Pizza Dough Made With Fresh Milled Flour, you can find that recipe HERE.
Why Should You Make This Pizza Dough With Fresh Milled Flour Recipe?
Well, do I even need to convince you? I think we can all agree, pizza is just about one of the most perfect foods, right? The balance of flavors and textures in your mouth, all melting together went baked to perfection! And, the very fact that we can all customize each pizza to our very own taste! Can there be a more perfect food option out there?

You can see the texture of this pizza crust, the air pockets are my favorite part!
What Toppings Should I Put On The BEST Fresh Milled Flour Pizza Dough?
That is the best thing about pizza, is you can use any toppings you wish, and everyone can have something different. We love a good classic pepperoni and cheese, but a simple cheese pizza can also hit the spot! There are so many topping choices, but we tried a new pizza today. We were inspired by a travel day lunch spot.

Even a simple cheese pizza can be amazing with fresh ingredients!
Macaroni & Cheese Pizza?
What? Macaroni & Cheese Pizza? Yes, please! We were inspired after a travel day lunch stop at Chick-Fil-A, and had a free macaroni and cheese on our mobile app. We have had their mac and cheese before, but we were so full, and had this leftover. I mentioned to my kids that we were planning to have homemade pizzas tonight, and they suggested why not put these two favorites togehter?
Wow!
Why didn’t I try this sooner?
This Macaroni & Cheese Pizza is now a favorite in our house! We didn’t make it with traditional red pizza sauce. Instead, we decided to try it with an olive oil & garlic sauce. It was perfect! I highly suggest you try this out sometime! Especially, if you have a pizza & mac n’ cheese lover in your house like I do!

Here are the results of our Chick-Fil-A Macaroni & Cheese Pizza. It was AMAZING and out of this world good!
Classic Pizza Topping Ideas!
With all the different taste out there, thank goodness for pizza! Pizza is one of those versatile foods that we all have come to love! Do you know why it is so lovable? Because it can be made to each and every person’s personal preferences. Pizza can be made sweet for dessert or savory for lunch, dinner, snack, breakfast, appetizer, whatever! Pizza is good all the time!
But, here are some classic flavors to try out:
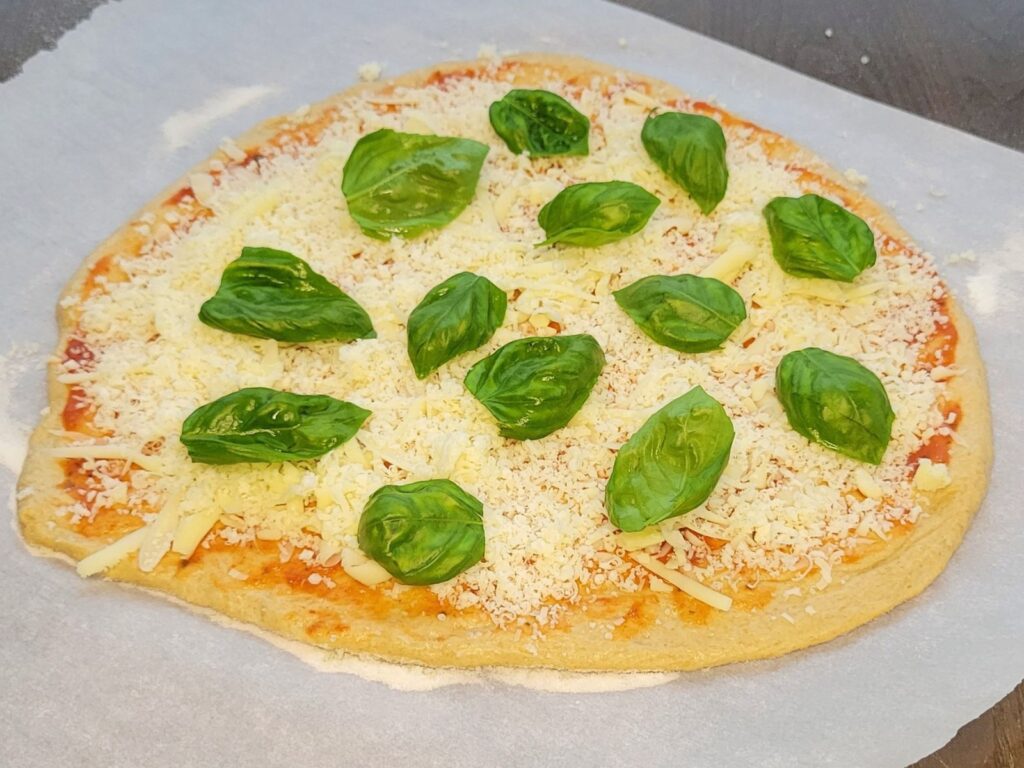
- Margherita: Fresh tomato slices, mozzarella cheese, fresh basil leaves, olive oil, and a sprinkle of salt.
- Pepperoni: Tomato sauce, mozzarella cheese, and pepperoni slices.
- Hawaiian: Tomato sauce, mozzarella cheese, ham or Canadian bacon, and pineapple chunks.
- Veggie Supreme: Tomato sauce, mozzarella cheese, bell peppers, red onions, mushrooms, black olives, and spinach.
- Four Cheese: A blend of mozzarella, cheddar, Parmesan, and ricotta cheeses with a touch of garlic.
- Meat Lover’s: Tomato sauce, mozzarella cheese, pepperoni, Italian sausage, ground beef, and bacon.
- BBQ Chicken: BBQ sauce, mozzarella cheese, grilled chicken, red onions, and cilantro.
- White Pizza: A garlic and olive oil base with mozzarella, ricotta, Parmesan, and spinach.
- Mushroom Lovers: Tomato sauce, mozzarella cheese, various mushrooms like cremini, shiitake, and oyster.
- Classic Marinara: Tomato sauce, mozzarella cheese, fresh basil, and a drizzle of olive oil.
- Mediterranean: Olive oil and garlic base, mozzarella cheese, cherry tomatoes, Kalamata olives, red onions, feta cheese, and oregano.
- Pesto Delight: Pesto sauce, mozzarella cheese, cherry tomatoes, roasted red peppers, and pine nuts.
- One of my personal favorites: Pepperoni, cheese, pineapple, and banana peppers! YUM!
Remember, pizza toppings are a matter of personal preference, so feel free to mix and match these classic options or get creative by adding your own unique twists!
Ingredients To Make This Pizza Dough With Fresh Milled Flour Recipe
- 1&1/2 cup warm water (354g)
- 1 TBSP sugar or honey
- 2 TBSP Light Extra Virgin Olive Oil
- 1&1/2 tsp salt
- 3.5- 4 cups fresh milled flour (460g) ( I like to mill 1&2/3 cup hard white wheat(330g), & 3/4 cup whole Kamut(130g) to get this flour)
- 2 tsp Instant Yeast
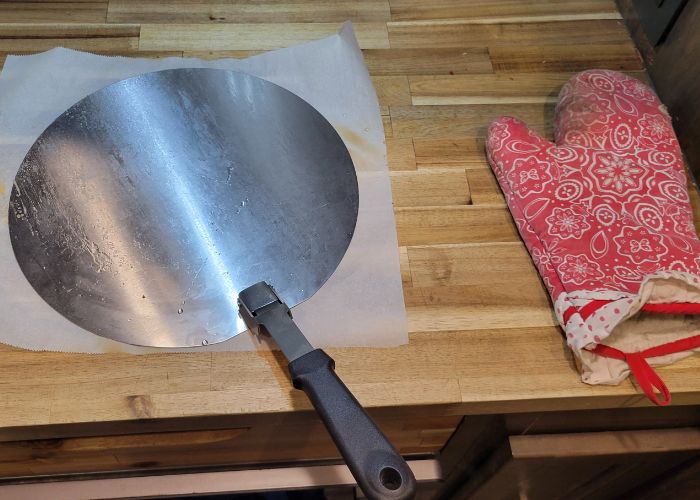
Having a pizza peel is very helpful, but you could also just use a pizza pan, just be careful not to burn yourself. You can find an inexpensive foldable pizza peel HERE.
Of course, there are nicer ones out there too, but I liked the idea of this one being lightweight, and foldable.
Instructions To Make This Pizza Dough With Fresh Milled Flour Recipe
This should make about Three -12 inch pizzas or Two- 15 inch pizzas. So, you can decide which sizes you prefer and how many pizzas you want to make. Also, you could even make several personal size pizzas if you wish.
- Firstly, mill the flour
- Warm the water to around 90*F.
- Then, in a stand mixer, add warmed water, salt, sugar, olive oil, and flour. Mix until all incorporated.
- Cover, and let sit for at least 15 minutes to allow the fresh milled flour to absorb the water.
- Then, add the yeast, and mix to incorporate.
- Once, incorporated, start the kneading process. (This can take 20 or 25 minutes sometimes with fresh milled flour.)
- Knead until the dough reaches the window pane test.
Now, decide if you want to make the pizza today, let it ferment (MY FAVORTIE OPTION) in the fridge overnight (up to 3 days), or freeze.
To Make Same Day
- Cover the dough, and let rise for 1 hour or until doubled.
- Preheat oven to 480*F
- Now, Divide the dough into 2 or 3 equal pieces. So, this recipe should make about Three -12 inch pizzas or Two- 15 inch pizzas.
- Then, tear off a large enough section of parchment paper for the pizza to fit on. And sprinkle with either rice flour, corn meal, or spray with baking spray. Just so the dough won’t stick.
- Put a little olive oil on a smooth surface, and flatten out each dough section until it is the desired size.
- Place flattened dough onto the parchment paper, and add sauce & toppings.
- Then using a Pizza peel or a pan slide the pizza and the parchment paper into the preheated oven.
- Slide the pizza with the parchment paper right onto the oven rack, and pull the pan or peel back out.
- Bake for about 8 minutes, then remove the parchment paper, and finish baking for about 8 more minutes directly on the oven rack. Bake until cheese is browned & bubbly.
- Remove the pizza with the peel or pan, and allow to cool for a few minutes before cutting.
Make Pizza Dough To Put In The Fridge (My favorite option – because it softens the dough & levels up the flavor!)
- After the dough reaches the window pane test, spray dough & Ziplock bags with a non stick oil.
- Then, divide dough, and place in sprayed bags, and press out the air.
- Place bags into the refrigerator for up to 3 days.
- Then, when ready to make, Prepare the same way as above.
Make Pizza Dough to Put In The Freezer
- After the dough reaches the window pane test, spray the dough & freezer safe Ziplock bags with a non stick oil.
- Then, divide dough and place in sprayed bags, and press out air.
- Place bags into freezer for up to 3 months.
- Then, when ready to make, pull the bags out of the fridge, and let defrost to room temperature. (probably will take about 2 to 3 hours.)
- Prepare same as above.
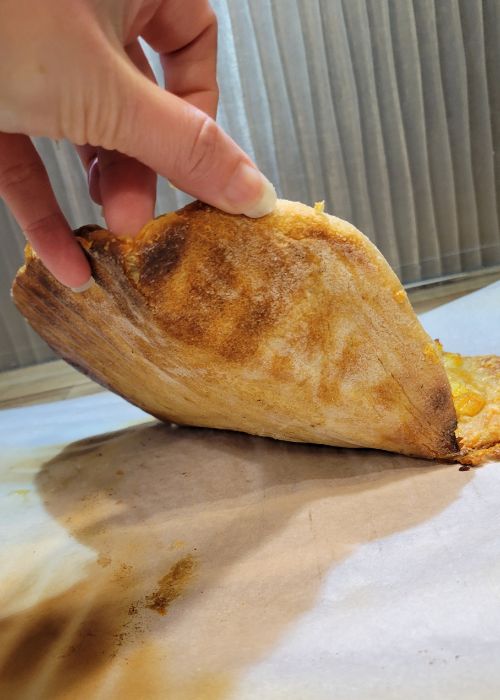
Here you can see the beautiful browned crusty bottom, and this is because we cooked it directly on the oven rack for the second half of the baking.
What Is The Window Pane Test?
The Window pane test is a test that is used to make sure a yeasted dough is finished kneading and ready to rise. A positive window pane test will insure that the bread or dough will have a light and airy texture after baking. So, if you have ever had dense bread, rolls, dough, etc then, chances are the dough did not pass the window pane test. There are of course other reasons for this, but under kneaded fresh milled flour dough is typically the number one reason. HERE is a short video showing a good window pane test and a failed window pane test.

I am just showing how stretchy we want the dough to be, demonstrating a window pane. HERE is a quick video showing the window pane.
Interested In Milling Your Own Flour? This Is A Great Place To Start!
I wrote this post for anyone interested in milling their own flour. My intentions are to help encourage and guide you into truly enjoying the process of milling your own wheat, and incorporating more whole grains into your daily routine. So, this is that post Fresh Milled Flour 101 – Where To Start?

Shop This Post
Checkout Some Of My Other Recipes
Sourdough Brown Butter Chocolate Chip Cookies
The BEST Pizza Dough Recipe Made With Fresh Milled Flour Video

The BEST Pizza Dough – Made With Fresh Milled Flour Printable Recipe

The BEST Pizza Dough – Made With Fresh Milled Flour
Ingredients
- 1&1/2 cup warm water 354g
- 1 TBSP sugar or honey
- 2 TBSP Light Extra Virgin Olive Oil
- 1&1/2 tsp salt
- 3.5- 4 cups fresh milled flour 460g ( I like to mill 1&2/3 cup hard white wheat(330g), & 3/4 cup whole Kamut(130g) to get this flour)
- 2 tsp Instant Yeast
Instructions
- Firstly, mill the flour
- Warm the water to around 90*F.
- Then, in a stand mixer, add warmed water, salt, sugar, olive oil, and flour. Mix until all incorporated.
- Cover, and let sit for at least 15 minutes to allow the fresh milled flour to absorb the water.
- Then, add the yeast, and mix to incorporate.
- Once, incorporated, start the kneading process. (This can take 20 or 25 minutes sometimes with fresh milled flour.)
- Knead until the dough reaches the window pane test.
Now, decide if you want to make the pizza today, let it ferment (MY FAVORTIE OPTION) in the fridge overnight (up to 3 days), or freeze.
Option 1 – Make The Same Day
- Cover the dough, and let rise for 1 hour or until doubled.
- Preheat oven to 480*F
- Now, Divide the dough into 2 or 3 equal pieces. This should make about Three -12 inch pizzas or Two- 15 inch pizzas.
- Then, tear off a large enough section of parchment paper for the pizza to fit on. And sprinkle with either rice flour, corn meal, or spray with baking spray. Just so the dough won't stick.
- Put a little olive oil on a smooth surface, and flatten out each dough section until it is the desired size.
- Place flattened dough onto the parchment paper, and add sauce & toppings.
- Then using a Pizza peel or a pan slide the pizza and the parchment paper into the preheated oven. Slide the pizza with the parchment paper right onto the oven rack, and pull the pan or peel back out.
- Bake for about 8 minutes, then remove the parchment paper, and finish baking for about 8 more minutes directly on the oven rack.
- Bake until cheese is browned & bubbly.
- Remove the pizza with the peel or pan, and allow to cool for a few minutes before cutting.
Option 2 – Refrigerate Dough & bake in 1-3 days (My Favorite Option, because it softens the dough, and levels up the flavor)
- After the dough reaches the window pane test, spray dough & Ziplock bags with a non stick oil.
- Divide dough, and place in sprayed bags, and press out the air.
- Place bags into the refrigerator for up to 3 days.
- Then, when ready to make, Prepare the same way as above.
Option 3 – Freeze Pizza Dough For Later Use
- After the dough reaches the window pane test, spray the dough & freezer safe Ziplock bags with a non stick oil.
- Divide dough and place in sprayed bags, and press out air.
- Place bags into freezer for up to 3 months.
- Then, when ready to make, pull the bags out of the fridge, and let defrost to room temperature. (probably will take about 2 to 3 hours.)
- Prepare same as above.


Are you kneading in the mixer for 25 – 30 minutes? Seems like a very long time! Looking forward to trying your recipe.
Sometimes, yes. Fresh milled flour does take longer to develop the gluten. If you want it to be light and airy and spongy, I find this is the best method. If not, then just the typical 8 minutes of kneading will still result in a decent bread. We just really love the light & airy texture!
If refrigerating, double you allow to let it double/rise before? Or right to the fridge and then next day, let it double?
I just make the dough, and oil some bags, than plop half the dough into each gallon size bag. Make sure not to put all the dough into one bag, because it will expand in the fridge and break open the bags! Ask me how I know, lol. I just let it sit on the counter for about 1 hour or so before making pizzas, but honestly, I have been known to just go ahead and bake it right from the fridge when I am pressed for time. I hope that helps! Happy Baking!
This was my first go at using FMF and it came out great! I used semolina instead of kamut. Thanks!
Awesome! I am so happy it was a hit! Nice job! 🙂
Have you done this with sourdough starter instead of yeast? Thanks!
Yes, you can just omit the yeast, and add about 1/2 cup sourdough starter 113g. Let me know what you think if you give it a try! Happy Baking!
I tried making it a sourdough before reading the comments!! Yes!!! It turned out amazing!!! The best pizza we have made in a long time!!!!!!
Yay! So glad to hear it was a hit! 🙂
Should the sour dough starter be active or discard starter? I’m assuming active but new to both sour dough and FMF. I have made some of your recipes and they are so delicious!
I have actually used it with success both ways. Thanks! 🙂
I am so grateful for the up front note on how long this pizza dough takes to make. Sometimes that can be hard to find in freshly milled recipes! I don’t have a mixer yet, and tried to kneed this dough by hand, but it got everywhere since it was so sticky. I resorted to kneeding in a bowl with a silicone spatula for 20 minutes. That’s all I could do. Haha. Praying it comes out great for tomorrow night’s dinner.
Thank you! I love to make it a day or two ahead, but in a pinch I will make it same day. I agree it can be hard to find fresh milled flour recipes, that is one reason I started this website! I love to share recipes, and help others learn more about it. I do like a wetter dough, and use a mixer. I am sorry it was such a sticky mess by hand. I think it will turn out just lovely thought! Let me know! Thanks!
It was a recipe worth the wait! We all enjoyed the pizza and the dough was so flavorful after 24 hours in the fridge. Thanks!
Thank you! I am so happy to hear that!
best pizza ever, whole family loved it.
thank you
Thank you! I am so glad you all liked it! It is my family’s favorite as well!
I’m a bit confused about the parchment paper. I’ve never seen any that was rated for 480*. And how do you remove it in the middle of baking without making a mess?
I think the best way to describe it is show you, I have a video on this. You can see what I mean about removing half way. Hope this helps!
https://youtu.be/wvlnXqxVxfc
Wow, this is what my fresh milled flour has been missing- the windowpane test. It takes me like 25-30 on my kitchen aid mixer at the highest speed- but it is definitely worth it!! The pizza is great! Thanks!! I also never thought to remove the parchment towards the end and I’m going to start! we use a pizza stone though! I didn’t have anymore Kamut and used spelt and it worked the same!
I am so happy to hear that! Be careful using the highest speed on your mixer, just because it can overwork it. I usually use speed 2, and it can take a good 25 minutes or longer for sure! It is hard not to be tempted to put more flour in, but it seems to come together in the end! Thanks
I know this is an old post but I hope you get this message and have an answer for me… I tried this twice yesterday and followed your directions to the T both times it came out in a sticky blobby mess. I do not understand what on earth the problem is. The first time I thought I may have had the mixer on too high so I did it again at a much lower speed,no matter same result. I used hard white and kamut just like you said the first time, no windowpane. Second time hard red and kamut because I ran out of white, no windowpane. Both times very little elasticity and broke easily. Just a sticky blobby mess. If I added more flour after the 20 minute knead it broke worse. Can you please tell me what I’m doing wrong. Thank you, I really hope you get this and appreciate any help
It depends on your mixer for kneading times. Generally with the Bosch style mixers, I knead for 5-7 minutes, any longer and it will over knead and break apart. The Ankarsrum can take around 20 minutes. And a kitchen aid can take longer, as it will need breaks in between kneading. Checkout this video to help with that. https://youtu.be/tdnCrbOsVag
Also, make sure your liquid is not too hot when you add it in. If it is too hot it can break down the dough and it won’t become stretchy. Lastly, if it is none of those, it may just be the wheat berries are too low in protein, and might need some vital wheat gluten (But, this is a more rare instance.)
I’ve made this twice and we LOVE it!! Your recipes are wonderful!!
Awww, thanks! I appreciate your support.
I don’t have Kamut yet, but many others. What would you recommend on place of the Kamut?
You can just use all hard white instead. I like to add the kamut for the color and slight buttery flavor. But, all hard white will be just fine too!
You say 3.5 to 4 cups flour, then say 1 2/3 + 3/4, which is less than 3. Can you clarify how much flour to use?
The 3.5 to 4 cups is referring to the flour amount. The other measurements are for those who measure the whole wheat berry amount then mill into flour (the amount of each kind of wheat berry before milling). I hope that makes sense.
This definitely messed me up. I milled 4 cups of berries and added all of the resulted flour 😩 first batch was a flop. Still waiting for mine to rise. Yours seemed way smoother than mine. So crossing my fingers for a good piece of pizza tonight
Oh no! That is the amount of milled flour. Next time it might be easier to go by weight. The weight of the wheat berries equals the weight of the flour, unlike the volume. Example: 100g grams of wheat berries = 100g of flour, BUT 1 cup of wheat berries does not equal 1 cup of flour. I hope this helps! You could always add some more water & ingredients to make 1.5 batch of pizza dough. I hope this helps!
That much of the whole grain will grind into that many cups of flour.
Is it possible to make this with dry active yeast? If so, any idea what adjustments would be needed?
Yes, at step 4 during the first resting tome. You can just take a little of the water & some of the sugar or honey and mix it with the active dry yeast. Then, let it sit for about 10 minutes or so. Once it is foamy you can add it in, then proceed with the kneading process. (if it does not foam, then there is something wrong with the yeast.) Hope that helps! Happy Baking!
Thanks for another amazing recipe, Kara – our pizza was awesome and now I’m going to try it using my starter & put some in the freezer. Never shall we ever buy a store bought shelf-stable crust again 🤢!
You also mentioned using beer in your video. Do you just replace the water with room temp beer or do you actually warm it up to the 90°?
Thanks
Yay! I love that we can have pizza night anytime! And, it is so much healthier, and makes you feel so much better! I just use room temp beer, you can do all beer, or half beer, half water. It gives a different flavor, so it’s fun to experiment with what your family likes best!
Can you use active dry yeast instead? I noticed on your bread recipe you have measurements for both instant yeast and active dry yeast and was wondering if it’s always 25% more active dry yeast if your recipe calls for instant yeast?
Yes, you can use active dry yeast, and you want to use just a bit more when subbing for instant yeast, or give it a little on the longer side to rise.
I tried to make this last night. It was my first experience kneading bread. I’ve usually just baked cakes and quick breads.
It didn’t go well.
Your recipe says 3.5 to 4 cups. Isn’t that s big difference? Should I start with 3.5 and add to it? How… And when… Would I know to add more?
I do have a scale. How much does the grain weigh before adding it to the mill? Maybe that would help me. Ha!
I’m enjoying your information, for sure!
The difference in the flour amount will very with everyone, there are a lot of variables that can affect that (humidity, elevation, moisture in the wheat berries, etc.) If this is the first time, I would recommend you use all the flour, because I like to work with a wet dough, so my recipes are typically already written to be on the wet side. Go by weight if you have a scale, it is more accurate. You can weigh the wheat berries and that will give you the same weight in flour (not the same volume, but same weight.) Make sure to add all the ingredients except the yeast, then cover and let it sit for 15 – 30 minutes so the fresh milled flour has time to absorb the liquids. Then add the yeast, and start kneading. Knead until the dough is very stretchy without breaking. I hope that helps! Happy Baking!
Is it possible to make the dough and put in the fridge, say for 24 hours, but if I don’t use all the dough up at that time, can I then put the extra dough into the freezer for another day? Hoping to making pizza tomorrow. Thank you for your help!
Yes! I love how versatile this pizza dough recipe it! I like to keep some in my freezer for that night I just don’t know what else to make. I have put the dough in the freezer after 2 days in the fridge, because something came up, and we didn’t end up eating it. Let me know how it turns out when you make it! Happy Pizza Making!!!
The recipe instructions are clear for 3 different options.
Do you think it could be put in vacuum seal bags or do you think that would mess up the amount it rises before freezing in the freezer?
Mine always rises in the fridge. I think it is possible that vacuum sealing would kill off the yeast, and when you go to make it there would be no rise left.
I just watched this pizza video and want to try making it. This will be my first time making pizza with fresh milled grain. What is the brand mixer you’re using to make the pizza dough? Thank you
In this video I am using my mini Bosch Compact mixer, which I adore! But, they have discontinued it and no longer sell it. Let me know if you give the pizza dough a try! YUM!
I really enjoyed this recipe for pizza dough. I used 470g of Prarie gold hard white wheat berries, milled to 4 cups of flour. Perfect amount for the recipe. I set a timer for 20 minutes and let my kitchen aid mixer do it’s thing. The dough was sticky. I was pinched for time so I oiled my instapot and placed the dough inside and pushed the Yogurt button for 20 minutes. It doubled beautifully. I divided it in two and rolled each out on a floured parchment paper. Placed them on pizza steels and topped them. Baked at 400° for 18 minutes. Next time, I’ll let the pizza stay longer if it has more than just cheese as a topping. Flavor was delicious! Whole family enjoyed it. Next time, I’d love to double this so I could freeze for later!
I am so happy you enjoyed it! Yes, it is a sticky dough, but I think that is one of the things that makes this dough have the perfect texture! Thanks so much! This can be doubled or tripled! I also love making bigger batched of this to have on hand!
What do you do if your dough doesn’t get passed the window pane test and keep ripping? What should i add
I really am looking for the dough to become very stretchy, and want to stay together without tearing easily. Typically the number one cause for no window pane to happen is too much flour. Try to resist adding more flour into the recipe. The next is the wrong kind of wheat, to get nice stretchy dough, we need a higher gluten wheat like a hard wheat variety. Another could be that you developed the gluten, and went passed the point to over-kneaded. There are some other things that could come into play, but I highly recommend you watch my focaccia video. I use the pizza dough, and show all the steps of what the dough looks like while I am kneading it. Here is that link. I hope it helps! Happy Baking https://youtu.be/3nDorxqEgaU
What a blessing you are to fresh-milled-flour learners! I’ve told you before, but it’s still true, your teaching is so thorough without boring with constant repeating. It’s perfect! And your recipes give all the information needed. Thank you for taking the time to teach and provide such well-written recipes.
I ordered two sets of the grain bins for storage from Amazon you recommend. I love them.
This pizza crust is amazing. Just what I was looking for. Will be making often.
Again, thank you for making this fresh-milled-flour journey so pleasant.
Thank you so much! I am so happy to hear it is helpful! I really appreciate it! It is my pleasure, and Thanks again for your support!
Amazing! Delicious! Made our dough yesterday half went in the freezer and we had half for dinner tonight. It did not disappoint. I like a very thin, crispy crust. Right amount of crust and we tried the pepperoncinis. Loved it. Thank you.
I am so happy you enjoyed it! Thanks so much!
Do you let the dough rise before you put in ziplock bags? I see for same day you do. Will it rise in the fridge? I have been making your recipes and love them! Thank you!
I don’t let it rise before I put it in the fridge or freezer. I just oil the bag, and pop it in. However, it will expand in the fridge, and you need to make sure your bag is large enough to hold the dough, and let it expand, and the added gas that forms, or the bag will overfill and break open. (Yes, I found that out by experience, lol.) I found if I cut one batch in half, each half needs a separate 1 gallon bag to allow for this expansion.
This combination of wheat was excellent! Great flavor. I didn’t knead it as long as the recipe said, about half the time, but it still turned out great. The recipe is definitely a keeper. Thanks for sharing.
Yay! I am so happy to hear it turned out great! Thanks so much!
I had decided kind of last minute to make homemade pizza (3:30) and was worried I wouldn’t find a quick enough fresh milled recipe but this was perfect! My family all raved about it too. Another recipe I used to use involved getting the pans you cook in super hot before putting the crust on and then adding toppings so my kids could never help. This way my kids were able to add toppings and the crust still got crisp!
Yay! I am so happy to hear that! I love when kids can get in the kitchen cooking and learning, and spending quality time with family! I am glad it was a hit! Thanks so much!
Hello! I have obly done same day so far,but if I were to freeze the dough, do I allow it to double before putting it in the freezer? Or do I divide and put them straight in the freezer and allow each ball of dough to double after thawing for a couple hours? Or does it rise while it is freezing so rise isn’t necessary at all?
Tha k you!
I just oil the bags, and put them right in the freezer, then pull them out a day or two before I want to use it. I find the flavor enhances if I let them sit in the fridge for a few days. Let the dough come to room temperature for 1-2 hours before baking with it.