
How To Make The BEST English Muffins With Fresh Milled Flour
Making English Muffins with fresh milled flour is such a fun and rewarding experience. There is just something special about filling all those nooks and crannies with some melted butter, farm fresh honey, homemade jam, or a generous spread Peanut butter. Whichever way you choose to top yours is fine with me, I am just so happy that there are so many options to choose from!
There are so many differing opinions out there about what makes a good English muffin, so in this post, I am going to share how you can easily alter the taste and texture to meet the desired results you are looking for.
How Do I Make My Fresh Milled Flour English Muffins More Sour?
So, to make your English muffins taste more sour, I recommend adding a Tablespoon of sourdough starter to your recipe, and this will provide that sharp sour flavor that you are looking for. If you don’t have sourdough starter or discard on hand, then you can simply sub the milk for buttermilk in the recipe, and this will provide a delicious tang to the English muffins.
How To Make My English Muffins Have More Nooks and Crannies?
This took me awhile to figure out, but I found if you make the English Muffins the night before, this will help increase the amount of nooks and crannies, as well as intensify the flavor! So, how I go about this is to make the dough as normal in the recipe, let it rise the first time, cut them out, and place them on a lined baking sheet that has either cornmeal or rice flour on the liner. This will help prevent sticking later. Then, cover those beauties, and place them right in the fridge overnight. The next morning, pull them out, preheat your cast iron skillet for 15-20 minutes while they warm up, and continue baking as described in the recipe below.
How Do I Make English Muffins Without A Cast Iron Skillet?
I love to use my cast iron skillet to make my English muffins, however I do realize that not everyone has a cast iron skillet. So, you will still need to preheat any skillet you are using to ensure a good even cook on your English Muffins. Therefore, I recommend on a thick bottom pan to preheat for 10-15 minutes, and on a thin bottom pan preheat for 5-10 minutes before cooking.
What About Flavored English Muffins?
If you find yourself pondering this question, you’ve undoubtedly captured my heart. Flavored English Muffins hold a special place in my soul! I LOVE cinnamon Raisin English Muffins, toasted with just an ever-so slight bit of blackened peaks. Then, generously slathered with melted butter right as they come out of the toaster oven, still warm! Oh my,.. I think I could eat that every morning!
Other Delicious English Muffin Flavors
Homemade English muffins can be customized with various flavors to suit your preferences. So, here are some delicious homemade English muffin flavor ideas:
- Cinnamon Raisin: Add ground cinnamon and a generous amount of raisins to the dough for a sweet and aromatic English muffin.
- Blueberry: Incorporate fresh, dried, or frozen blueberries into the dough to create a burst of fruity goodness in every bite.
- Cheddar and Chive: Mix grated cheddar cheese and chopped chives into the dough for a savory and cheesy English muffin.
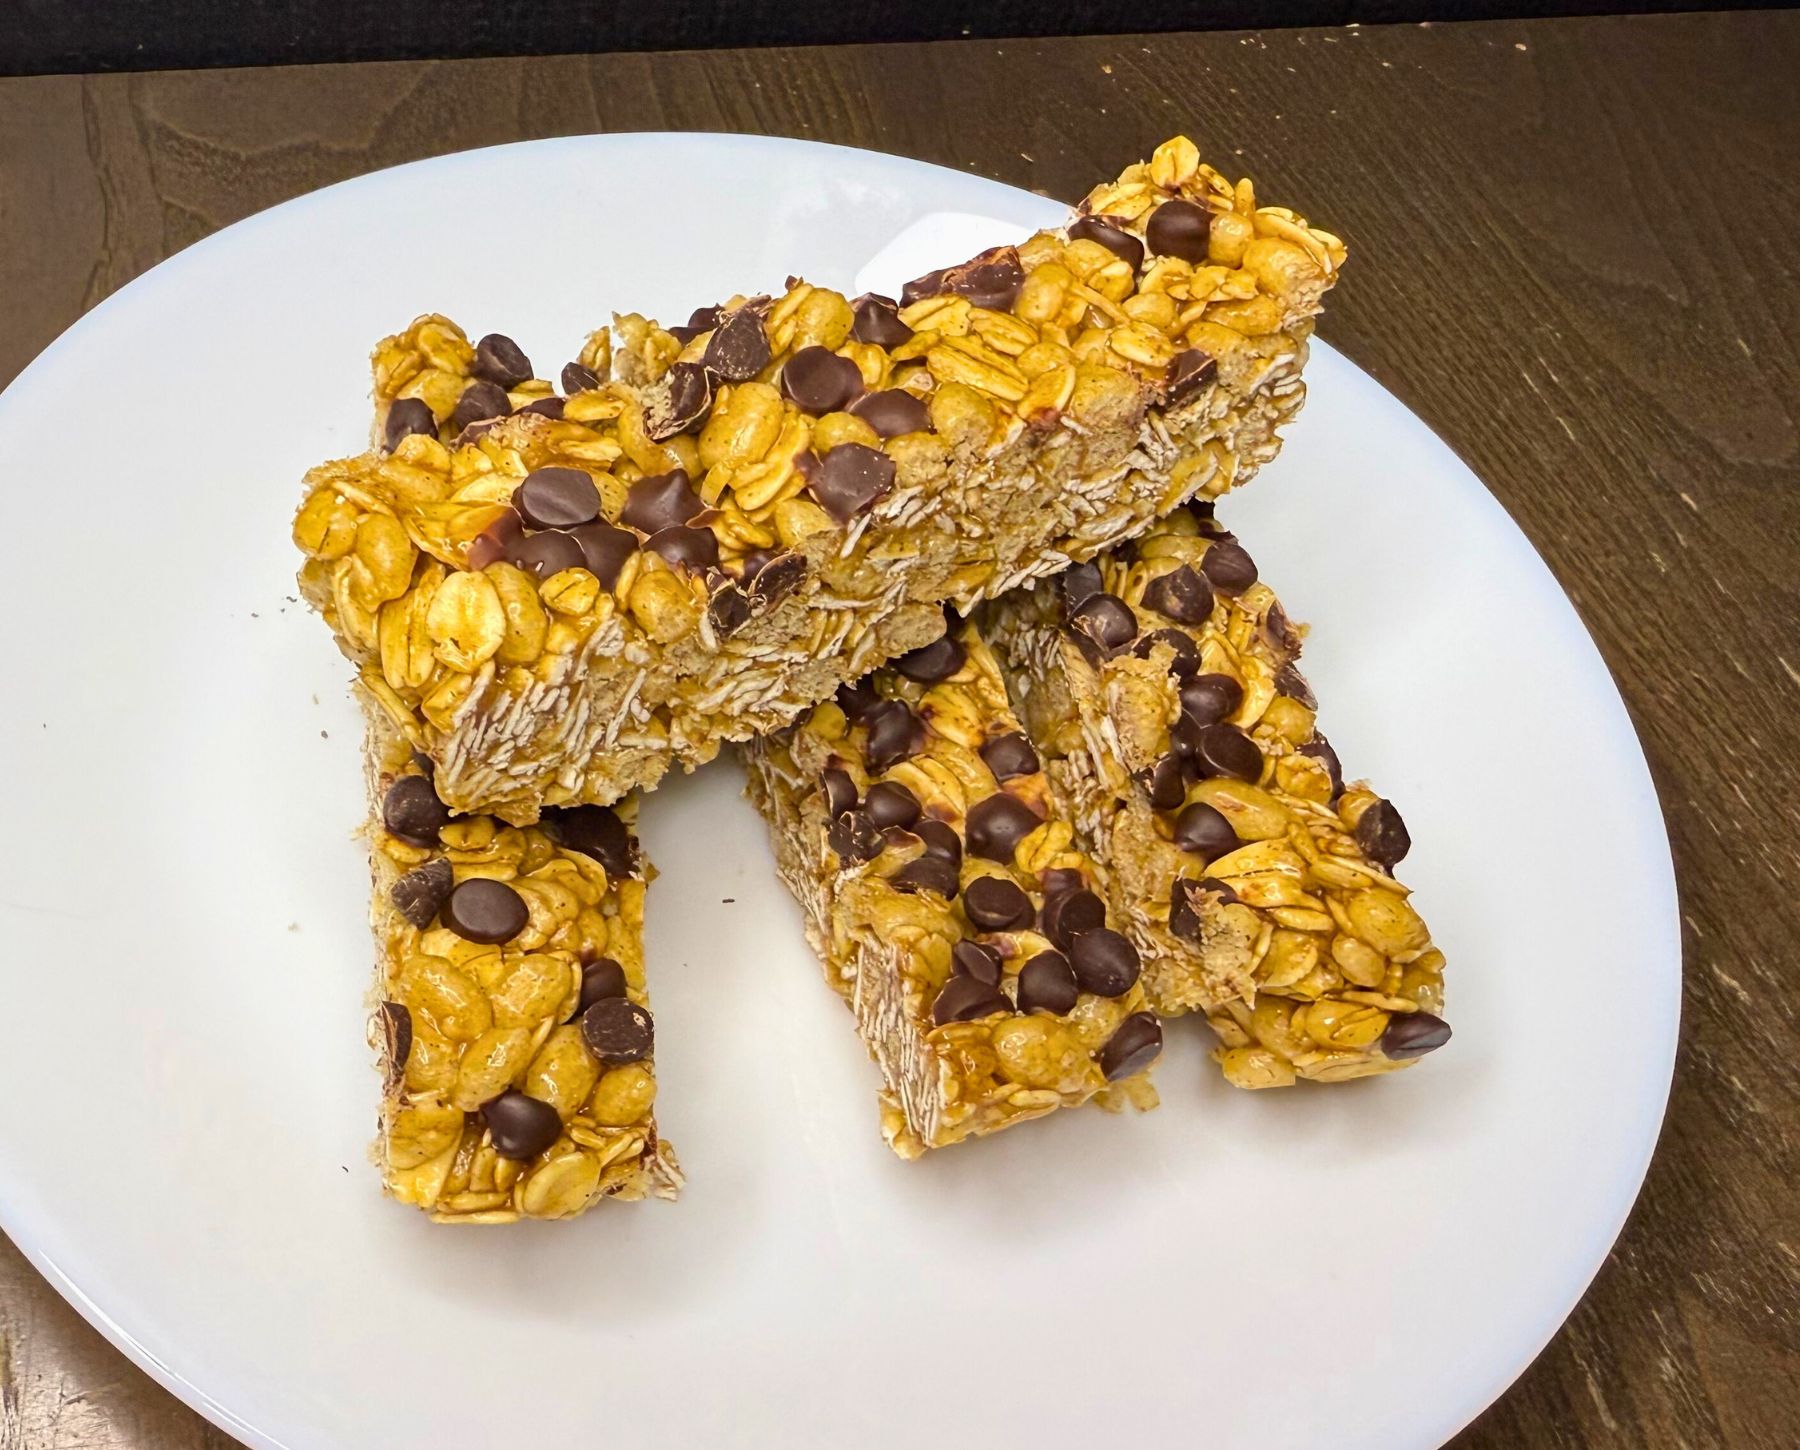
- Chocolate Chip: Toss in chocolate chips to make a sweet and indulgent breakfast treat.
- Savory Herb: Incorporate a blend of dried herbs like rosemary, thyme, and oregano into the dough for a savory, aromatic English muffin.
- Pumpkin Spice: Infuse the dough with pumpkin puree and a mix of pumpkin pie spices for a cozy fall-inspired English muffin.
- Lemon Poppy Seed: Mix in lemon zest and poppy seeds for a zesty and refreshing muffin.
- Banana Nut: Mash ripe bananas and fold in chopped nuts (like walnuts or pecans) for a moist and flavorful muffin.
Also, remember to adjust the quantity of flavoring ingredients to suit your taste preferences, and enjoy experimenting with these homemade English muffin flavors!
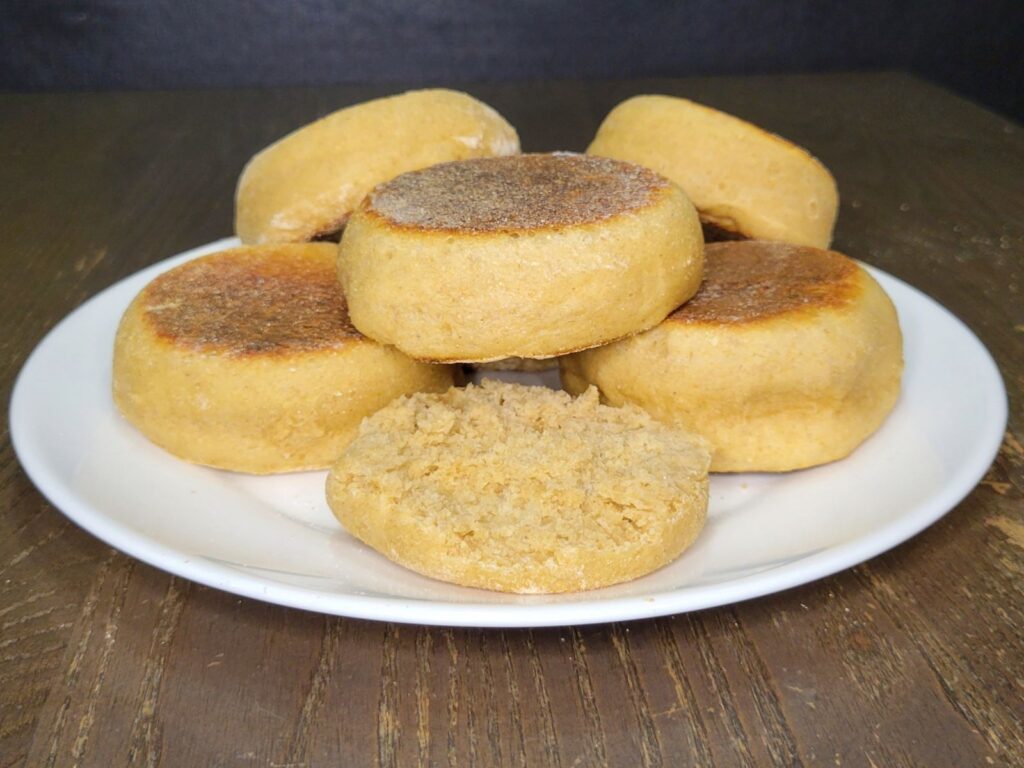
Plain English Muffins
If you prefer a classic plain English Muffin, hey that is wonderful too! Especially when they can be topped with so many different tasty goodies!
What Should I Top My English Muffins With?
Topping English muffins is a delightful part of enjoying them. Here are some popular and delicious options:
- Butter: Classic and simple, a generous spread of butter complements the nooks and crannies of an English muffin beautifully.
- Jam or Jelly: Choose your favorite fruit jam or jelly for a sweet and fruity topping.
- Honey: Drizzling honey over a warm English muffin adds natural sweetness and a touch of luxury.
- Peanut Butter: Creamy or crunchy peanut butter can be a protein-packed and satisfying choice.
- Cream Cheese: Spread some cream cheese for a rich and creamy topping.
- Nutella: The hazelnut-chocolate spread pairs wonderfully with English muffins.
- Avocado: Mash ripe avocado on top for a healthy and creamy option, possibly adding a sprinkle of salt and pepper or some red pepper flakes for extra flavor.
- Poached Egg and Hollandaise Sauce: Create a delicious Eggs Benedict by topping your English muffin with a poached egg and hollandaise sauce.
- Sliced Cheese and Bacon: Melted cheese and crispy bacon can turn your English muffin into a savory breakfast sandwich.
- Sausage or Bacon and Egg: Create a breakfast sandwich by adding cooked sausage or bacon, eggs, and your favorite condiments.
So, feel free to mix and match these toppings to create your own favorite English muffin combinations. The possibilities are endless!
Ingredients To Make Fresh Milled Flour English Muffins
- 1&3/4 cup whole milk (very warm) 425g
- 3 TBSP butter (softened) 43g
- 1&1/4 tsp salt
- 2 TBSP sugar or honey 25g
- 1 egg
- 4&1/4 cup fresh milled flour 500g (I used half hard white and half Kamut)
- 2 tsp instant yeast
- cornmeal or rice flour for dusting
Instructions To Make English Muffins With Fresh Milled Flour
Making The dough
- Firstly, Mill the flour
- Heat up the milk until steamy, but NOT boiling!
- Place softened butter, salt, sugar, and warmed milk into stand mixer.
- Mix until combined, and add the egg, than mix again.
- Slowly add the flour to the liquids and mix to incorporate the dry flour.
- Cover, and let the dough sit for 15 minutes to allow the freshly milled flour to absorb the liquids.
- After this rest period add in the instant yeast and start to mix the dough together.
- Once all the yeast is incorporated, start kneading the dough. I knead on level 2. Watch the dough periodically while kneading. The dough should eventually come together, and appear smooth, but still sticky. This can take anywhere from 7-25 minutes depending on many variables.
- Once the dough is smooth and stretchy, cover and let rise at room temperature for 1-1.5 hours or until the dough has doubled in size.
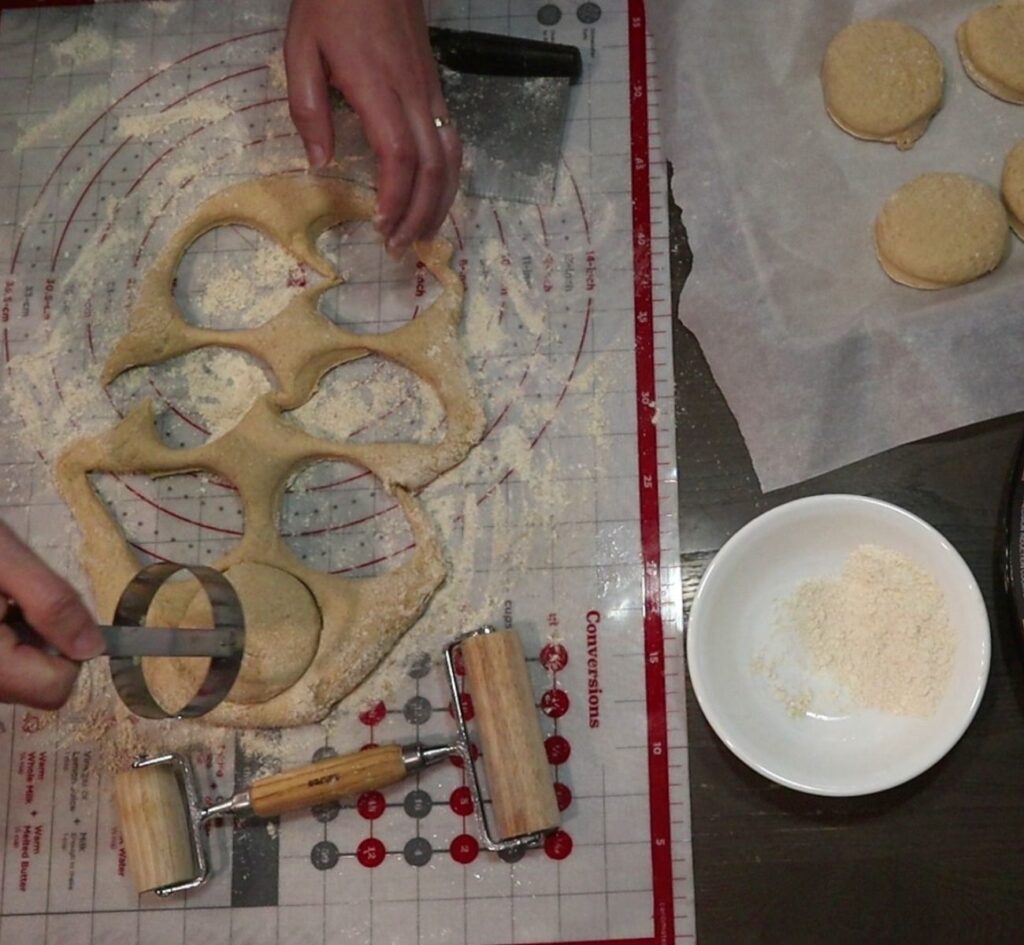
Cutting The English Muffins
- Mill a little extra flour (any kind) and take it to a clean work surface. Sprinkle work surface with flour, and take dough out of the bowl. Try your best not to punch it down or deflate it too much. (It will deflate some with handling, that’s ok.)
- Gently roll the dough out without pressing too much of the air out. (keeping this air in the dough helps create those nooks & crannies. Roll until it is about 3/4 inch thick.
- Using a 3 inch biscuit cutter, dusted with flour on the cutting edge, cut out 3 inch circles.
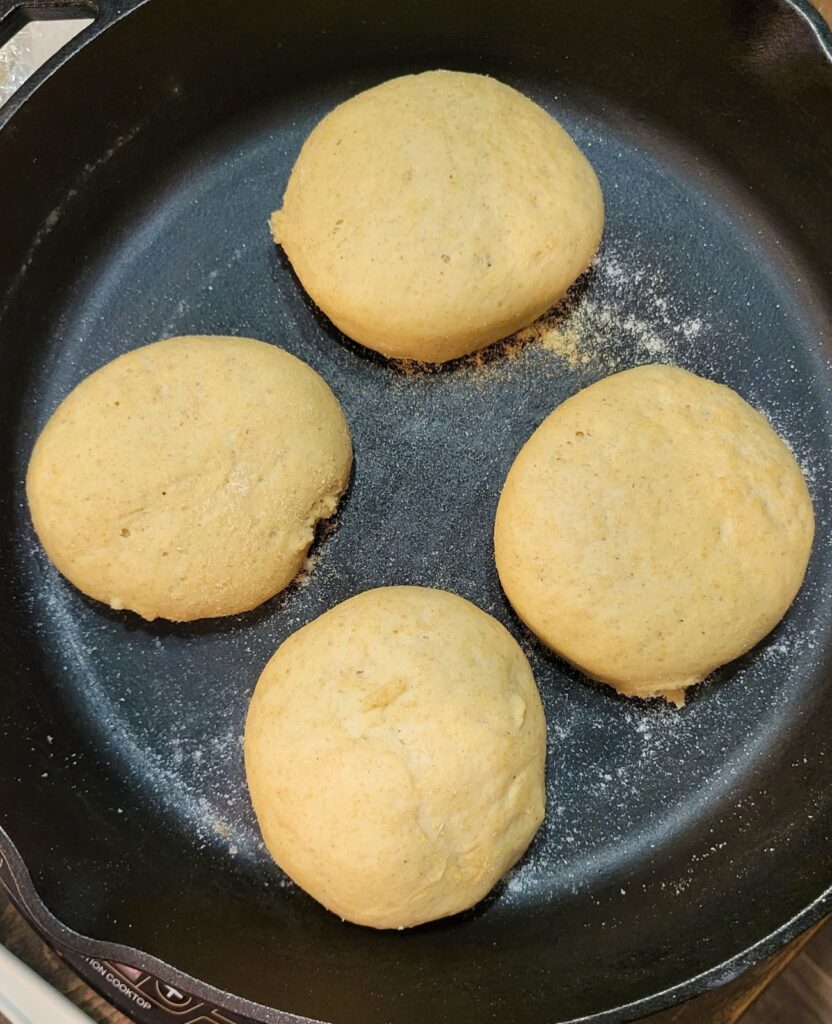
- Place dough circles onto a lined baking sheet that is also dusted with cornmeal or rice flour. Repeat until all dough is gone, you will need to reroll the dough and recut a couple times.
- Cover the dough circles, and place in the fridge overnight to enhance the flavor, and the nooks & crannies. OR to make same day, let sit for 15-30 minutes.
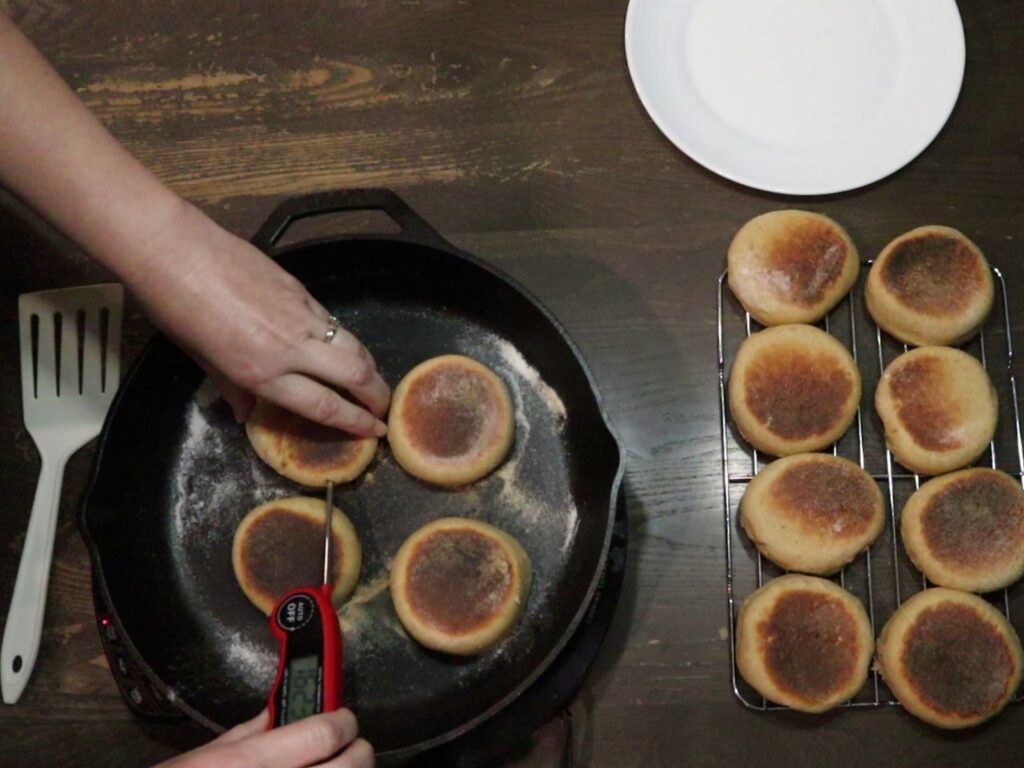
Cooking The English Muffins
- Make sure to preheat your pan to 350*F (Medium) before cooking, so remove from fridge the next morning, then preheat cast iron skillet for 15-20 minutes while English muffin dough warms up to room temperature. If making same day, preheat cast iron skillet during the second rise. (see blog post for cooking without cast iron.)
- Once the skillet is preheated, sprinkle with a little rice flour or cornmeal.
- Gently (try not to deflate too much) place 4 English Muffins in the pan, cornmeal or rice flour side down. Don’t overcrowd the pan, they should have 1-2 inches on all sides clear of other English Muffins, and the sides of the pan. Cook for about 7 minutes.
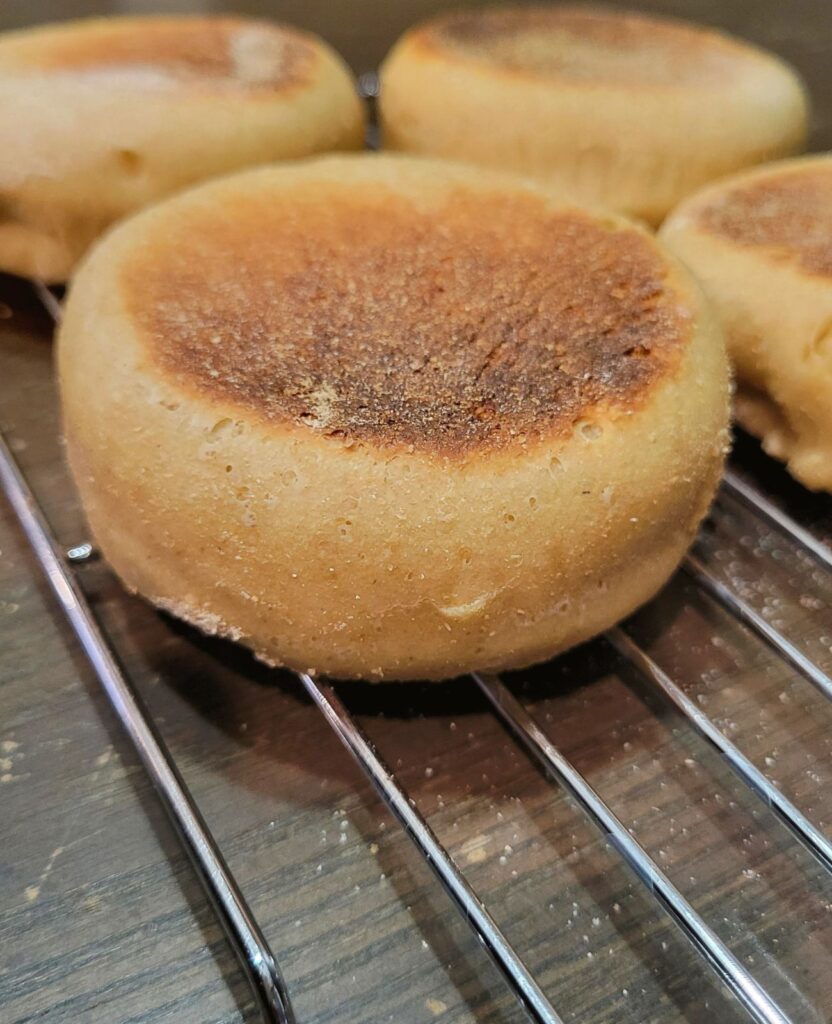
- Then, gently turn them over and cook on the other side for 7 more minutes. The first side should be dark golden brown, if not you may need to adjust the heat, or preheat longer. Also, the internal temperature of the center of each English Muffin should be 200*F.
- Once the first batch is done, remove them to a wire rack, and wipe out the cornmeal or rice flour from the skillet so it doesn’t burn onto your next batch.
- Put fresh cornmeal or rice flour into the pan, and cook another batch the same way. Repeat until all cooked, making sure to wipe the skillet pan between each batch.
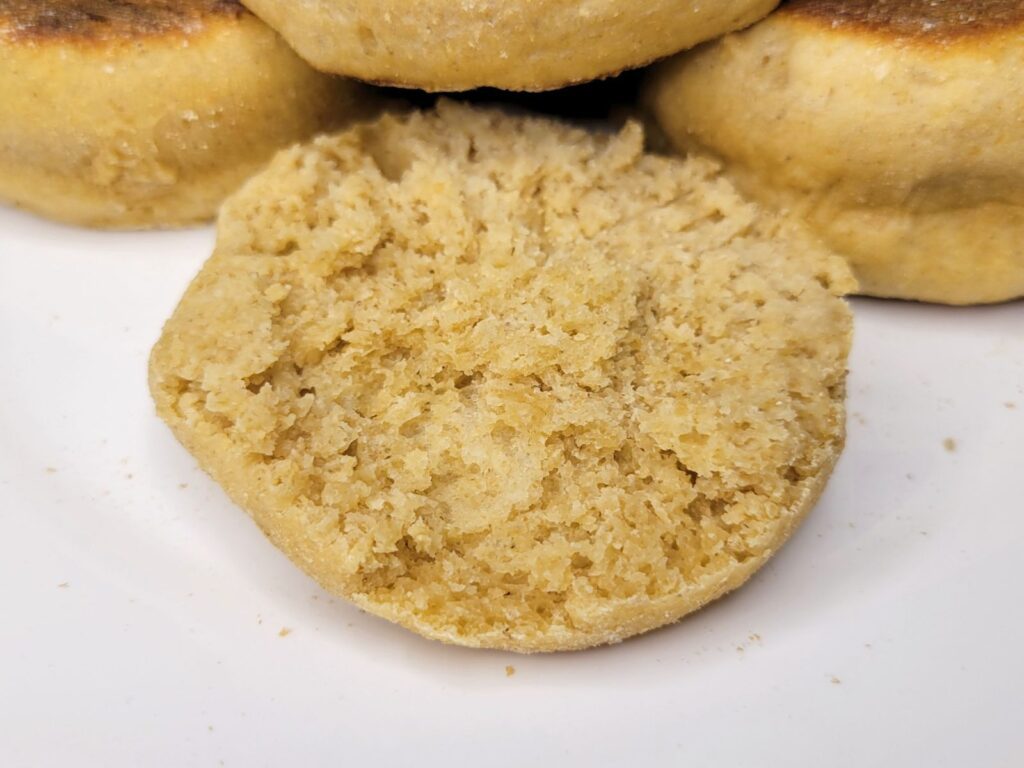
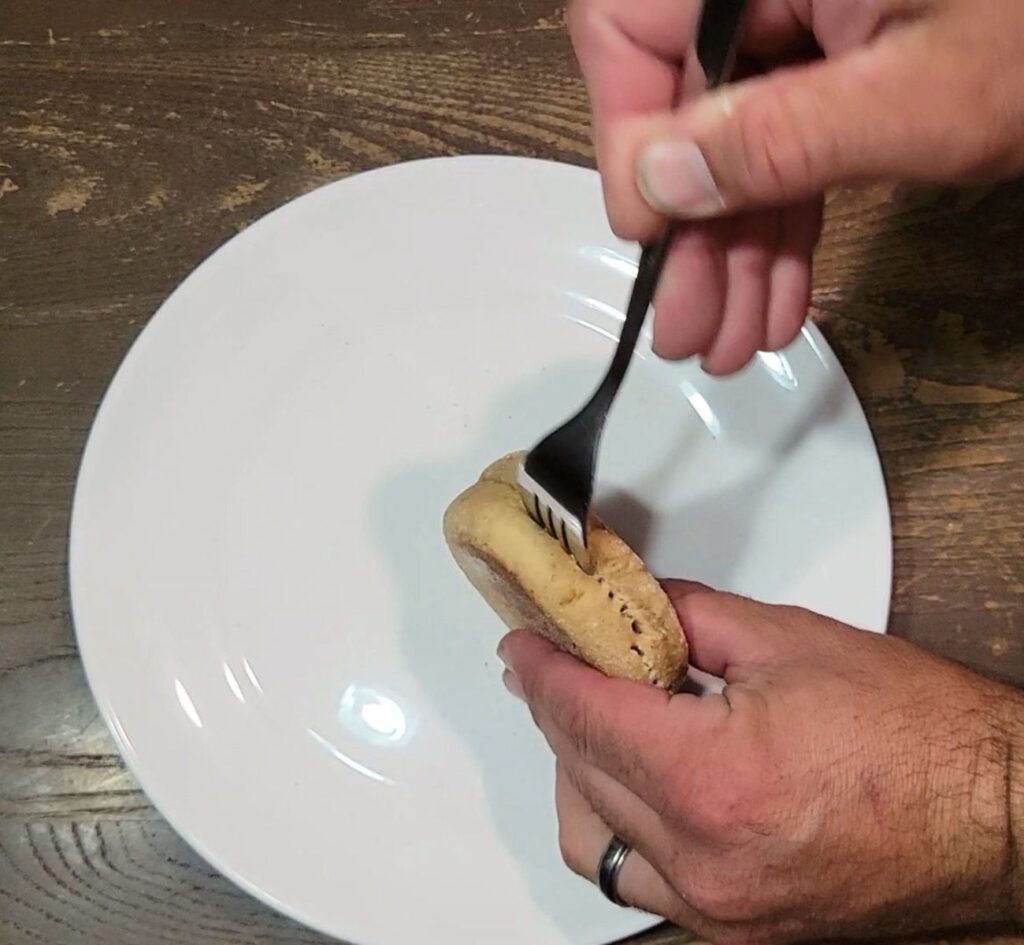
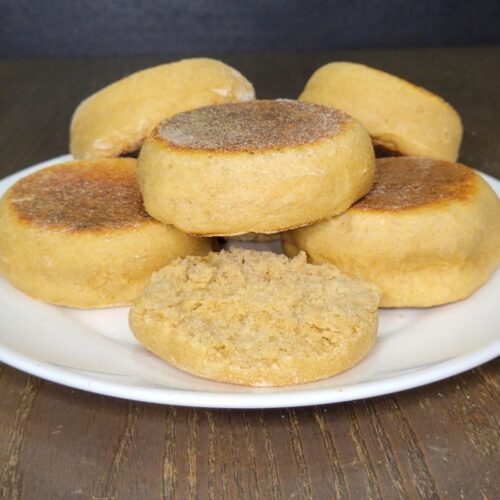
- Once cooled, you can cut open with a fork around the edges (don’t just slice with a knife, that ruins your nooks & crannies!
- Then, toast, top with your choice of toppings, and enjoy!
How To Cut An English Muffin
Make sure to take care in cutting your English Muffins, after all you put so much effort into making them, you want to preserve those beautiful nooks & crannies. So, to do this, I recommend you use a fork and insert it multiple places around the edge, then gently rip it open. So, don’t grab for that knife, you will loose some of the texture you worked so hard to create.
How To Store English Muffins Made With Fresh Milled Flour
To store these fresh milled flour English Muffins, place in airtight container or bag at room temperature for 1- 2 days. For longer storage, I recommend place in a freezer safe container or bag the same day they are made, but make sure they are completely cooled. They will be good for 3-4 months in the freezer. To enjoy, let them thaw at room temperature for a couple hours.
Shop This Post
Grain Flour Mill Use Coupon Code: Grainy for $20 Off yours
Induction Burner With Temperature Control
Check Out Some Of My Other Fresh Milled Flour Recipes
Fresh Milled Flour Recipe Index

English Muffins With Fresh Milled Flour Printable Recipe
English Muffins With Fresh Milled Flour
Equipment
- 1 3 inch biscuit cutter
Ingredients
- 1&3/4 cup whole milk very warm 425g
- 3 TBSP butter softened 43g
- 1&1/4 tsp salt
- 2 TBSP sugar or honey 25g
- 1 egg
- 4&1/4 cup fresh milled flour 500g I used half hard white and half kamut
- 2 tsp instant yeast
- cornmeal or rice flour for dusting
Instructions
- Firstly, Mill the flour
- Heat up the milk until steamy, but NOT boiling!
- Place softened butter, salt, sugar, and warmed milk into stand mixer.
- Mix until combined, and add the egg, than mix again.
- Slowly add the flour to the liquids and mix to incorporate the dry flour.
- Cover, and let the dough sit for 15 minutes to allow the freshly milled flour to absorb the liquids.
- After this rest period add in the instant yeast and start to mix the dough together.
- Once all the yeast is incorporated, start kneading the dough. I knead on level 2. Watch the dough periodically while kneading. The dough should eventually come together, and appear smooth, but still sticky. This can take anywhere from 7-25 minutes depending on many variables.
- Once the dough is smooth and stretchy, cover and let rise at room temperature for 1-1.5 hours or until the dough has doubled in size.
- Mill a little extra flour (any kind) and take it to a clean work surface. Sprinkle work surface with flour, and take dough out of the bowl. Try your best not to punch it down or deflate it too much. (It will deflate some with handling, that’s ok.)
- Gently roll the dough out without pressing too much of the air out. (keeping this air in the dough helps create those nooks & crannies. Roll until it is about 3/4 inch thick.

- Using a 3 inch biscuit cutter, dusted with flour on the cutting edge, cut out 3 inch circles.

- Place dough circles onto a lined baking sheet that is also dusted with cornmeal or rice flour. Repeat until all dough is gone, you will need to reroll the dough and recut a couple times.
- Cover the dough circles, and place in the fridge overnight to enhance the flavor, and the nooks & crannies. OR to make same day, let sit for 15-30 minutes.
- Make sure to preheat your pan to 350*F (Medium) before cooking, so remove from fridge the next morning, then preheat cast iron skillet for 15-20 minutes while English muffin dough warms up to room temperature. If making same day, preheat cast iron skillet during the second rise. (see blog post for cooking without cast iron.)
- Once the skillet is preheated, sprinkle with a little rice flour or cornmeal.
- Gently (try not to deflate too much) place 4 English Muffins in the pan, cornmeal or rice flour side down. Don’t overcrowd the pan, they should have 1-2 inches on all sides clear of other English Muffins, and the sides of the pan. Cook for about 7 minutes.

- Gently turn them over and cook on the other side for 7 more minutes. The first side should be dark golden brown, if not you may need to adjust the heat, or preheat longer. The internal temperature of the center of each English Muffin should be 200*F.

- Once the first batch is done, remove them to a wire rack, and wipe out the cornmeal or rice flour from the skillet so it doesn’t burn onto your next batch.

- Put fresh cornmeal or rice flour into the pan, and cook another batch the same way. Repeat until all cooked, making sure to wipe the skillet pan between each batch.
- Once cooled, you can cut open with a fork around the edges (don’t just slice with a knife, that ruins your nooks & crannies!

- Then, toast, top with your choice of toppings, and enjoy!
Video
Notes
*This post contains affiliate links, which means I make a small commission at no extra cost to you! As an Amazon Associate I earn from qualifying purchases. But, I will only suggest items I actually Love and Have Used!


Have you tried making these with sourdough starter? I’m just wondering how much starter you would use in place of commercial yeast. Thanks
I would probably start with 100g of starter in place of the yeast, and watch the rise times. Let me know how they turn out!
I substituted 100 g of starter for the yeast last night, and let them rise overnight! I cooked them this morning. They are perfect!
Yay! I am so happy to hear they were a hit! Nice job! 🙂
I made these last week with sourdough starter! I used what I had, which I think was a little under 100 grams. It worked great! I’m adding my modifications in another comment.
Yay! So happy to hear they were hit! Thanks!
These turned out phenomenal!! Your video and instructions are so clear and helpful. I wish I could include pictures. Thank you for sharing your recipes and helpful tricks. Takes so much guess work out for us newbies. I appreciate you ♥️
Yay! I am so happy to hear that! If you have Facebook, I have a free group there were you can share pictures! Thanks so much! Here is a link to that group if you want it. https://www.facebook.com/groups/782667429899138/
My husband loves eggs Benedict, so I surprised him with these for his birthday breakfast. There was not a single one left after everyone finished eating! I made them with sourdough starter and it worked great. I used maybe 85 grams of starter (not sure, it was almost all I had left). I also used hard white and einkorn. I kneaded some by hand, but didn’t fuss too much about it since I expected the long ferment time to develop the gluten just fine. (It did.) When I cut the circles, I was worried my dough was too slack, but it worked! I refrigerated them overnight and cooked the next morning. The cooking took some trial and error, but I got there. Checking the internal temp was very helpful.
My husband was so excited to have his favorite breakfast, and everyone said they were the best English muffins they had ever had!
Happy Birthday to your husband! Thank you for sharing for anyone else interested in making these with sourdough!
Hi Brooke! Did you make any other adjustments? Did you have to knead for a while? My dough is very sticky. Still sticking to the sides. It’s still kneading- probably going on 10min. I used 85g of sourdough starter at 100% hydration. And fermented the dough from 7pm to 7am at a ratio of 1:4:4. I used warm milk & did everything else as the recipe calls for. Sny help would be appreciated.
I love this recipe! The first few times i made them with my kitchen aid and all went well. I have since got a Bosch mixer. My dough just doesn’t seem to come together. Any suggestions. The dough seems too wet and I cant get a window pane
I am happy to hear you are enjoying the recipe. It does take time to get used to a new mixer. I am guessing the Bosch it kneading the dough much quicker than your kitchen aid did. Try stopping and checking the dough at 5 minutes of kneading on low speed. It kneads dough quickly, but that also means it can over knead quickly too. When dough is over kneaded, it gets super liquid-y and nothing will stay together. Here is a short video I made to show what over kneaded dough looks like. (This is bread dough, but the idea is the same.) https://youtube.com/shorts/C8KQklITZSg
Just been looking into making English muffins from fresh milled flour. Never made any of any kind. Other recipes are saying they need to be pan fried in rings. You don’t need those?
I don’t use the rings, I have a tutorial video on how I do them here. https://youtu.be/pwmriE-OBdk
Was wondering if you tried this as a bread loaf?
I have not tried it as a loaf yet, but if you end up trying it out, let me know how it goes!
I’m so excited to have found your blog, the Sue Becker book has been problematic for me! I have a hard time trusting a baker who measures in cups and not by weight but also every recipe I’ve tried has been a flop and it’s so frustrating wasting ingredients in this economy. I’m curious if you’ve tried putting the lid on while you cook these? I’ve only made sourdough english muffins but every recipe I’ve seen says to use a lid. I’m wondering if it actually affects cook time..
Thanks so much! I am so happy to hear you are enjoying my recipes! I don’t use the lid, but I know others who prefer to. So, really whichever way you are more comfortable with. I did make a video on how I made these is you want to watch how I did it in my pan. https://youtu.be/pwmriE-OBdk
Also- if using a kitchenaid should I use the dough hook?
Yes, use the dough hook. 🙂
These turned out very well and taste so good!! Thank you for this recipe!
My pleasure! I am happy to hear that! Yay! Nice job. 🙂
Is the kamut necessary? Would only hard white wheat be too dense?
You can use all hard white wheat, I just love what the Kamut does for the flavor, texture, and color!
I can honestly say that I probably would have given up on milling my own flour had I not found this page. Every single recipe has turned out beautifully and I love the way everything tastes with the fresh flour. I was very intimidated with English Muffins and never made them when I was using regular flour BUT I just used this recipe and they came out amazing. I used about 100g or so of sourdough starter in place of the yeast and had no issues.
I am so happy to hear that! Nice job! Thanks so much! 🙂
Just made these today and they turned out great! Thank you for the recipe and video. It was very helpful since this was my first attempt and new to fmf baking.
Awesome! I am so happy to hear they were a hit and that my video was helpful! Thank you so much! 🙂
Do you think a KitchenAid stand mixer can accommodate a double batch? I want to make a batch of breakfast sandwiches for the freezer for postpartum, but would love to do it all at once. Never made English muffins before!
Fresh milled flour can create strain on the Kitchen aid mixers, so just make sure to give it breaks between kneading the dough. Let me know how it goes! They are super delicious with fresh milled flour! 🙂
I love this recipe! I’ve made it multiple times. My only concern is, I use all hard white wheat. Every time I have made it, I have to add a good bit of extra flour sprinkled in to make the dough even consider coming together. Is that normal when not using half kamut? Thank you!
Sometimes you may need to alter it just a bit. But, yes Kamut is a very hard and thirsty grain.
Great recipe! I got busy and let them proof 2 1/2 hours rather than 1 1/2, but worked out fine. I did one change, referencing sue beckers recipe, I cooked on 300° for 15 minutes and tented with tin foil to hold in some heat. They were a perfect golden brown when 200° internal temp. I like your recipes and ideas so well, we ordered your cook book today. Can’t wait till it arrives. Thanks for sharing so much and helping us all be successful with FMF.
Awesome! Thanks for sharing! I hope you love my cookbook! 🙂
I have made this recipe twice and the second time I got the knead/moisture right, trusting the recipe. The flavor is delicious. I have tried many different recipes even before milling flour and this is the best flavor for me and the quality is very nice. I don’t know if the rich taste is due to milk, butter, sweetener or kamut but I tend to think kamut gives it a buttery taste. Yummy! Thank you!
I also enjoy cinnamon/raisin English muffins. Can I add those to this recipe and if so, how much and at what stage?
Awesome! I am so happy to hear that! Yes, it is all of the above that play a part in the amazing flavor! Yes, you can fold the cinnamon and raisins into the dough at the end of kneading. I would just use a little at first so it doesn’t affect the dough rise/texture. I use maybe a handful of raisins, and a tsp of cinnamon.
Hi! I am curious, if you use pumpkin puree to make pumpkin english muffins, do you need to adjust the liquid for the recipe. Thank you!
Yes, you will want to decrease the liquid a bit to account for the liquid in the puree. I with my recipe, I would add about 1/2 cup pumpkin puree (120g) and decrease the milk by about 1/4 cup (60g), and I would add a tsp of pumpkin spice. The rise might be a little slower, and the results may be slightly denser because of the added pumpkin, but yum! 🙂
Do you think it would be ok to use buttermilk (leftover from making fresh butter) instead of milk?
Yes, I think buttermilk would be wonderful in these! I have been playing around with homemade buttermilk lately, and loving the results!
Ok I’m going to try it!
How did it tun out? I just made a bunch of butter, and have the buttermilk in the fridge. Searching recipes for muffins, this is my favorite so far. Can you share how it turned out using the buttermilk please.
Can I make these on the dough setting in Zojirushi bread maker?
You could mix and knead the dough in the dough maker, then remove for the rise, shaping, and baking.
Can I form these by hand instead of using a biscuit cutter?
I actually haven’t tried it by hand, I am not sure if you will get the same rise up the sides, they may be more rounded like buns. But, if you give it a try, let me know how it goes! 🙂
I haven’t made these yet but plan to do so very soon. I just want to say I love your channel and style! May the Lord bless you and keep you and make His face to shine upon you and give you peace!!
Thank you so much! 🙂