
How To Make The Perfect Soft Tortillas Made With Fresh Milled Flour
How To Make The Perfect Soft Tortillas From Fresh Milled Flour, I want to dive in and show you how this can be done, and easily as long as you follow my simple tricks. A Flour tortilla is a simple, yet versatile culinary gem, so why is it then, so many things can go wrong when we try to make them at home? Let’s take a deep look behind the scenes, and do some troubleshooting. But, first we need to discuss what is the perfect flour tortilla Recipe? Well, It is not always just in the recipe, sometimes it is simply the technique or method that can make or break it!
What Is The Perfect Tortilla?
So, what is the perfect tortilla? Well, I say that depends on who you ask. And, each person you ask will probably have a different opinion. However, I do think there is one thing we can ALL agree on, and that is a homemade tortilla, served fresh is the best tortilla!
Troubleshooting Fresh Milled Flour Tortillas
I tested multiple different variations of my favorite tortilla recipe. And, of course I made them each with fresh milled flour. So, let’s jump in together and see all the fails and successes along the way.
What Liquid Is Best For Making Fresh Milled Flour Tortillas?
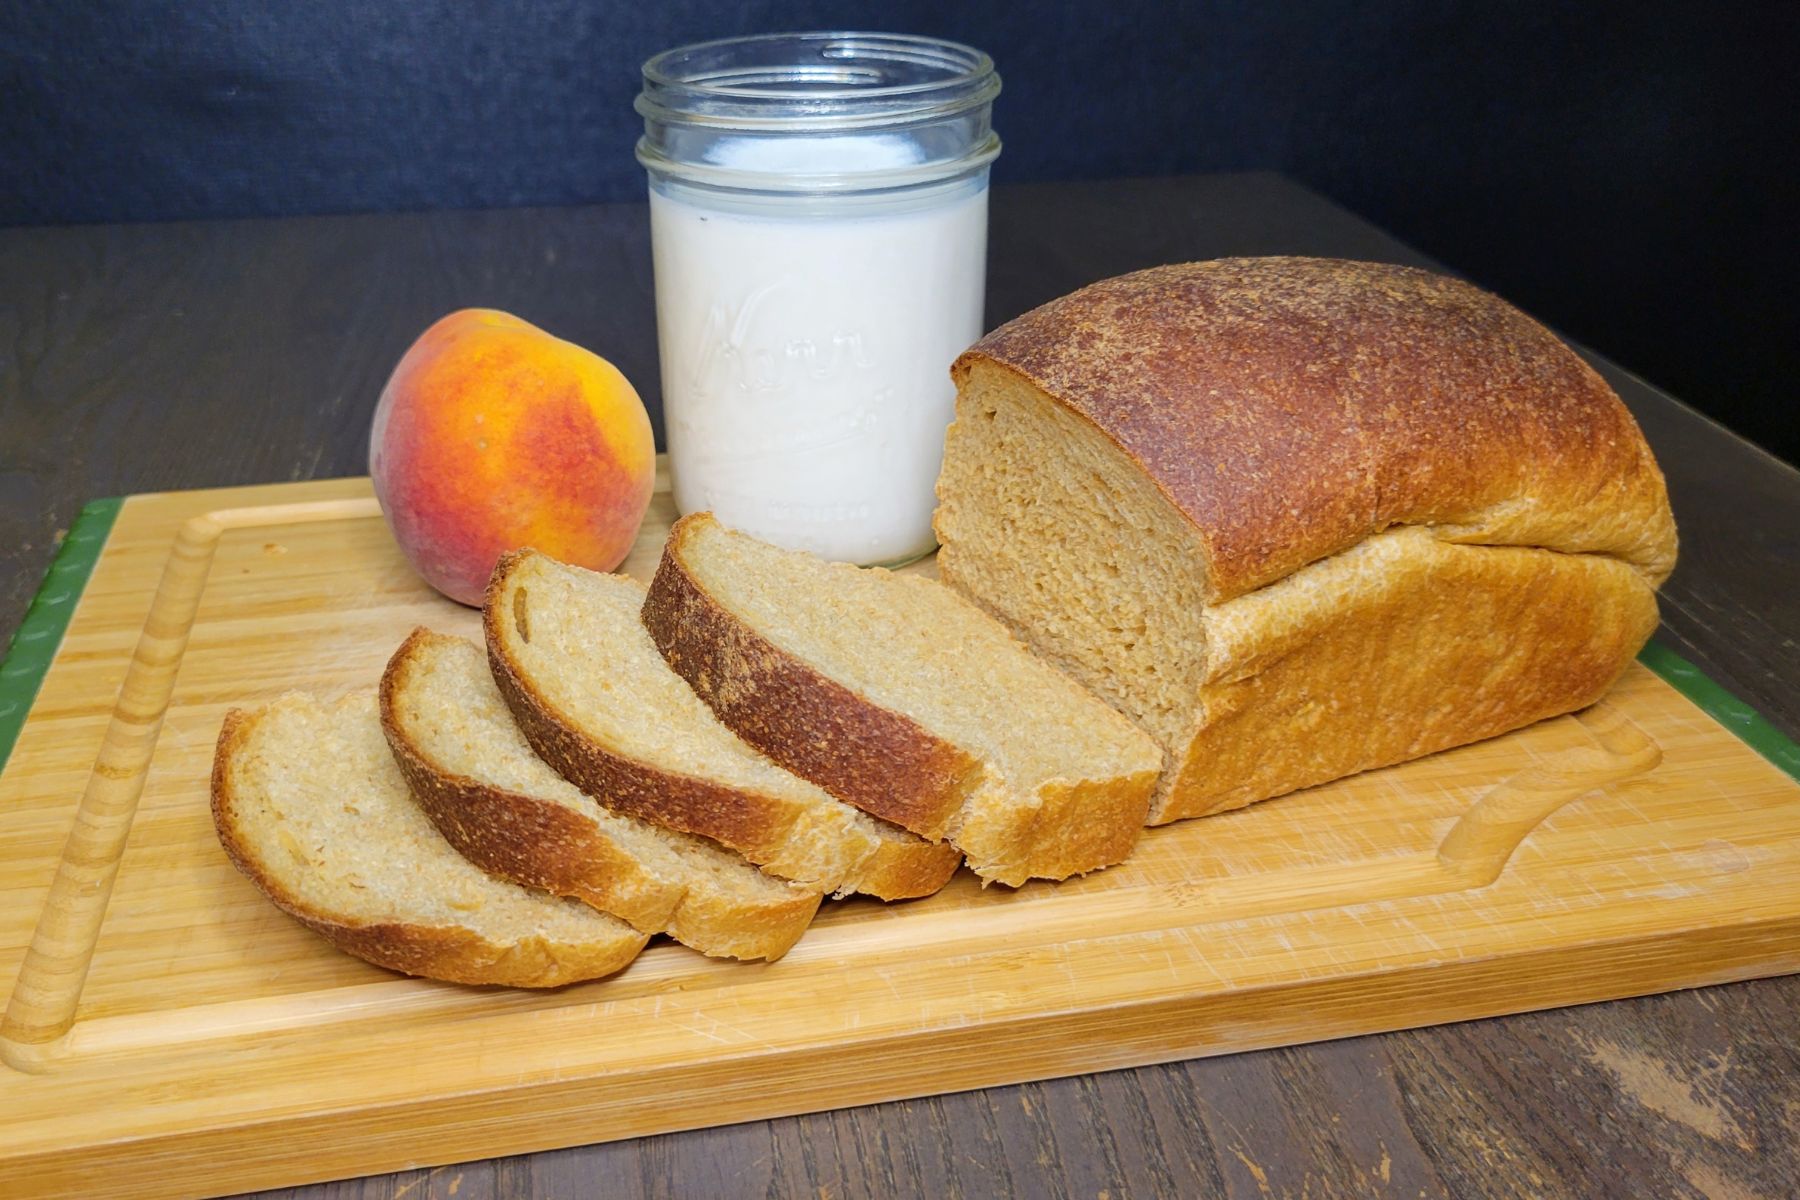
I made several batches using water, milk, and a buttermilk substitute. And, I was surprised to find out that the traditional option of water preformed the worst for me. Not to say that they were terrible, of course they were still edible, but we can do better. When I used milk instead of water, I got more of the browned bubbly goodness! So, I opted to continue on with the milk as the liquid. But, then I decided I would try adding vinegar to my milk to make a buttermilk “substitute” (To be honest, I would have just used buttermilk, but I did not have any on hand.) But, this made a nice difference with the amount of bubbling action! So, with this milk & vinegar combo (which honestly sounds, and kind of looks disgusting) I found to be the best browning & bubbling! So, I stuck with that!

What Kind Of Wheat Should I Use To Make Fresh Milled Flour Tortillas?
I tested out many different wheat variations, and combinations of wheat berries. Some were easier to work with than others, and some tasted better than others. Again, this does come down to personal preferences. But, hands down 4 out of 4 of my family members. The recipe I share with you here was the favorite, and hit all the points of a perfectly cooked, soft flour tortilla. We decided that half hard white and half Kamut (Khorasan Wheat) was the perfect balance. Those perfect points I was looking for were as follows:
- How easy is the dough to work with?
- Did the dough dry out too much?
- How soft was the dough?
- Did the tortilla dough roll out easily?
- Was there enough gluten & strength to hold the dough up to thin rolling, lifting, and flipping?
- Was I able to roll it out super thin?
- Did they remain soft even after they cooled down?
- Lastly, and most importantly, did it taste good!

What Fat Should I Use To Make Flour Tortillas With Fresh Milled Flour?
This may be controversial, because I am not using the traditional lard in this recipe. But, I figured, with the delicious results I attained with the olive oil, why not keep it just a bit healthy. I didn’t feel it sacrificed from the flavor or texture at all! There are some areas lard is easily obtainable, and alternatively, some areas we have been in that has been impossible to find (unless it was ordered in.) So, I feel olive oil is a great choice for these reasons.
Why Do My Dough Balls Keep Shrinking When I Am Rolling Them Out?
When rolling out tortilla dough, and you find the dough just keep shrinking back, then the dough is telling you it is not quite ready. Put it back in the bowl, and cover it back up. Let that dough rest a bit longer, even 5 or 10 more minutes makes a world of a difference. Listening to our dough is one of the most important things we can do while baking, or cooking… anything really. Typically, the dough tells us what it needs.
Tips For Making Soft Fresh Milled Flour Tortillas
It doesn’t matter what recipe you follow, if these 5 things are not right, then the results will be less than ideal.
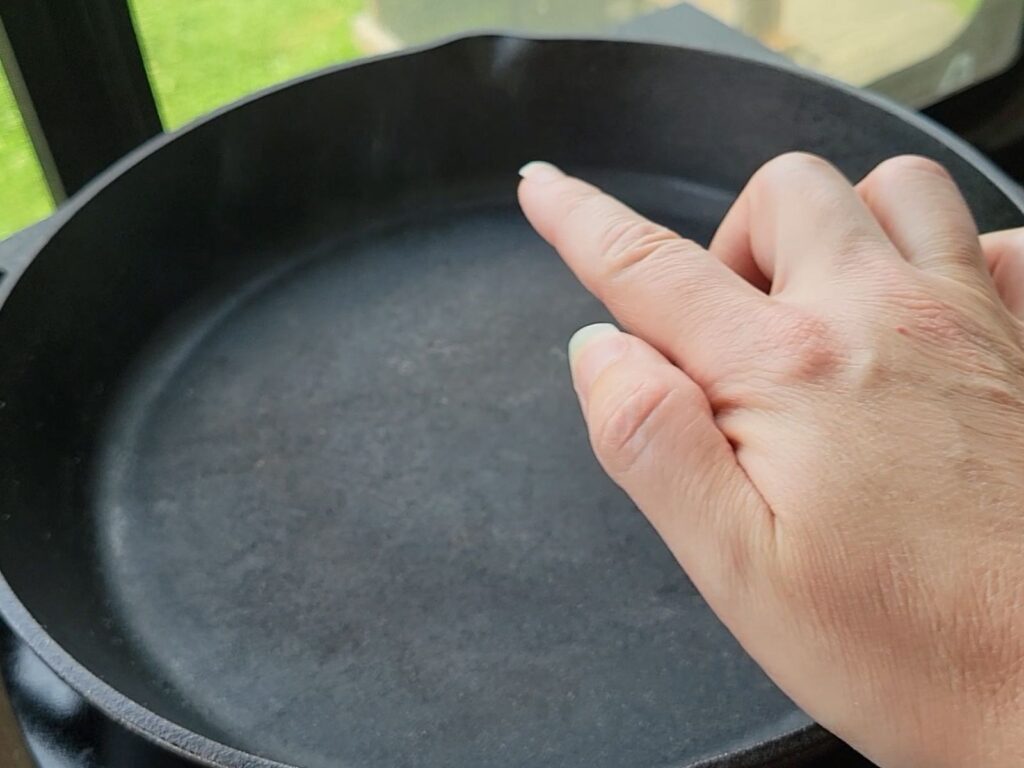
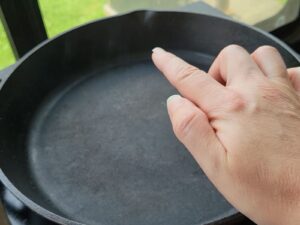
- The Heat Is Important! Make sure to preheat your pan well before you start cooking. Preheating your pan to the correct temperature is crucial! (I preheat cast iron pans for about 10-15 minutes, and regular pans for at least 5 minutes) You want the pan to be slightly smoking, but not billows of smoke.
- Don’t Let The Dough Dry Out! Make note of the dryness of your dough during each step. If it seems dry in the mixing, then it will be too dry! Make sure the dough is soft and pliable, and not starting to form a skin.
- Roll Your Tortillas Thin! Make sure to roll the tortillas thin. If your dough is ripping and breaking during rolling, it is too dry, and needs to be kneaded longer.
- Don’t Overcook Your Tortillas! Overcooked tortillas, are crispy tortillas. No more than 1 minute on each side. I like to do about 30-40 seconds each side. If they don’t bubble up in the first minute, they probably aren’t going to. Maybe something else went wrong.
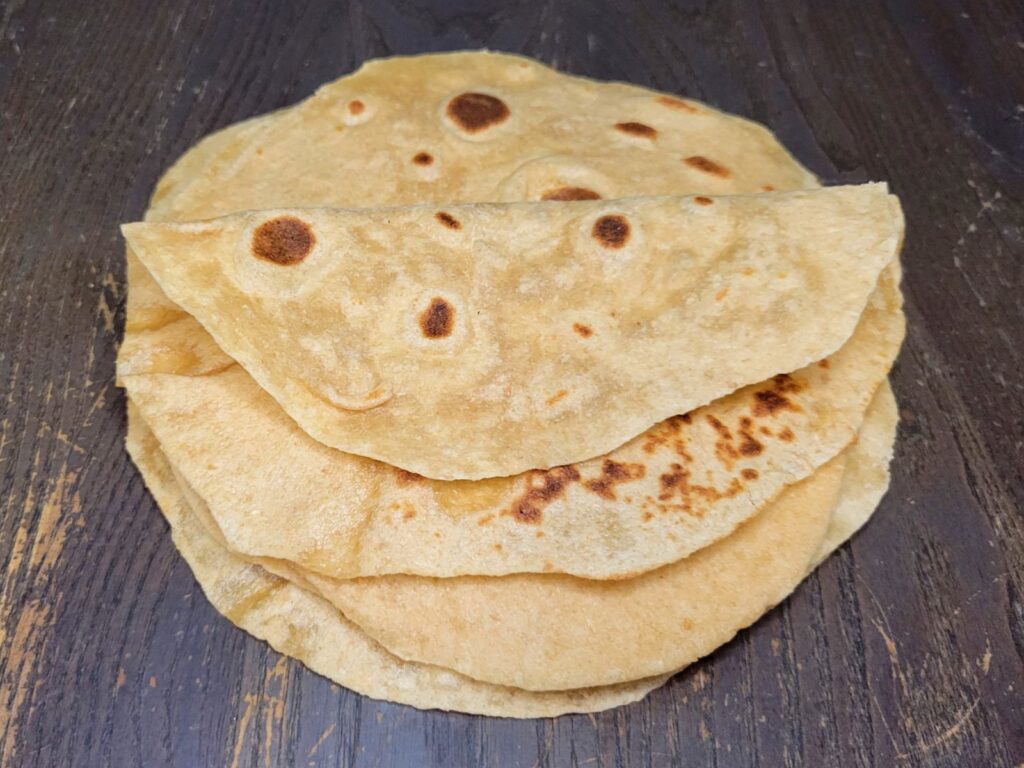
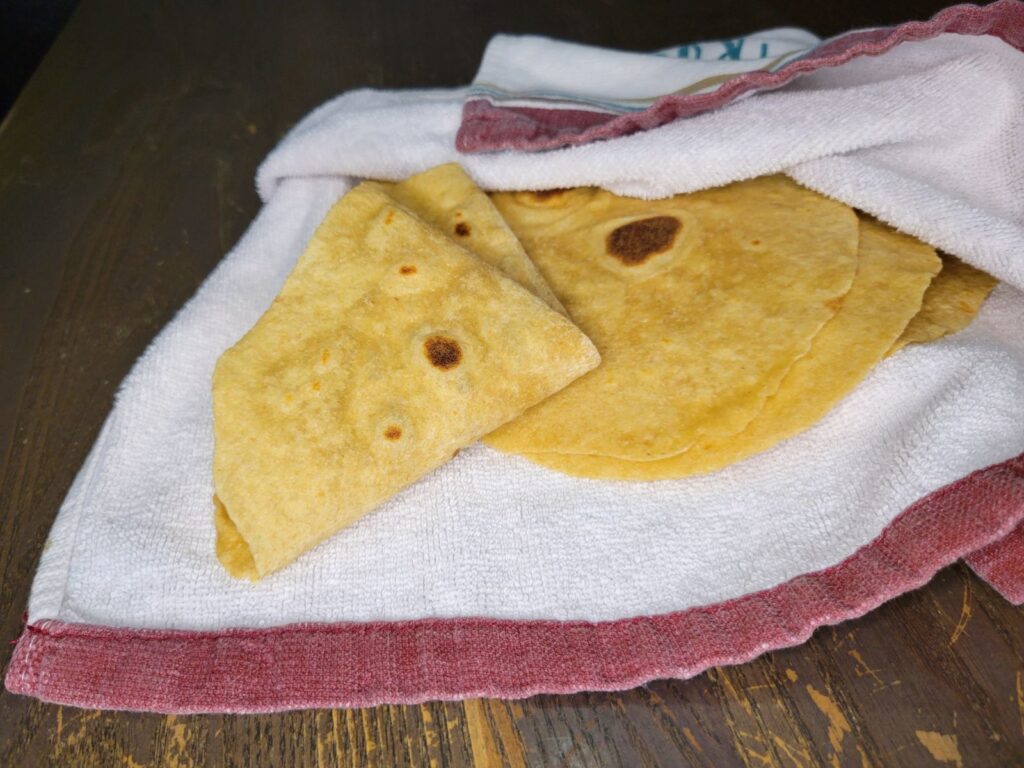
- Keep Cooked Tortillas Covered! It is VERY important to make sure to have a kitchen towel or tortilla keeper on hand to put the freshly cooked tortillas into. Right after pulling them off the heat, wrap them in the towel. This helps retain the steam, and ensures your tortillas will remain soft & pliable.
So, if you follow those 5 tips, that will ensure a perfectly soft flour tortilla every time!
Ingredients To Make Fresh Milled Flour Tortillas
- 2 cups fresh milled flour 240g (I milled half (120g) hard white(2/3c) & half( 120g) Kamut(2/3c) to get this.)
- 1.5 tsp baking powder (make sure it is not old baking powder)
- 1 tsp salt
- 1 TBSP extra virgin olive oil
- 3/4 cup milk 180g
- 1 TBSP Vinegar

Instructions To Making Fresh Milled Flour Tortillas
Making The Tortilla Dough
- Mill the flour
- Add baking powder to the flour, stir in to incorporate.
- In a microwave safe container, put milk, vinegar, and salt. Heat in microwave for about 1 minute. Stir until milk is heated through, and salt has dissolved. It will appear lumpy form the vinegar (this is normal.)
- Drizzle olive oil over the flour and stir again.
- Then, make a well in the dry ingredients to add the milk mixture. Pour the milk mixture in and stir to combine. It will be sticky at this point. (if the dough is too dry, add a bit of warm water. Make sure all the freshly milled flour is wet, and no dry flour is left.
- Cover the bowl, and set aside for 10 minutes.
- While the dough is resting, make sure to get a towel to place the cooked tortillas in while they are still hot! This is important to keeping your tortillas soft & pliable!
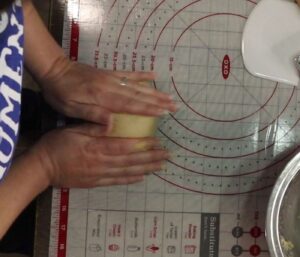
- After the dough has had a chance to rest, start kneading the dough. Knead until the dough is smooth. (About 3-5 Minutes.) Then, form it into one ball, place back into a lightly oiled bowl and roll the ball to lightly coat the dough ball. Cover the bowl and let it rest for 10 more minutes.

Shaping & Cooking The Tortilla Dough
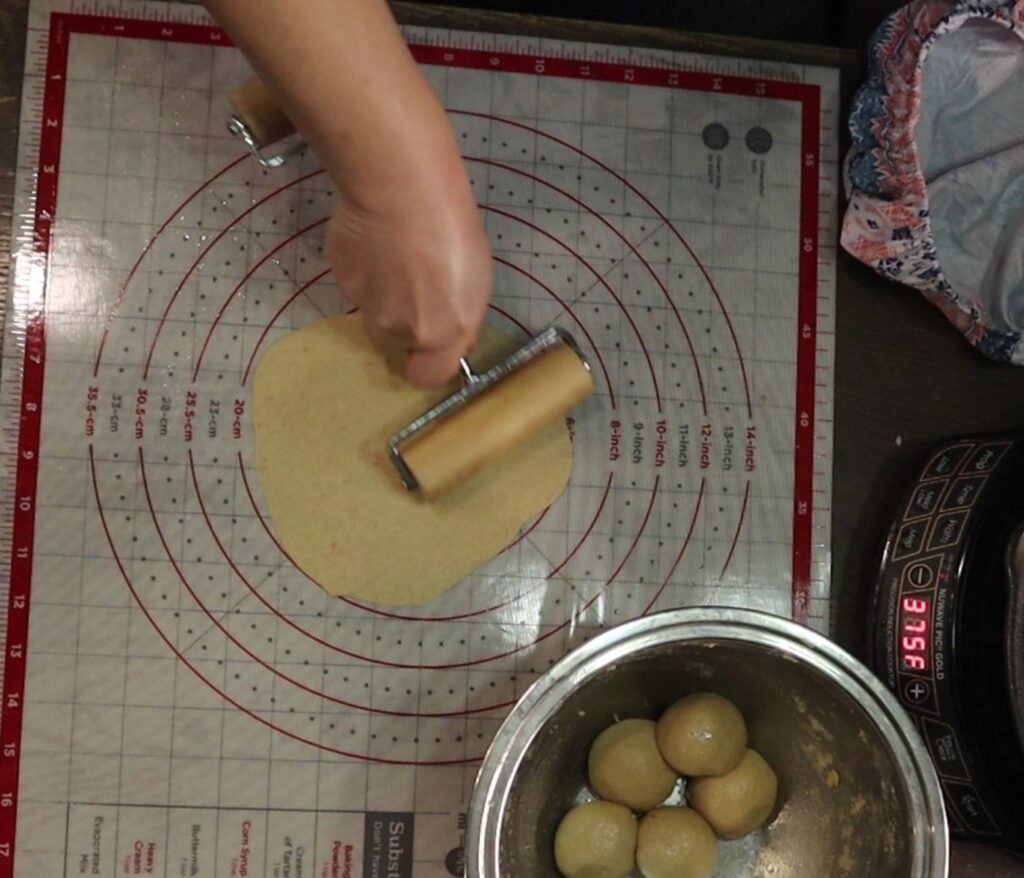
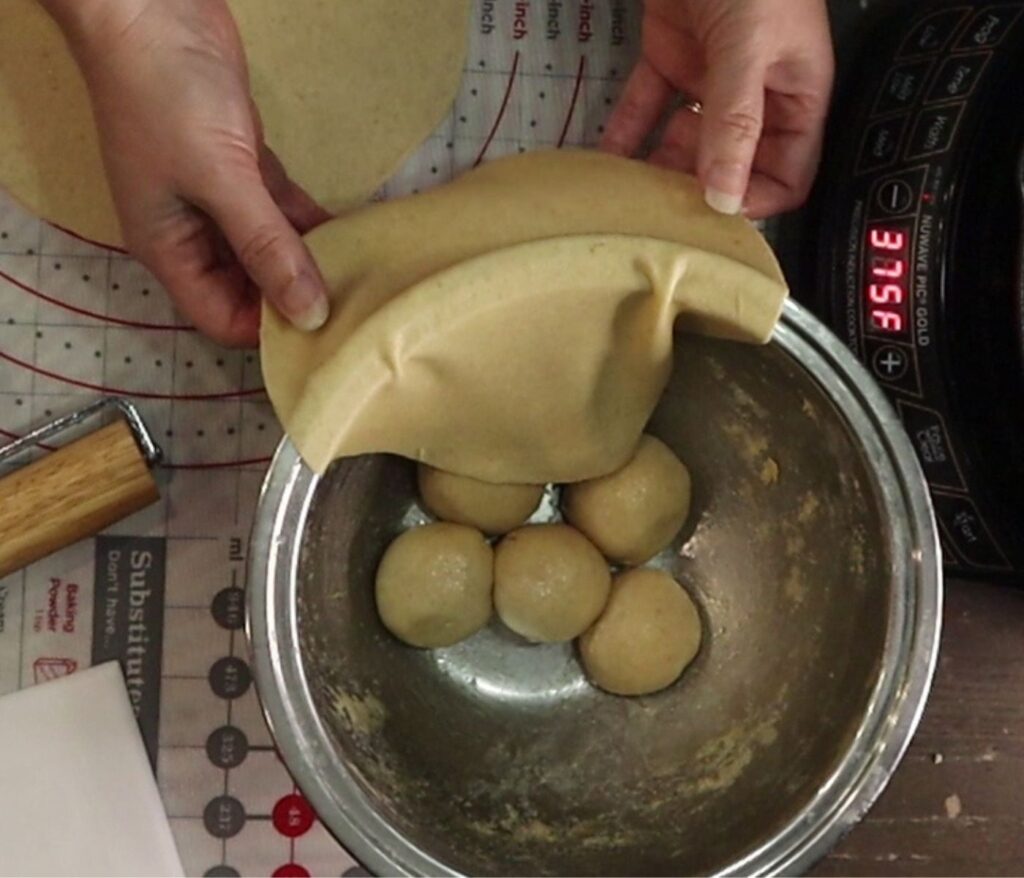
- After the second rest period, divide the dough into 10 equal size portions. create a bit of surface tension, then roll into a ball. (You can watch me do all these steps in the video.)
- During this, I like to get my pan preheating. I place my cast iron pan on an induction cooking top at 375*F at least 10-15 minutes before I can cook them. (If you don’t have the same setup as me, that is fine. Just preheat to medium, and if it is a regular pan, you may only need to preheat for 5 to 10 minutes.)
- Coat each ball in a little bit of olive oil, and place them back into the lightly oiled bowl and cover. Let the dough balls sit for 10 more minutes.
- Once they have rested for the 3rd time, now it is time to roll and cook them.
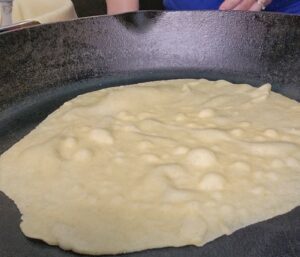
- Flatten each dough piece with your hand a little bit, then flip the dough and roll it out into about an 8 inch round. (You want these to be very thin, I could see my rolling mat through mine.)
- Lift the dough gently trying not to tear it, so it doesn’t stick to your work surface. If you find things are sticking badly, you can coat your work surface with a little bit of oil. If your dough balls keep shrinking back up while rolling, they need to rest a bit longer.
- I like to lay each of my rolled out tortillas over the edge of the bowl while they are waiting to be cooked. Continue with the same for each dough ball.
Cooking The Tortillas
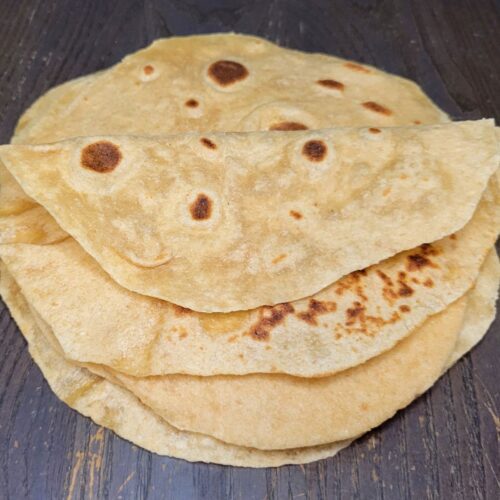
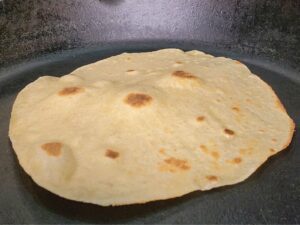
- Place the tortilla in the preheated hot pan (be careful not to burn yourself.) Wait 30-40 seconds (no longer than 1 minute.) Then, the tortilla should puff some bubbles, and the side facing the pan should have some browned spots. Flip, then cook on this side for another 30-40 seconds. If you didn’t get those dark spots on the first side, you can flip it back to the first side, and cook another 10-20 seconds. (If it hasn’t puffed up at this point, it probably isn’t going to. * See my blog post for troubleshooting tips.)
- While the dough is resting, make sure to get a towel to place the cooked tortillas in while they are still hot! This is important to keeping your tortillas soft & pliable!
- Stack each cooked tortilla on top of the next, making sure to keep them covered. Then, enjoy!

Can I Double This Fresh Milled Flour Tortillas Recipe?
You can double this recipe if you want to make more, but anymore than double, I just recommend a new batch all together, so things don’t get dried out too quickly. I set aside a day, and made 5 batches so I could have some in my freezer for the future.

How To Store Your Tortillas (Fresh Milled Flour)
Store wrapped up in the fridge for 1-3 days. But, for longer term storage place small squares of parchment paper in between each tortilla, and put them in a freezer safe container, and freeze for up to 1 year.
What To Serve In Your Fresh Milled Flour Tortillas?
These are very versatile tortillas! We like to mix things up and serve them in many different ways! Here are a few ideas:
- Tacos, Burritos, etc (traditional)
- Air Fried Flautas
- BBQ shredded pork with coleslaw (Texas Style!)
- Cut them into chips, and air fry
- Warm with just butter
- Butter, then add cinnamon and sugar (Dessert Idea!)
- And so many more!
Do I Have To Have A Tortilla Press?
No, you can hand roll the tortillas, which is actually quite satisfying! I have a baking mat, and use a small little hand roller. Although a Tortilla Press will work with a flour tortilla, they work for corn tortillas much better. I think they are more likely to cause frustration, than they are to help. To prove this, I had a fancy tortilla press that cooked the tortillas and pressed them for me, and it cause some frustration, and it broke on me after only a couple uses! See where I broke my tortilla press HERE.
Shop This Post
My Favorite Mini Rolling Pin – This little rolling pin worked perfectly!
Check Out Some Of My Other Recipes
Fresh Milled Flour Recipe Index

Fresh Milled Flour Tortillas – Printable Recipe
The Perfect Fresh Milled Flour Tortillas
Ingredients
- 2 cups fresh milled flour 240g I milled half (120g hard white(2/3c) & half( 120g) Kamut(2/3c) to get this.)
- 1.5 tsp baking powder make sure it is not old baking powder
- 1 tsp salt
- 1 TBSP extra virgin olive oil
- 3/4 cup milk 180g
- 1 TBSP Vinegar
Instructions
Make The Tortilla Dough
- Mill the flour

- Add baking powder to the flour, stir in to incorporate.
- In a microwave safe container, put milk, vinegar, and salt. Heat in microwave for about 1 minute. Stir until milk is heated through, and salt has dissolved. It will appear lumpy form the vinegar (this is normal.)
- Drizzle olive oil over the flour and stir again.

- Then, make a well in the dry ingredients to add the milk mixture. Pour the milk mixture in and stir to combine. It will be sticky at this point. (if the dough is too dry, add a bit of warm water. Make sure all the freshly milled flour is wet, and no dry flour is left.
- Cover the bowl, and set aside for 10 minutes.
- While the dough is resting, make sure to get a towel to place the cooked tortillas in while they are still hot! This is important to keeping your tortillas soft & pliable!
- After the dough has had a chance to rest, start kneading the dough. Knead until the dough is smooth. (About 3-5 Minutes.) Then, form it into one ball, place back into a lightly oiled bowl and roll the ball to lightly coat the dough ball. Cover the bowl and let it rest for 10 more minutes.
- After the second rest period, divide the dough into 10 equal size portions. create a bit of surface tension, then roll into a ball. (You can watch me do all these steps in the video.)

- During this, I like to get my pan preheating. I place my cast iron pan on an induction cooking top at 375*F at least 10-15 minutes before I can cook them. (If you don't have the same setup as me, that is fine. Just preheat to medium, and if it is a regular pan, you may only need to preheat for 5 to 10 minutes.) Coat each ball in a little bit of olive oil, and place them back into the lightly oiled bowl and cover. Let the dough balls sit for 10 more minutes.
- Once they have rested for the 3rd time, now it is time to roll and cook them.
- Flatten each dough piece with your hand a little bit, then flip the dough and roll it out into about an 8 inch round. (You want these to be very thin, I could see my rolling mat through mine.)

- Lift the dough gently trying not to tear it, so it doesn't stick to your work surface. If you find things are sticking badly, you can coat your work surface with a little bit of oil. If your dough balls keep shrinking back up while rolling, they need to rest a bit longer.
- I like to lay each of my rolled out tortillas over the edge of the bowl while they are waiting to be cooked. Continue with the same method for each dough ball.

- Place the tortilla in the preheated hot pan (be careful not to burn yourself.) Wait 30-40 seconds (no longer than 1 minute.) Then, the tortilla should puff some bubbles, and the side facing the pan should have some browned spots. Flip, then cook on this side for another 30-40 seconds. If you didn't get those dark spots on the first side, you can flip it back to the first side, and cook another 10-20 seconds. (If it hasn't puffed up at this point, it probably isn't going to. * See my blog post for troubleshooting tips.)
- While the dough is resting, make sure to get a towel to place the cooked tortillas in while they are still hot! This is important to keeping your tortillas soft & pliable!
- Stack each cooked tortilla on top of the next, making sure to keep them covered. Then, enjoy!

Video
Notes
*This post contains affiliate links, which means I make a small commission at no extra cost to you! As an Amazon Associate I earn from qualifying purchases. But, I will only suggest items I actually Love and Have Used!


These look great!
Thank you! They are so yummy! Let me know if you try them, how you like them!
I made these an misread the recipe in the book and did 240 grams of hard wheat and 120 grams of Kamut. I just adjusted my liquid when I saw my error, they were so good! Very easy to roll out.
Yay! Great job adjusting on the fly! Glad to hear they were a hit! Thanks! 🙂
Just made them and wow they came out great! I made your Flautas with chicken and the tortilla rolled up really nice and didn’t break apart. I am new to graining your own flour but your website has helped me out a-lot, thank you!
Thank you! I am so glad to hear that! My family LOVES the flauta recipe, and we have tried it with several different types of proteins too.
These are great!! My family loved them 🙂 I will be using this recipe for now on. Exodus 23:35
I am so happy to hear that! Thank you!
Can I sub the milk for water?
Yes, you can, but I really think the milk makes the flavor delicious, and helps with the softness. 🙂
I have made them both ways, and every time my family prefers the milk ones. LOL Try it each way and see which you prefer. 🙂
I’ve made this recipe a couple of times, and while they taste incredible, I’m struggling to transfer the rolled out tortilla from my silicone mat to the cooking pan without them stretching and tearing under their own weight. What might I be doing wrong? Do they need to rest longer so that the bran is sufficiently soft? I’m following the recipe exactly on that.
I want to try and make larger tortillas, but I fear until I solve this problem they will just break.
Thanks! Your recipes are my go-to for FMF!!
Make sure to oil the silicone mat, as I find that helps a ton. But, also make sure to roll each one out a little, then flip the dough over and roll the other side. Make sure to keep moving the dough as you roll it out and this will help. Also, the dough may need kneaded a bit longer in the kneading stage. I find when I add spelt or soft white into the mix, the tend to be softer, but tear much easier than when using hard wheat and Kamut. I hope that helps!
Exodus 23:25
I’ve tried several fresh milled tortilla recipes and they all have their issues. These were perfect!!
Have you tried making the dough and leaving in the fridge overnight to use the next day? Not sure if they would turn out the same?
Thanks so much! I would assume it would still work, but I have not tried that myself yet. Let me know if you try it how it works!
I made the dough the day before following the directions through separating into balls then refrigerated over night. They turned out just as amazing if not even better!
Yes! That overnight ferment makes just about everything taste better! Right? I love to do that with my pizza dough, bagels, and dinner rolls as well! Thank you!
Thank you for sharing that! I was wondering if that would work to leave the dough to rest for a different day. Glad to know it works!!
My husband and kids love these. This recipe has become my to go to for tortillas. Thank you so much for sharing.
Thank you! I am so happy to hear that! We love them too! I make a triple batch about 2 times per month! lol! I keep them in the freezer with parchment paper in between each one.
I made these tortillas and the cheez its yesterday. 💣
I made pizza on Friday (cheese) and Canadian bacon and pineapple on Saturday (also yesterday) and both were 💣!
I made your everyday sandwich bread on Thursday and it was gone by Saturday morning 💣.
Everything has been great! I feel like the recipes and notes are valuable enough that you should be charging us for all of it.
Yay! I am so happy to hear they were all a hit! Thank you so much! I have considered a cook book in the future, trying to map out some spare time for that! lol. Thanks again! Happy Baking!
I made these to use to make spiced taco chips. It was excellent. I used avocado oil bc I was out of EV Olive oil. I use soy milk because I was going to a Cook Book Party and had made a vegan nacho dip-the book this month was a vegan one. After making, I cut them up into chip size and spray with avocado oil and paprika, chili powder, garlic powder and salt and baked at 300 till crunchie. Everyone loved them. I made extra to leave as wraps-so yummy, thanks for great recipe and instructions.
That sounds delicious! Thanks for sharing! I am so happy everyone enjoyed them!
When making in advance and storing in the freezer, do i cook them first or stored rolled out in dough form flat and pull out when ready to cook? Thank you so much
I cook them first completely, make sure to keep them covered with a towel right after they are cooked so they don’t dry out. Then I will put a small piece of parchment paper in between each tortilla, and place the whole stack in a freezer bag! I always double the recipe so I have extra in my freezer. My son loves to have these on hand for quick snacks! I hope that helps!
Thank you! Made these last night and they were delicious!!! Double batch next time for sure, so I have some to freeze 🙂
Yay! I am so happy to hear they turned out great! I love doubling the batch to have some in the freezer too!
I made these for the first time last week, and they came out great! Thank you!
I did have a question: Can I make the doughahead of time and roll them out later?
Yay! So happy they turned out great! Nice job! I have made the dough in the morning, and just let it sit on my counter until I finished them later that evening. If you want the dough to sit longer than 3-4 hours before making them, I would recommend putting the dough in the fridge. If you do that, just let the dough come to room temp before finishing them. I also like to make a double batch, then freeze the leftover tortillas for another day! They thaw out so quickly! I hope that helps!
Another amazing recipe! Thank you. I’ve made flour tortillas before from freshly milled flour but these were so much easier to work with. The dough was supple and easy to roll and transfer to the hot griddle. I used cashew milk as a dairy alternative and that worked very well. The Kamut was also delicious!
Yay! I am so happy to hear that! I LOVE this tortilla dough too! So fun to work with I agree. In fact, I just made another double batch today. (I make them often, lol) Great idea to use the cashew milk for the alternative, thank you so much for sharing!
I loved these! I used soft white instead of kamut because my kamut was frozen! I also used a tortilla press and my husband pressed them twice to make them extra thin. Do you know how I would make these sourdough? I prefer to long ferment my grains.
I would add about 1/2 cup starter (~115g) to the recipe, and just watch the flour amount, if your starter is wet, you may need to add a bit more flour. Then, let this sit for about 2-4 hours and proceed with the recipe. I hope that helps! Let me know how they turn out!
Perfection!!! I did everything just and you said and I’ve finally found my go-to tortilla recipe. Thank you!
P.s. your pizza crust recipe also changed our pizza night. Thanks so much!
Yay! I am so happy to hear that! Nice job!!! Thanks so much!
Do you have to use two different wheat types? I only have hard white and soft white. You said mixing it with soft doesn’t work well but what about using all hard wheat?
You can make these with all hard white wheat as well, if you want to use a little soft white you can do that too! Let me know how it goes!
They tasted great! I ended up using 94g of soft white (because that’s what was left in my jar) and the rest hard white. My kids loved them so much they ate them plain! Also, I was out of milk and used half and half. I can only imagine how good it would taste with real milk! Your recipes are the only ones that work for me. Thanks for all the hard work you put into this so the rest of us can have smooth and easy bakes!
Yay! I am so happy to hear they were a hit! Nice job! Thank you so much!
Sorry for the possible repeat question but do you always sift your flour after milling?
Thank you!
I don’t sift my flour, but if you prefer to you can. I hope that helps! Happy Baking!
Love this recipe!
Thank you so much!
Hi! We just tried making these and are new to FMF. We aren’t quite used to the chewy texture of all the bran so we sift out at least a little bit in every recipe but I make sure the weights are the same (—I say this in case you think this is the problem!) For this recipe I found that it was extremely sticky and stuck to everything our hands (although throwing it in the mixer for a little bit helped), the roller, the silicon mat. Also, how are yours so yellow? We used the same ratio of grains and ours look very brown. Any thoughts? Thank you!
Hmmm, I think we need to start with what wheat variety you used. Then, my next question is did you let the flour sit with the liquid before trying to work with it?
I used the kamut (technically khorsan, not the kamut brand) and hard white ratio in the recipe. And we did all the rest periods. When it was wicked sticky, I threw it in the mixer and that helped a little, but then when we actually rolled it out it got sticky again.
Thank you!
Hmmmm, was it humid that day? I recommend rolling them out with a bit of olive oil, that helps tremendously, but it shouldn’t be super sticky after the rest and some hand kneading, maybe increase the flour by just a bit for your climate?
I just made these exactly as the recipe said as well and mine came out golden brown and sticky and its February in Ohio. I added the extra olive oil as I kneaded and they rolled out and cooked perfectly, but were very golden brown. Did the extra flour help with the stickness? I was nervous about adding more flour in case they would dry out. The internet said ” Golden Color: Kamut is naturally yellow/golden, which imparts a “gorgeous golden hue” to baked goods compared to standard white flour.” So I am thinking thats why ours came out so golden brown maybe our Kamut was just extra lol . I used the Food to Live brand because it came the fastest. What brand do you use Kara?
Yes, the variety of wheat berries can change the color. I have used several different kind of Kamut, I have used the Food to Live, Azure, and a many others, each batch can be a bit different.
The moisture absorbency of grains changes a surprising amount depending on even the location grown. It’s tricky because if you’re used to working with store-bought flour, that’s very consistent! But sometimes you may find that you need to add more fresh flour to get the correct texture. I find Kara (the author of this recipe) very helpful because she always does videos showing how the dough should look.
Yes! Each time I make a recipe it is just a little different, learning to feel the dough and what it looks like is the best way to judge the moisture level! Thanks for sharing!
Made these today!!! Thank you for all the research you did before posting your final fav! So easy and fun. Can’t wait to taste these at dinner time!
By chance, can you make this a corn tortilla by milling yellow corn??
Would the recipe stay the same?
Thank you so much! We love them here! I always make a double batch to have some in the freezer for later! I haven’t tried these as corn tortillas, but I de believe to make corn tortillas, you need masa (nixtamalized corn). I am unsure if these would work with just ground corn flour.
I was a little hesitant to make these. I have another recipe that I’ve used often and love. But these completely different and a bit healthier so I decided to give them a go. I needed street sized for our carne asada tacos and they were perfect! I split the dough into 12 instead of 10 and they were so good! I had made the dough in the morning so ended up putting it in the fridge for about 4 hrs. Pulled and let get to room temp before rolling and cooking. They were just as good tonight as leftovers. Thank you for another great recipe!
Awesome! I am so happy to hear they were a hit! I love to have these on hand in the freezer, so we can have taco night whenever we feel like it! lol. Thanks so much for sharing! 😊
This is exactly what I was looking for today. Thank you so much for the detailed explainations, especially the freezer information. I’m going to make my first batch of these this weekend (and after I get the kamut ordered). Now off to check out your other freshly milled receipes! YAY!!
Awesome! I am so happy to hear it was helpful! I have a video that goes with this too incase you have a questions on what it should look like along in the process. Thanks so much! https://youtu.be/bUz-vk6-iyY
We don’t use dairy products, so would homemade almond milk work? I do use it in many of my recipes as a straight swap
You can use a milk substitute, but make sure to add in the vinegar. I have also made these with water and vinegar, and they work. The milk just ads delicious flavor and texture! 😊
My dough was very sticky it was very hard to knead. Should I have added more flour? I followed the recipe but my milk was not very warm, I would say room temp
The dough does start out very sticky, but after the first rest period, then some kneading it should come together. I recommend a bit of butter, oil, or lard on your work surface so that it isn’t too sticky to work with. What wheat variety did you use?