
Yellow Cake Made With Fresh Milled Flour From Scratch
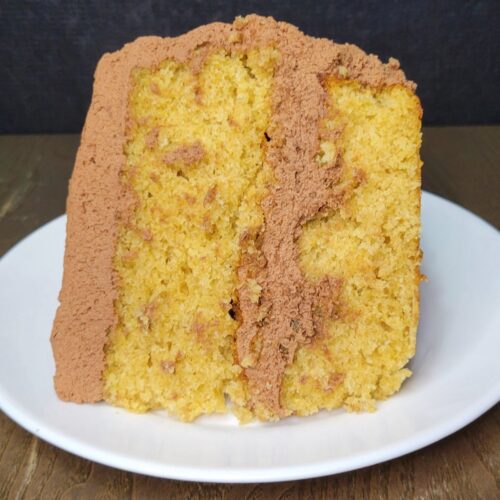
This is the perfect classic yellow cake made with fresh milled flour and it’s made from scratch! This cake really delivers that classic vanilla yellow cake with a moist and tender crumb, but perfectly simple so you can take it up a notch with any frosting or fillings.
I made this cake in honor of my husband, Matthew’s, Birthday. He really loves cake, and he loves a simple yellow cake. But, it has been hard for me to find that perfectly moist yellow cake made with fresh milled flour… Until now! Finally, I did it! So, I am here to share it with you today.
Today’s Classic Birthday Cake!
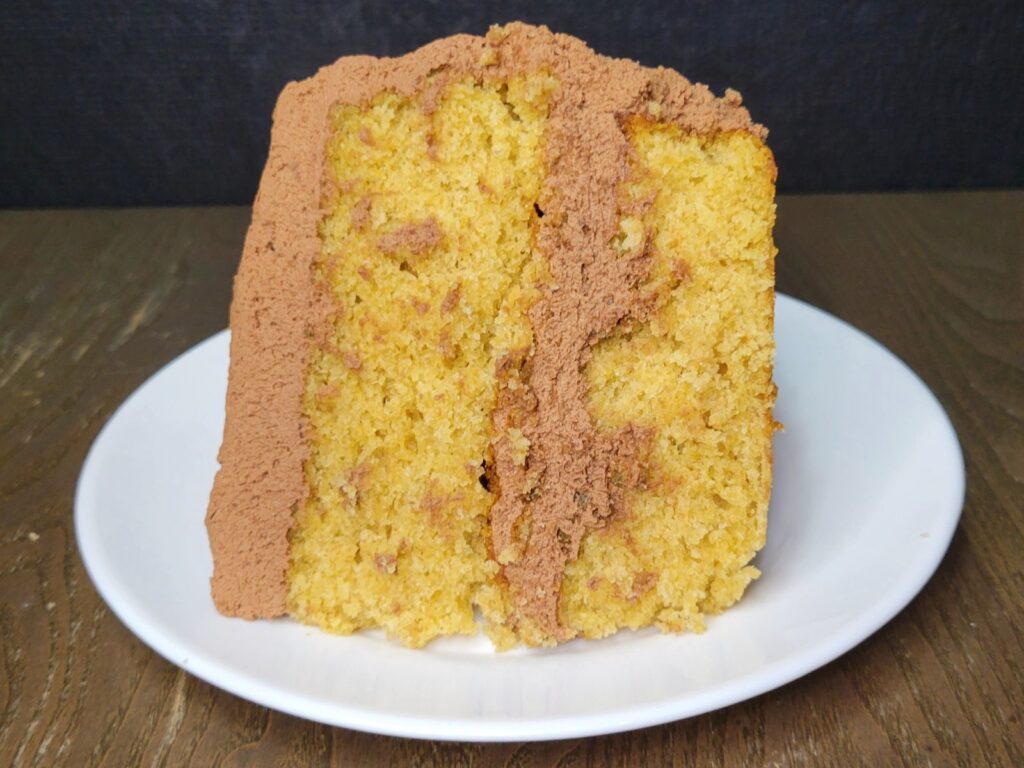
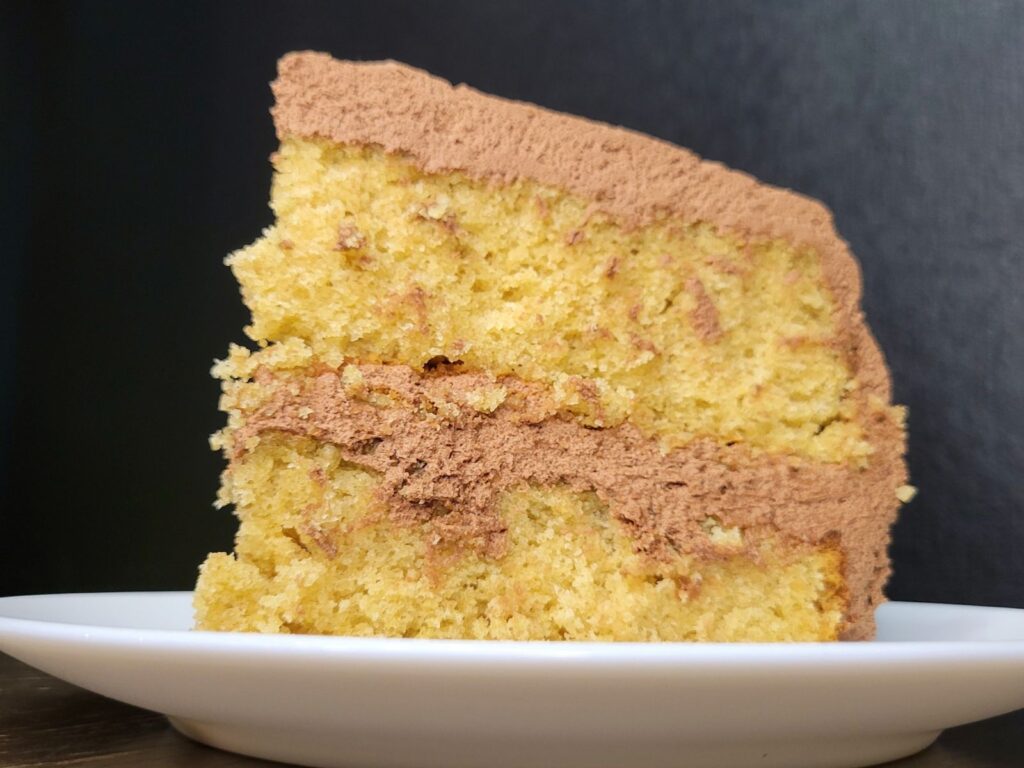
Today, I made a chocolate ganache buttercream frosting, and oh my goodness it was Ah-Mazing! If you really want a deep chocolate cake, I do have a chocolate cake with a more typical chocolate buttercream that is perfectly balanced, and not too sweet. You can grab both my chocolate cake and the chocolate buttercream HERE.
If you are a new cake baker, never fear! I am here to help you. There is a video for this yellow cake down below. Also, I have the chocolate cake step by step video. I will walk you through the process, see that video HERE. I will see you there!
Great Yellow Cake Frosting Options
There are several delicious frosting options that pair wonderfully with fresh milled flour yellow cake. Here are some popular choices:
- Chocolate Buttercream: The combination of rich chocolate frosting with light and fluffy yellow cake creates a perfect balance of flavors. I have a lovely chocolate Buttercream recipe HERE.
- Vanilla Bean Buttercream: A classic choice that complements the subtle sweetness of yellow cake. You can also add a hint of vanilla extract or vanilla bean for extra flavor.
- Cream Cheese Frosting: This tangy and creamy frosting adds a delightful contrast to the sweetness of yellow cake. It’s particularly popular with carrot cake, but it works equally well with yellow cake. Checkout my Cream Cheese Frosting Recipe HERE.
- Lemon Buttercream: Bright and zesty lemon frosting adds a refreshing twist to yellow cake, making it perfect for spring or summer occasions.
- Whipped Cream Frosting: Light and airy whipped cream frosting is a refreshing option that complements the delicate crumb of yellow cake.
- Coconut Buttercream: If you enjoy coconut flavor, coconut buttercream frosting is a delicious choice. It adds a tropical flair to yellow cake and pairs well with shredded coconut sprinkled on top.
- Raspberry Buttercream: Tangy raspberry buttercream adds a burst of fruity flavor and vibrant color to yellow cake, creating a visually stunning and delicious dessert.
These frosting options offer a variety of flavors and textures to complement your classic yellow cake and elevate it to a special treat. Choose based on your preferences and the occasion!
Fresh Milled Flour Classic Yellow Cake Filling Options
If you want to get fancy, you can also level up your fresh milled flour yellow cake with many filling options. Here are some great choices:
- Fruit Preserves or Jam: Spread a layer of your favorite fruit preserves or jam between the cake layers for a burst of fruity flavor. Raspberry, strawberry, apricot, and peach are all classic options. I have a small batch Raspberry Jam recipe HERE.
- Lemon Curd: Tangy and creamy lemon curd is a delightful filling choice that pairs beautifully with the sweetness of yellow cake. It adds a refreshing citrusy flavor to each bite.
- Pastry Cream: Also known as custard, pastry cream is a rich and creamy filling made with eggs, milk, sugar, and vanilla. It adds a luxurious texture and flavor to the cake layers. Grab my Fresh Milled Flour Pastry Cream recipe HERE.
- Cream Cheese Filling: Sweetened cream cheese filling adds a tangy and creamy contrast to the sweetness of yellow cake.
- Chocolate Ganache: Rich and decadent chocolate ganache is a luxurious filling choice that adds intense chocolate flavor and a smooth, velvety texture to the cake layers.
- Coconut Cream: Creamy coconut filling made with coconut milk and sweetened shredded coconut adds a tropical twist to yellow cake. It’s perfect for coconut lovers.
- Fresh Fruit: Layer slices of fresh fruit like strawberries, bananas, or peaches between the cake layers for a naturally sweet and juicy filling that adds freshness and texture.
These are just a few options to consider, but feel free to get creative and experiment with different fillings to create your own unique and delicious yellow cake masterpiece!
Ingredients To Make Fresh Milled Flour Yellow Cake
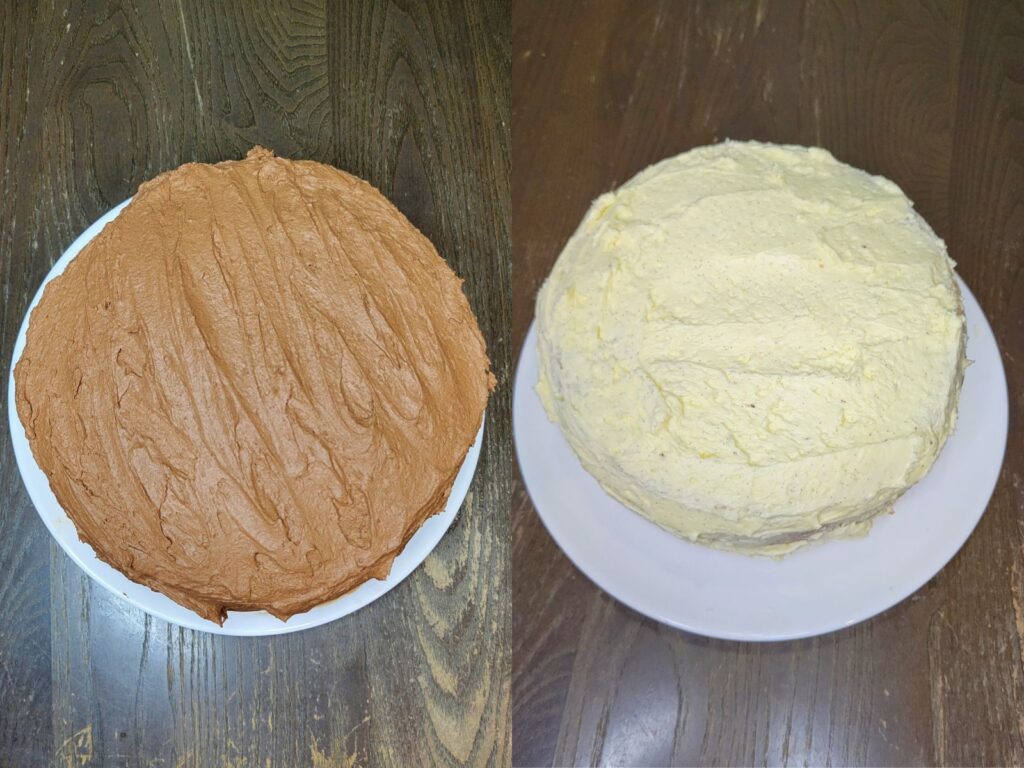
Choose Your Frosting First! I give 2 different options, but I also share so many options above. Also, you can get creative, and choose your own!
Chocolate Ganache Buttercream Ingredients
- 12 0z of a decent quality chocolate of your choice 300g (can use dark, milk, etc)
- 1&1/2 cup Heavy Cream 340g (I used half and half in the video for a thinner ganache)
- Pinch of salt
- 1/2 cup very softened butter 113g (not melted!) (1 stick)
- 1&1/2 cup powdered sugar 180g (to taste)
Vanilla Bean Buttercream Ingredients
- 1 vanilla bean (sliced longwise, and scrape out the vanilla beans)
- 1&1/2 cup softened butter 340g (Not Melted!) (3 Sticks)
- 3 cups powdered sugar 360g (to taste)
- pinch of salt
- 1-2 TBSP whole milk to thin if needed 15-30g (can use heavy cream or half and half also)
Ingredients To Make The Fresh Milled Flour Yellow Cake
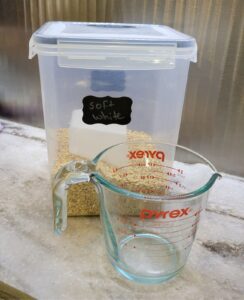
- 2&1/2 cups fresh milled flour 300g (soft white wheat)
- 1/4 cup potato starch 32g (you can use cornstarch, tapioca starch, etc.)
- 1/2 tsp baking soda
- 1 tsp baking powder
- 1/2 tsp salt (if using unsalted butter)
- 1/2 cup softened butter 113g (not melted) (1 stick)
- 1/2 cup olive or avocado oil 105g
- 1&2/3 cup sugar 332g
- 3 large eggs (room temperature)
- 1 TBSP vanilla extract
- *optional – 1 tsp almond extract
- 1 tsp white vinegar
- 1/2 cup heavy cream, half and half, or buttermilk 120g (room temperature)
- 1/2 cup Yogurt 120g (vanilla or plain – room temperature)
Instructions To Make Yellow Cake Made With Fresh Milled Flour
Make The Yellow Cake Batter
- Firstly, mill the flour. I used all soft white wheat.
- Then, add potato starch, baking soda, baking powder, salt (if using unsalted butter) to the flour, and stir to combine. Set aside.
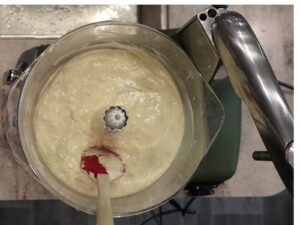
- In a stand mixer, add room temperature butter, oil, and sugar. Cream together for 3-5 minutes until it becomes lighter in color, and increases in volume. Also, make sure to scrape the sides down as needed for even mixing.
- Add eggs one at a time, mixing a little between each egg. Then, after all the eggs are incorporated, beat until mixture becomes fluffy (about 1-2 minutes more.)
- Then, add the vanilla extract, almond extract (if using), vinegar, and heavy cream. Mix until well combined. (save the 1/2 cup yogurt until you have added half the flour mixture.)
- Now, it is time to add in your flour mixture. Slowly mix in half the flour without overmixing.
- Then, add in the yogurt, mix in just a little.
- Lastly, add in the rest of the flour, and fold in with a spatula just until there is no dry flour mixture left. Don’t overmix it will deflate all the air you put in the cake, and make it tough.

Prepare & Bake The Cake
- Preheat the oven to 350*F.
- Let the yellow cake batter sit and allow the fresh milled flour to start absorbing all the liquid while the oven preheats. (15 mins or so.)
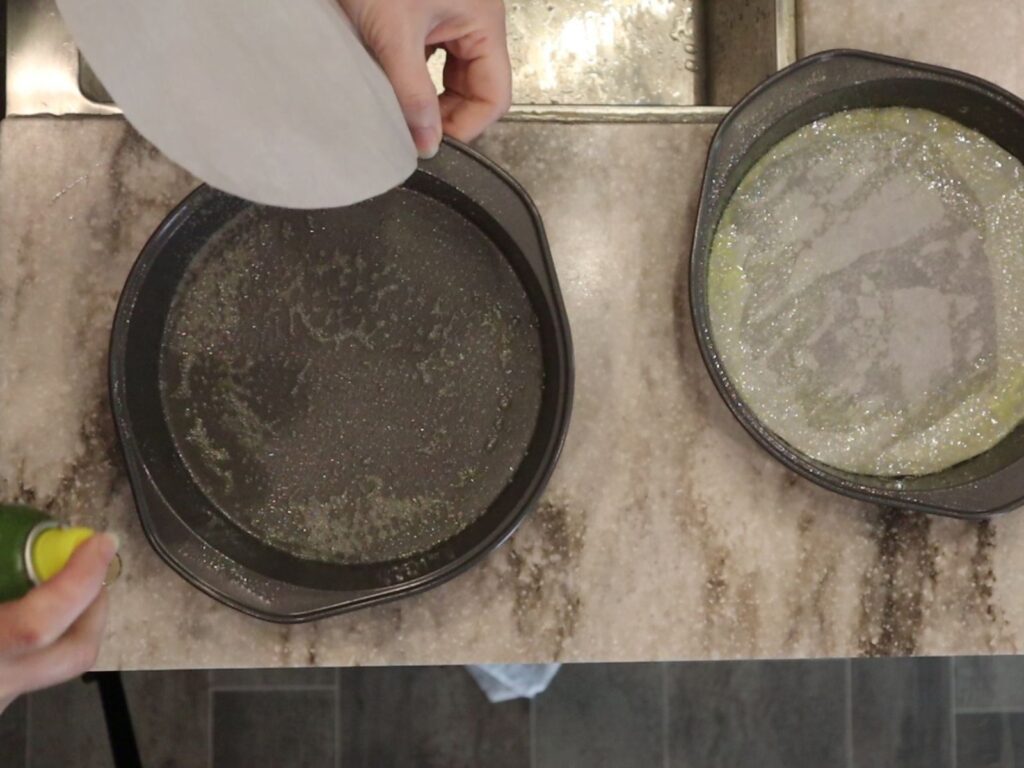
- While the batter is resting, and the oven is preheating. Get two 8 inch round cake pans, and cut out parchment paper circles to line the bottom of the pan. (I like to trace the pan with a pencil to get the exact size I need.
- Then, spray or grease the pans, and place a parchment paper circle into each pan, spray or grease the pans again including up the sides. (So, you want spray or grease under and above the parchment paper.)
- Pour half the yellow cake batter into each pan. Gently tap the pans on the counter to let the top set and get any air pockets out.
- Bake for 30 minutes, watch for the edges of the cake to pull away from the pan. Once this happens the cake is done! If it overbakes even a couple minutes, it will cause the cake to be dry. (you can use the toothpick trick, and cake crumbs or oil is ok to come off on the toothpick, it is still done. Just, not done if wet cake batter comes out.)
Cooling The Cake
- After the cakes are baked, remove from oven, and let them cool in the cake pan for 20 minutes. (If you release them right away, they will make a mess, and not hold together. If you leave them too long to cool completely, they will tend to get stuck in the pan. I find that 15-20 minute mark is perfect!)
- When it is time to release them from the pan, get a wire cooling rack, place on top of the cake pan, and flip the pan and cooling rack together over to release the cake from the pans. (see video)
- Let the cakes cool completely on the wire rack before frosting (at least 1-2 hours.) You may find it easier to frost if you wrap the cooled cakes in plastic wrap, and freeze.
Choose Your Buttercream
- Make the Buttercream of your choice. I have 2 options I will list.
Vanilla Bean Buttercream
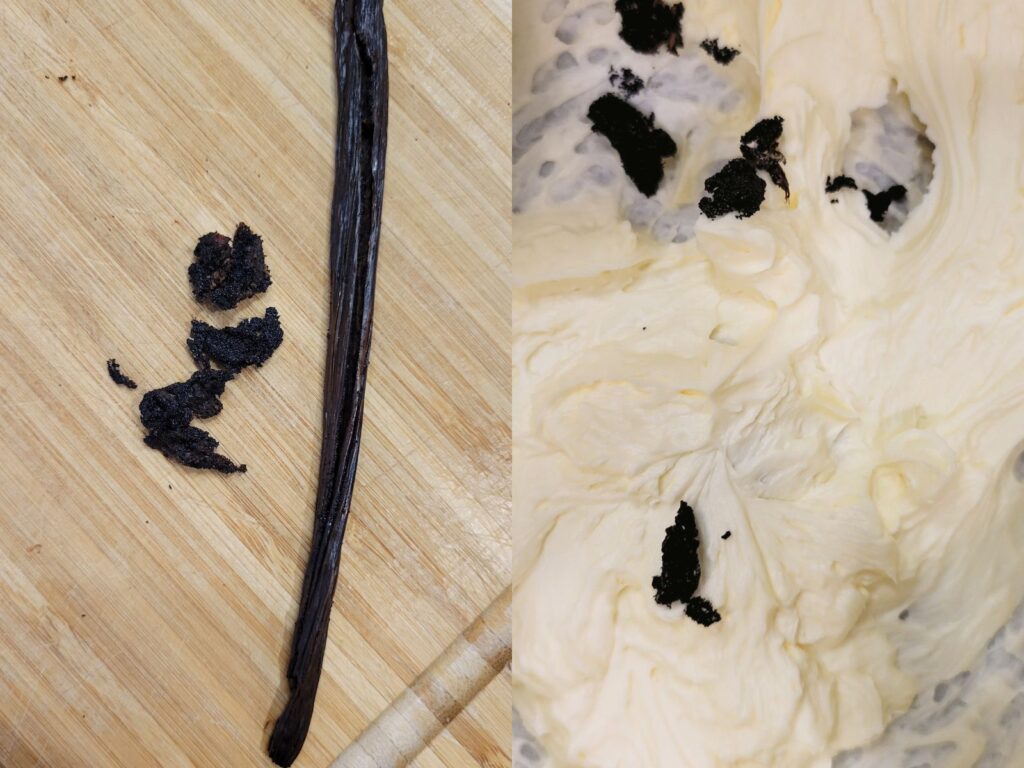
- To make the vanilla bean buttercream, in a clean bowl in a stand mixer, add room temperature butter, powdered sugar, and vanilla beans from the pod. (not the pod)
- Then, mix on low speed for a few minutes until the ingredients are incorporated. Once combined, then turn up the speed to medium-high/high and mix until light and fluffy. Scrape the sides of the bowl as needed for even mixing.
- Adjust the sweetness by adding more or less powdered sugar. Thin the buttercream buy adding whole milk a little at a time. Once, the buttercream is the sweetness, and thickness you prefer, it is done. Don’t frost the cake until it has completely cooled.

Chocolate Ganache Buttercream
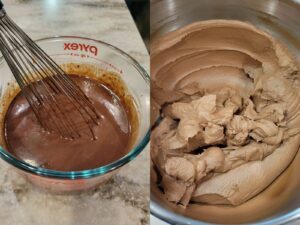
- To Make The Chocolate Ganache Buttercream, Heat the heavy cream in a saucepan or the microwave until it is hot, but not boiling.
- Put chocolate in a large heat safe bowl, and pour the hot cream over the chocolate. Do not stir it yet!
- Let the chocolate sit in the hot cream for 5 minutes (set a timer.) Then, add a pinch of salt, and whisk mixture until the chocolate has completely melted. The mixture may seem to separate, but keep stirring, and it will come together, and be a smooth chocolatey goodness!
- Cover this chocolate mixture with plastic wrap, and let it cool on the counter for 2 hours. (You can cool in the fridge, but it will need to be stirred occasionally) But, since our cakes need to cool anyways, I find that 2 hours cooling works great for both!
- Once the mixture is room temperature add it to a clean bowl in a stand mixer. Then, add softened room temperature butter, and powdered sugar.
- Start mixing in slowly, but then when everything is incorporated, turn up the speed to medium-high/high. Beat this mixture until it is light and fluffy. Scrape down the sides as needed.
- You can adjust the sweetness with the amount of powdered sugar to taste. Once light and fluffy, then the chocolate ganache buttercream is ready. Don’t frost the cake until it has completely cooled.

Assemble The Cake
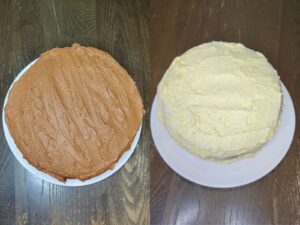
- Once everything has cooled. It is time to assemble and frost the cake. I like to use a pipping bag for this.
- I place my first cake round with the smooth pan side down.
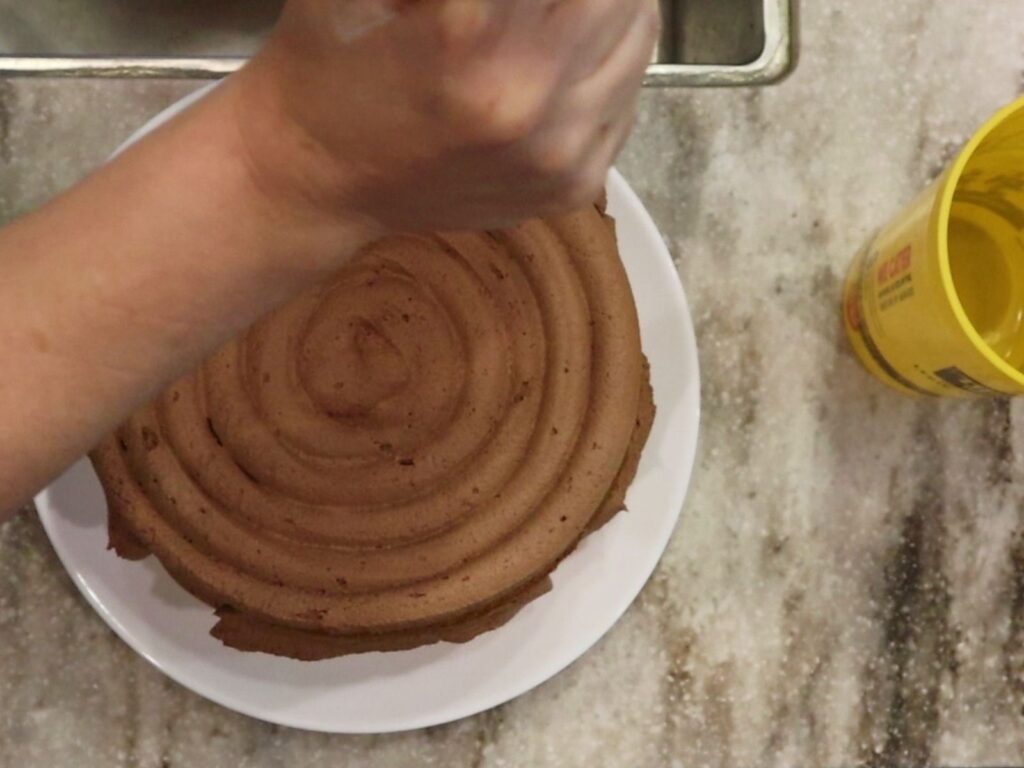
- I will put all my buttercream in a pipping bag, and then start from the center, and fill the first cake top. I typically use about 1/3 the buttercream for this center layer.
- Then, for my top cake round, I put the smooth pan side up for a nice smooth top. (You can carve off any dome of the cakes if you prefer, I usually just keep them, and fill in the gap with frosting! lol)
- Then, I pipe a thick layer starting in the center of the top of the cake, and go around on my way out covering all of the top.
- Lastly, Use a spatula or offset cake spatula if you have one to level off the top of the frosting, and let the excess overhang and fall to the sides. You can use this to go around the sides with the frosting. Decorate however you desire!
Baking Pan Alternatives
I bake my cakes in two 8×8 round cake pans, but you can bake in any baking dish you prefer. So, these are just baking time suggestions, it is important to check your cake for it’s doneness.
- 9×9 Round Pans: bake for about 5-10 minutes less.
- 9×13 Rectangle Pan: bake for 5-10 minutes longer.
- Cupcakes: bake for about 18-22 minutes.
How To Store Yellow Cake Made With Fresh Milled Flour
Store this cake covered at room temperature for 2-3 days. If you have a cake keeper, that is a great option. If not, I like to take a big mixing bowl and flip it upside down over the top of the plate of remaining cake. However, for longer storage, freeze cake up to 3 months. Defrost at room temperature for a couple hours.
Shop This Post
Grain mill Nutrimill (Use Coupon Code: Grainy for $20 Off yours)
Soft White Wheat (Small Amount)
Soft White Wheat (Bulk)
Shop At Azure Standard For Bulk Grains!
Check Out Some Of My Other Recipes
Chocolate Cake With Chocolate Buttercream
Fresh Milled Flour Recipe Index

Yellow Cake Made With Fresh Milled Flour Printable Recipe
Yellow Cake Made With Fresh Milled Flour From Scratch
Equipment
- 2 8 inch Round Pans This could be made as a flat sheet cake as well in a 9×13 baking dish. But, baking times may vary.
Ingredients
Yellow Cake Ingredients
- 2&1/2 cup fresh milled flour 300g soft white wheat
- 1/4 cup potato starch 32g you can use cornstarch, tapioca starch, etc.
- 1/2 tsp baking soda
- 1 tsp baking powder
- 1/2 tsp salt if using unsalted butter
- 1/2 cup softened butter 113g room temperature, not melted (1 stick)
- 1/2 cup olive or avocado oil 105g
- 1&2/3 cup sugar 332g
- 3 large eggs room temperature
- 1 TBSP vanilla extract
- *optional – 1 tsp almond extract
- 1 tsp white vinegar
- 1/2 cup heavy cream, half and half, or buttermilk 120g room temperature
- 1/2 cup Yogurt 120g vanilla or plain – room temperature
Vanilla Bean Buttercream Ingredients
- 1 vanilla bean sliced longwise, and scrape out the vanilla beans
- 1&1/2 cup softened butter 340g Softened, but Not Melted! (3 Sticks)
- 3 cups powdered sugar 360g to taste
- pinch of salt
- 1-2 TBSP whole milk to thin if needed 15-30g can use heavy cream or half and half also
Chocolate Ganache Buttercream Ingredients
- 12 oz Decent quality chocolate of your choice 300g can use dark, milk, etc
- 1&1/2 cup Heavy Cream 340g I used half and half in the video for a thinner ganache
- Pinch of salt
- 1/2 cup very softened butter 113g (not melted!) 1 stick
- 1&1/2 cup powdered sugar 180g to taste
Instructions
Make The Yellow Cake
- Firstly, mill the flour. I used all soft white wheat.
- Then, add potato starch, baking soda, baking powder, salt (if using unsalted butter) to the flour, and stir to combine. Set aside.
- In a stand mixer, add room temperature butter, oil, and sugar. Cream together for 3-5 minutes until it becomes lighter in color, and increases in volume. Also, make sure to scrape the sides down as needed for even mixing.
- Add eggs one at a time, mixing a little between each egg. Then, after all the eggs are incorporated, beat until mixture becomes fluffy (about 1-2 minutes more.)
- Then, add the vanilla extract, almond extract (if using), vinegar, and heavy cream. Mix until well combined. (save the 1/2 cup yogurt until you have added half the flour mixture.)
- Now, it is time to add in your flour mixture. Slowly mix in half the flour without overmixing.
- Then, add in the yogurt, mix in just a little.
- Lastly, add in the rest of the flour, and fold in with a spatula just until there is no dry flour mixture left. Don’t overmix it will deflate all the air you put in the cake, and make it tough.
- Preheat the oven to 350*F.
- Let the yellow cake batter sit and allow the fresh milled flour to start absorbing all the liquid while the oven preheats. (15 mins or so.)
- While the batter is resting, and the oven is preheating. Get two 8 inch round cake pans, and cut out parchment paper circles to line the bottom of the pan. (I like to trace the pan with a pencil to get the exact size I need.
- Then, spray or grease the pans, and place a parchment paper circle into each pan, spray or grease the pans again including up the sides. (So, you want spray or grease under and above the parchment paper.)

- Pour half the yellow cake batter into each pan. Gently tap the pans on the counter to let the top set and get any air pockets out.
- Bake for 30 minutes, watch for the edges of the cake to pull away from the pan. Once this happens the cake is done! If it overbakes even a couple minutes, it will cause the cake to be dry. (you can use the toothpick trick, and cake crumbs or oil is ok to come off on the toothpick, it is still done. Just, not done if wet cake batter comes out.)
- After the cakes are baked, remove from oven, and let them cool in the cake pan for 20 minutes. (If you release them right away, they will make a mess, and not hold together. If you leave them too long to cool completely, they will tend to get stuck in the pan. I find that 15-20 minute mark is perfect!)
- When it is time to release them from the pan, get a wire cooling rack, place on top of the cake pan, and flip the pan and cooling rack together over to release the cake from the pans. (see video)
- Let the cakes cool completely on the wire rack before frosting (at least 1-2 hours.) You may find it easier to frost if you wrap the cooled cakes in plastic wrap, and freeze.
Choose Your Buttercream
- Make the Buttercream of your choice. I have 2 options I will list.
Vanilla Bean Buttercream
- To make the vanilla bean buttercream, in a clean bowl in a stand mixer, add room temperature butter, powdered sugar, and vanilla beans from the pod. (not the pod)

- Then, mix on low speed for a few minutes until the ingredients are incorporated. Once combined, then turn up the speed to medium-high/high and mix until light and fluffy. Scrape the sides of the bowl as needed for even mixing.
- Adjust the sweetness by adding more or less powdered sugar. Thin the buttercream buy adding whole milk a little at a time. Once, the buttercream is the sweetness, and thickness you prefer, it is done. Don’t frost the cake until it has completely cooled.
Chocolate Ganache Buttercream
- To Make The Chocolate Ganache Buttercream, Heat the heavy cream in a saucepan or the microwave until it is hot, but not boiling.
- Put chocolate in a large heat safe bowl, and pour the hot cream over the chocolate. Do not stir it yet!
- Let the chocolate sit in the hot cream for 5 minutes (set a timer.) Then, add a pinch of salt, and whisk mixture until the chocolate has completely melted. The mixture may seem to separate, but keep stirring, and it will come together, and be a smooth chocolatey goodness!
- Cover this chocolate mixture with plastic wrap, and let it cool on the counter for 2 hours. (You can cool in the fridge, but it will need to be stirred occasionally) But, since our cakes need to cool anyways, I find that 2 hours cooling works great for both!
- Once the mixture is room temperature add it to a clean bowl in a stand mixer. Then, add softened room temperature butter, and powdered sugar.
- Start mixing in slowly, but then when everything is incorporated, turn up the speed to medium-high/high. Beat this mixture until it is light and fluffy. Scrape down the sides as needed.
- You can adjust the sweetness with the amount of powdered sugar to taste. Once light and fluffy, then the chocolate ganache buttercream is ready. Don’t frost the cake until it has completely cooled.
Assemble The Cake
- Once everything has cooled. It is time to assemble and frost the cake. I like to use a pipping bag for this.
- I place my first cake round with the smooth pan side down.
- I will put all my buttercream in a pipping bag, and start from the center, and fill the first cake top. I typically use about 1/3 the buttercream for this center layer.
- Then, for my top cake round, I put the smooth pan side up for a nice smooth top. (You can carve off any dome of the cakes if you prefer, I usually just keep them, and fill in the gap with frosting! lol)

- Then, I pipe a thick layer starting in the center of the top of the cake, and go around on my way out covering all of the top.
- Use a spatula or offset cake spatula if you have one to level off the top of the frosting, and let the excess overhang and fall to the sides. You can use this to go around the sides with the frosting. Decorate however you desire!
Video
Notes
*This post contains affiliate links, which means I make a small commission at no extra cost to you! As an Amazon Associate I earn from qualifying purchases. But, I will only suggest items I actually Love and Have Used!


I made this last week but turned it into a lime cake by subbing lime juice for some of the liquid and adding a bunch of lime zest. I also reduced the sugar by a lot. It was a hit!! I was glad I doubled it and made a half sheet! I only did 4 stars because I think it would have been way too sweet for us if I had followed as written. It was delicious though!
Lime cake sounds yummy!
Hi. I would love to cut back on the sugar if possible. How much sugar did you use?
I can’t wait to try this for my birthday cake in a few days after trying two of your other recipes. I will follow up and modify my review after making it, but I have a question.
I’d like to make this into a lemon cake. Do you know if adding fresh lemon juice and zest would work, and if so, what would you change, and how would I incorporate it? Thank you!
I think I might have answered this on my Facebook page, But, I am going to answer it here too incase someone else is interested. Great idea! I haven’t tried it yet, but I would start with decreasing the buttermilk from the recipe to 1/3 cup 80g. Then, add 1/4 cup lemon juice 60g. Also, I would add 2-3 TBSP of lemon zest to the batter. You could also add lemon extract or lemon essence if you want it to be more of a lemon punch. Then you could even add lemon curd as the filling and a lemon buttercream, or cream cheese frosting. Yum! It sounds great! Let me know how it goes! Happy Baking!
Just made this. Lovely flavor and definitely recommend the almond extract. Wondering if I should have sifted this to lighten the cake crumb? Is that a thing?
Yay! Glad to hear that. I haven’t needed to sift, but making sure the butter and sugar is very important, and also creaming between each egg, and making sure the liquids are nice and fluffy. This keeps the air in the cake to make it nice and fluffy, and also not adding in the flour all at once helps to not overtax the batter, and to keep the air in. I hope that helps!
Question! Can the cake be frozen and then thawed and iced at a later date? My daughters first birthday is coming up and I’m trying to do as much ahead of time as I can.
Yes, you can bake the cake and have it ready to go, let it cool completely, then freeze. Then just pull it out that morning, and make the icing/frosting. Happy early Birthday to your little one!
Could I use this recipe to make a pineapple upside-down cake?
I think it would work great! Let me know how it turns out!
It turned out great. Just have to bake it approximately 15 minutes longer. I cut the recipe in 1/2 for 1 8” pan. Next time I may use a 9×13 pan and make a larger cake.
Your recipes are so easy to follow.
Thanks
I am glad to hear it! Thanks!
Wow!! Quite possibly the best cake I’ve ever had! I used soft white wheat, coconut sugar to sweeten the batter, and half and half. The cake tasted like a graham cracker in the best way. Didn’t have almond extract but used vanilla. Really appreciate your step by step simple instructions! I didn’t make the frosting and the cake is amazing on its own. I had a little oven fiasco and tightly wrapped my bowl and stuck it in the freezer until the oven issue was remedied. The batter baker just fine once thawed. I did a 9×13 pan and 6 cupcakes with the batter. Can’t wait to try your other recipes!
Awesome! I am so happy to hear that! Thanks so much! 🙂
Hi! Can I add sourdough discard to this recipe?
Yes, generally about 1/2 cup 115g or so.
Just made this cake for my husband to celebrate us becoming debt free! It tastes INCREDIBLE! I made it in a 9 x 13 cake pan and it only took an extra 5 minutes to bake! I was dumb and took the cake out of the pan once done cooking, thinking it was going to stick to the bottom.. but it didn’t. It flopped out so fast onto the cooling rack that the whole thing broke in two! 🤦🏼♀️ But I took off some of the bigger piece and turned the sheet cake into a double tiered rectangle, so it worked out!
Overall, amazing cake recipe! This will be a go-to for our family.
That is fantastic! Congratulations! I am glad you were able to run with it! Sometimes things happen when baking! I am happy to hear it was a hit! Thanks so much! 🙂
Can I sub the yogurt for anything, eggs maybe?
You can use buttermilk for the yogurt
Hi. I put the cake in two 8-in pans and it overflowed big time in the oven. Wondering what I did wrong? Is it ok to use cane sugar?
Yes, I use cane sugar, I am not sure why it would have overflowed. Are they 8 inch cake pans, or pie pans with shorter sides maybe?
They are 8-in cake pans but are not very high and the batter almost filled the pan. I think I will try it again and make a three or four layer cake. We like our desserts less sweet. Is there anyway I could cut back on the sugar? Thank you.
Sounds like a plan. I have not tried with less sugar, but others have said using half coconut sugar has been good. Also, you can sub the buttercream for something less sweet like fresh sliced berries and whipped cream or something like that is delicious! 🙂
Hi, any idea why my cakes collapse in the center when using this recipe? I’ve tried three times with the same result. Sides of cake good but center only rises about 3/4 inch. I’m using two 8 inch cake pans. I’ve tried:
1) Verifying oven temperature with infrared thermometer
2) Different baking soda and powder, and proofed them
3) Different soft white wheat berries
4) Sifting flour
5) Not touching oven until 30 minute mark
Any suggestions would be appreciated!
Try increasing the flour by a tiny bit, each climate is slightly different from another, Here is the video it may help to see the texture of the batter you are looking for. https://youtu.be/46KkwXOjpXo
Room temp ingredients help the rise ! Eggs, butter, milk etc
Do you know if arrowroot powder is a good substitute for the cornstarch in this recipe?
Yes, you can sub the arrowroot for the cornstarch.
I made this for my husband’s birthday today and it was a hit. I followed the directions exactly since I am new to fresh milled anything, and we loved it. We did not find the cake to be sweet especially compared to store bought cakes. Thank you for the recipe! It’s definitely something I will make again!
Yay! I am so happy to hear it was a hit! Happy Birthday to your husband! 🙂
Hi, I am so glad I found this recipe, I just got my grain mill for mother’s day yesterday and I will be baking my son’s 4th birthday cake next week! I have a question about the type of sugar. If I use Panela for the sugar in the cake part of the recipe, do you think I would use the same amount? Thank you so much!
Yay! Happy Mother’s Day gift, that is wonderful! Honestly, I have not tried Panela before. I would assume it would be the same amount by weight, then blend it to a fine sugar consistency. Let me know how it goes! 🙂
Ahh, blend it to a fine sugar consistency! That is such a helpful tip, thank you!!! And thank you very much, I will definitely let you know how it goes. : )
Awesome! I am glad I could help! 🙂
This cake was so delicious! I made it last weekend for my son’s birthday, and I am making another two for his party this Saturday! I wanted to let you know a couple of things about my experience.
My cake batter was VERY thick – much thicker than yours in your video. I used heavy cream and I think that half and half or whole milk is a much better call. I will be using whole milk when I do it again.
Like someone else commented above, my cake also fell in the center a little. Not sure why, especially as adding more flour which you suggested to him would not be an option for me given how thick my batter already was!
I used milk chocolate for the ganache buttercream, but it caused my buttercream to be way too liquidy, and it just wouldn’t stiffen up no matter how long I mixed it. I had to refrigerate it to get it to be less liquid, but it would of course return to its more loose state once it was back to room temp. So I think dark chocolate is actually necessary for the ganache buttercream to work (more cocao butter, I’m guessing).
And overall it was just a bit more sweet than I would prefer, so I think I will reduce sugar in the buttercream this time, too (not in the cake itself, which I think was perfectly sweet).
I’ll let you know I go this time!
Yes, you can cut back on the sugar a bit in the cupcakes as well, and that can help.
I made a chocolate ganache buttercream cake AND a vanilla cake for my son’s birthday party on the weekend, and everyone loved them! I think I converted a few people to fresh-milled flour! The ganache worked perfectly this time using dark chocolate (70% cacao). I used half and half in the cake batter instead of heavy cream, and the batter was a little less thick but still much thicker than yours was in the video. However the finished product tasted amazing and the texture was perfect so it seems whatever the reason for that thick batter is is irrelevant?! I did reduce the sugar in the cake batter from 330g to 230g and I thought it was perfect. Thank you SO much!
I am looking for a great cupcake recipe, if I kept an eye on the baking time, do you think this would work as cupcakes as well?
Yes, we use it to make cupcakes often, just make sure not to fill the cups too much. These rise nicely and create a nice level top (not a dome) for frosting! 🙂
Tastes good but centers sunk at end of baking. Any ideas???? Used soft white wheat. Would elevation play a part??
It could be elevation, you can try to lower the oven temp by 25 degrees, and add a few minutes to the baking time
Could you swap the yogurt for dairy free yogurt or the milk for almond or coconut milk?
Yes, you can swap out those. 🙂
Please recommend what you might use for your chocolate icing when your recipe states “Decent quality chocolate”. I have Nestle semi-sweet real chocolate morsels, is this what would be good for the recipe? Thank you!
I recommend a chocolate without any additives. Chocolate chips like that tend to not melt well and have thickeners/emulsifiers in them. You can use a chocolate chip without those, or a baking chocolate bar even.
Can you explain the changes you made in this recipe from your yellow cake mix in a jar recipe?
Instead of two sticks of butter you did half butter and half oil. What is the benefit? And instead of one cup of buttermilk you’ve written half a cup of cream and half a cup of yogurt plus a teaspoon of vinegar.
Do you find that these changes make a better texture than what was written in that other recipe?
Honestly, the change for the jar cake mix was for easy of making with less ingredients. Because often times these were for gifts for people who may not bake often or bake with fresh milled flour, it was to make them a bit easier and less intimidating.
This cake is AMAZING!! I have tried a few other times to make a cake with freshly milled flour and they did not turn out. So I was SO excited that this one rose like it should, was moist and so yummy. Thank you for creating this recipe for us FMF folks!
Yay! I am so happy to hear it was a hit! Thank you! 🙂
Does this call for vanilla AND almond (if wanted). Or one or the other?
We like to use both.