
Cheesy Garlic Pull Apart Bread Made With Fresh Milled Flour
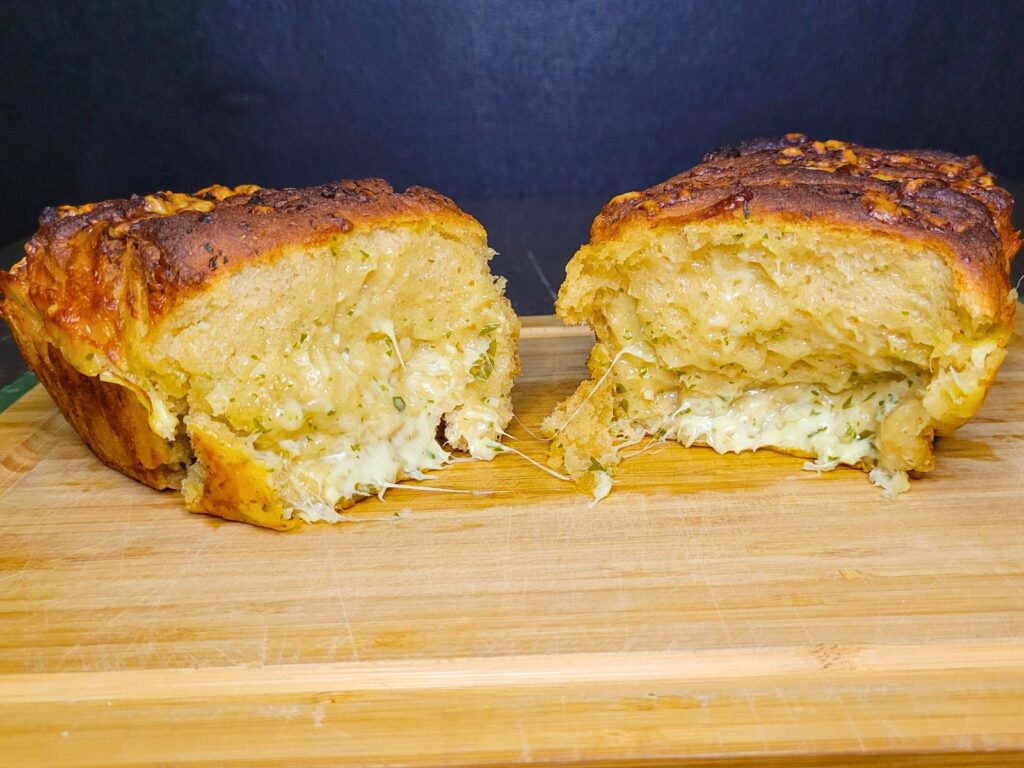
This ooey gooey cheesy garlic pull apart bread made with fresh milled flour is absolutely delicious! What a perfect bread option to accompany any dinner! I mean look at that picture, does this garlic bread even need an introduction?
Of course, to make this amazing cheesy garlic pull apart bread, you need to have an amazing garlic and herb butter to fill it with.
Making A Garlic & Herb Compound Butter From Scratch
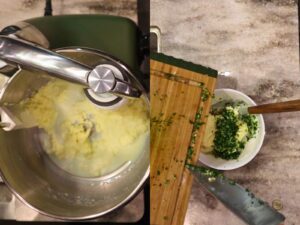
I made an amazing compound butter from scratch, but you could of course, just use softened butter. I will share the details in the recipe however, just in case you too would like to try it. Making compound butter from scratch is way easier than you can imagine. I went one step further, and made the butter from scratch too! A stand mixer makes this job extremely quick and easy. I have a review video on my Ankarsrum mixer HERE, you can see me using in the photos. Grab Yours HERE.

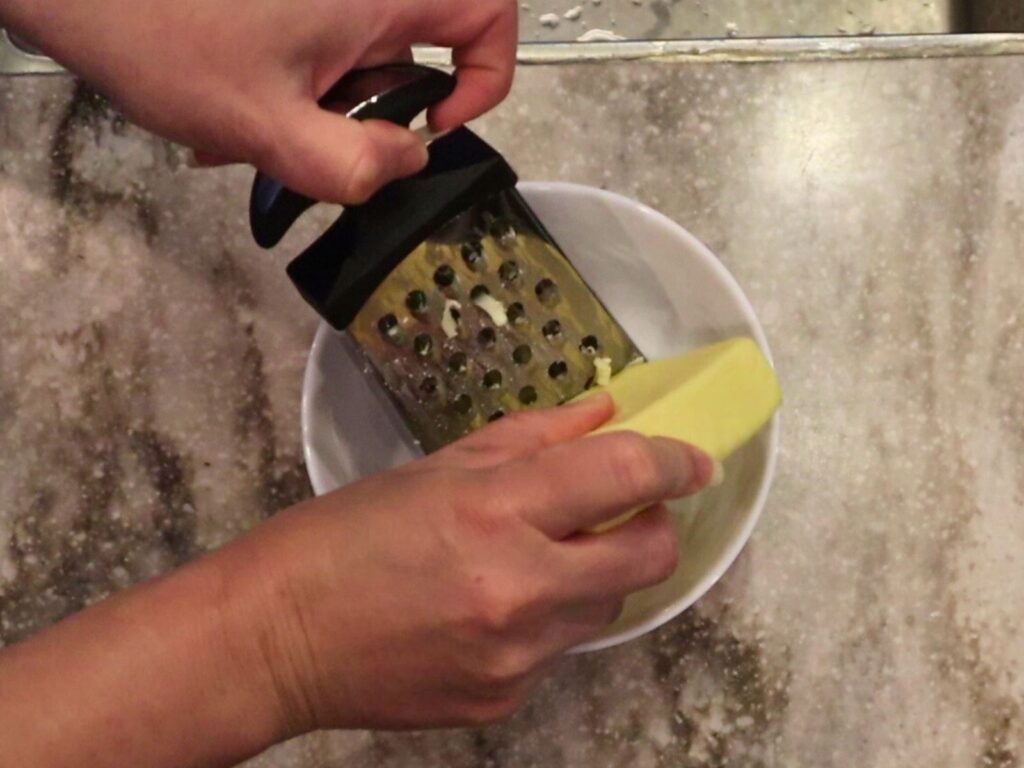
Is Pre Shredded Cheese Just As Good As Shredding Cheese Myself?
No! And here’s why. Pre-shredded cheese is coated with anti-caking agents, which causes the cheese to clump up and not melt to that ooey-gooey consistency that we all love! Admit it, you love to watch those mouth watering cheese pull videos late at night! LOL.
Oh my goodness, if you have never shredded your own cheese, then once you try fresh shredded cheese, I don’t think you will ever go back to buying the bagged shredded cheese again! It really only takes a couple minutes, just be careful for your knuckles! LOL. Plus that added workout shredding the cheese, just makes you even hungrier to enjoy this garlic pull apart bread! (OR just enlist one of your kids or grandkids to to this job *wink.)
Ingredients To Make Cheesy Garlic Pull Apart Bread With Fresh Milled Flour
Dough Ingredients
- 1&1/2 cup warm water 354g
- 1 TBSP sugar or honey 13g
- 2 TBSP Light Extra Virgin Olive Oil 26g
- 1&1/2 tsp salt
- 3.5- 4 cups fresh milled flour 460g (I like to mill 330g hard white wheat, & 130g whole Kamut to get this flour)
- 2 tsp Instant Yeast
Ingredients For The Compound Butter
- 1 cup softened salted butter 230g (2sticks) OR 16oz heavy cream & a pinch of salt if making from scratch. *(I will add my recipe for the homemade compound butter if making from scratch.)
- 4-6 cloves garlic (peeled and minced)
- 1-2 TBSP minced fresh parsley
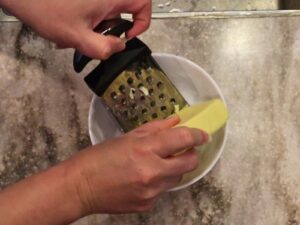
- 80z block of mozzarella cheese (shredded)
Instructions To Make Fresh Milled Flour Garlic Pull Apart Bread
Making The Garlic & Herb Compound Butter From Scratch
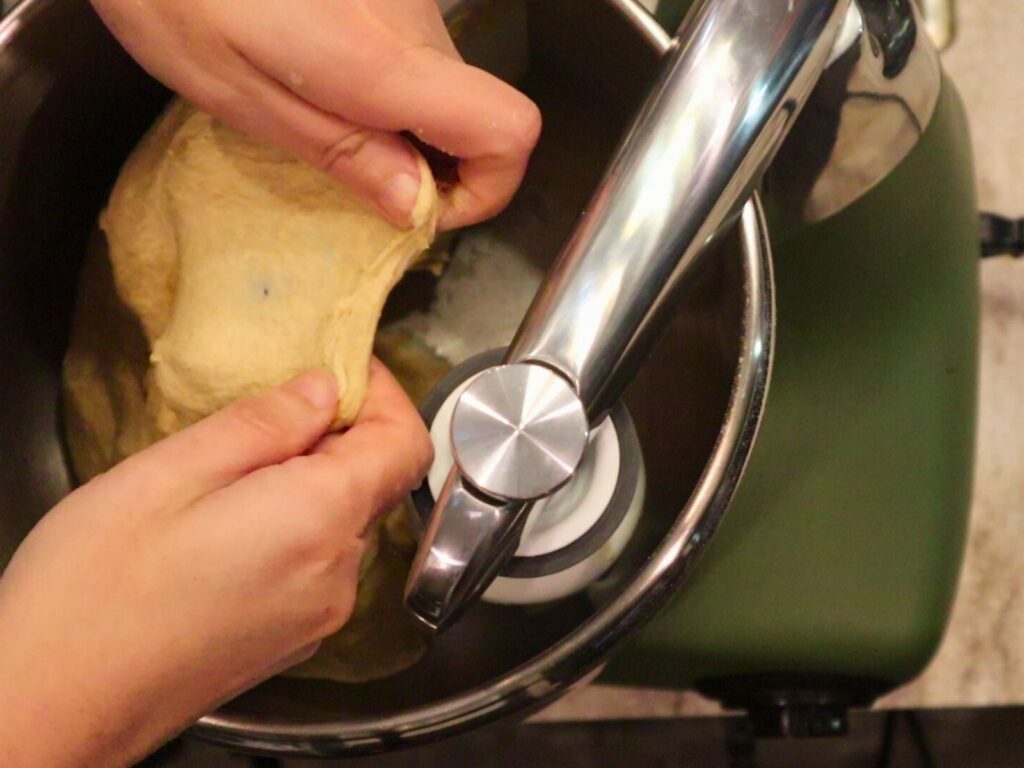
- Place 16 oz of heavy cream into a stand mixer, start slow, then turn the speed up. The cream should turn to whipped cream first, so keep going. It will eventually turn into a thicker, yellower butter consistency that separates. The solid parts is the butter, and technically the liquid is butter milk. (You can save the butter milk for another recipe, or use it in this dough in place of the water.)
- Pour off the liquid, and squeeze and rinse the solid butter a few times until the water runs clear.
- Then, mince garlic and parsley (you can add other herbs if you desire.) Add these to the butter along with a pinch of salt. Mix until incorporated.
- Cover, then set the compound butter to the side while you make the dough. This will allows the flavors to penetrate the butter throughout.
Making The Dough
- Firstly, mill the flour
- Warm the water to around 90*F, no warmer as this can kill your yeast.
- Then, in a stand mixer, add warmed water, salt, sugar, olive oil, and flour. Mix until all incorporated.
- Cover, and let sit for at least 15 minutes to allow the fresh milled flour to absorb the water. This autolyzing step will allow the fresh milled flour to start absorbing the liquid, and the bran to soften.
- Then, after this rest period, add the yeast, and mix to incorporate.
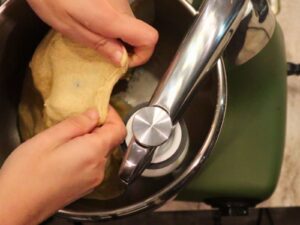
- Once, incorporated, start the kneading process. (This kneading time can vary from 7-25 minutes with fresh milled flour.) Just make sure to check on it, once it becomes nice and stretchy you are there!
- Knead until the dough is nice and stretchy.
- Cover the dough, and let rise for 1 hour, or until doubled.
Shaping The Garlic Pull Apart Bread Dough
- Prepare your bread tins with parchment paper.
- After the dough has doubled in size, take it to a lightly oiled work surface. Lightly oil your hands, and bench scraper as well.
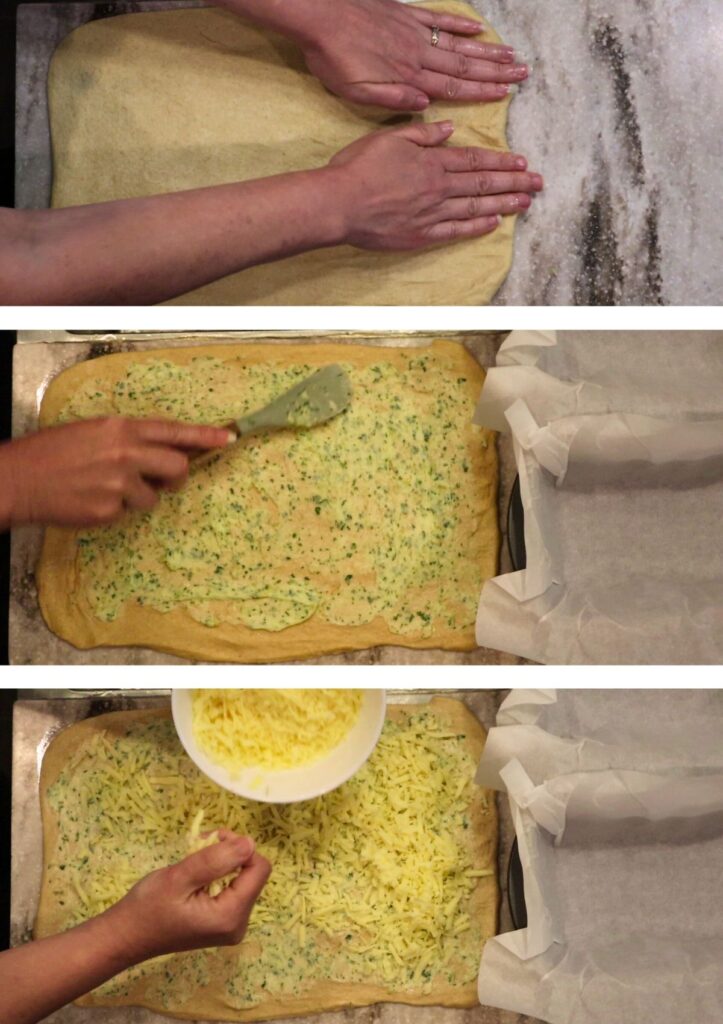
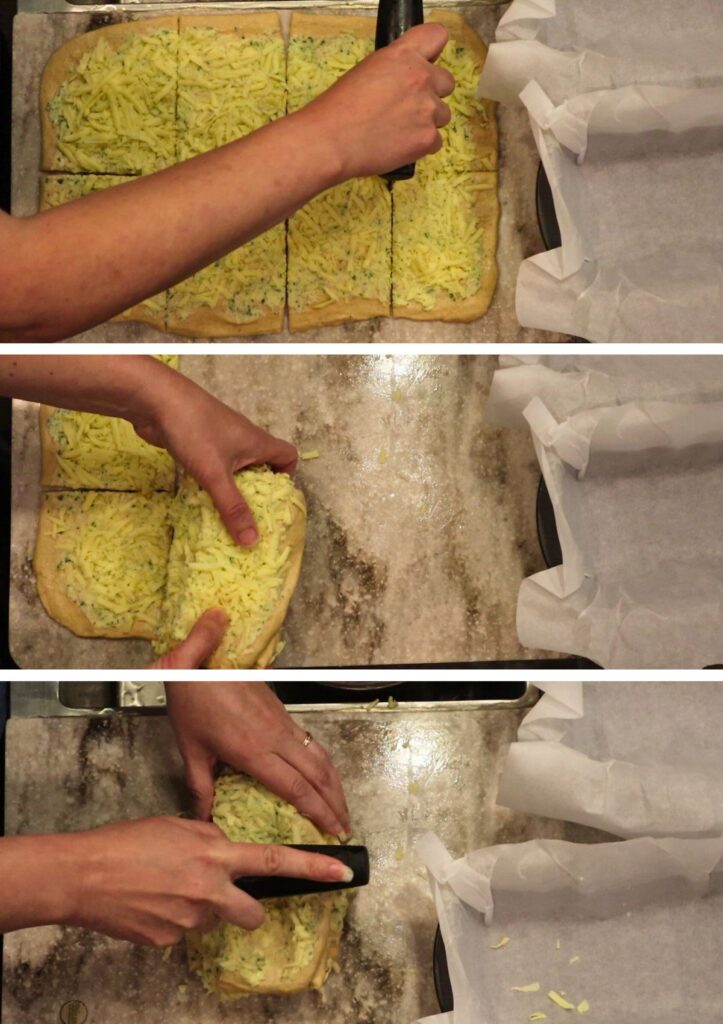
- Divide the dough in half, and flatten one half into a rectangle as if you were going to make cinnamon rolls.
- Then spread a little less than half the butter mixture all over the surface of the flattened dough. (I like to leave a little extra butter mixture to rub on the tops of the bread too.)
- Sprinkle on half the shredded mozzarella cheese. Then, lightly press the cheese into the butter so it sticks.
- Cut the dough into rectangles, and then stack the rectangles on top of each other. (*See photo or video)
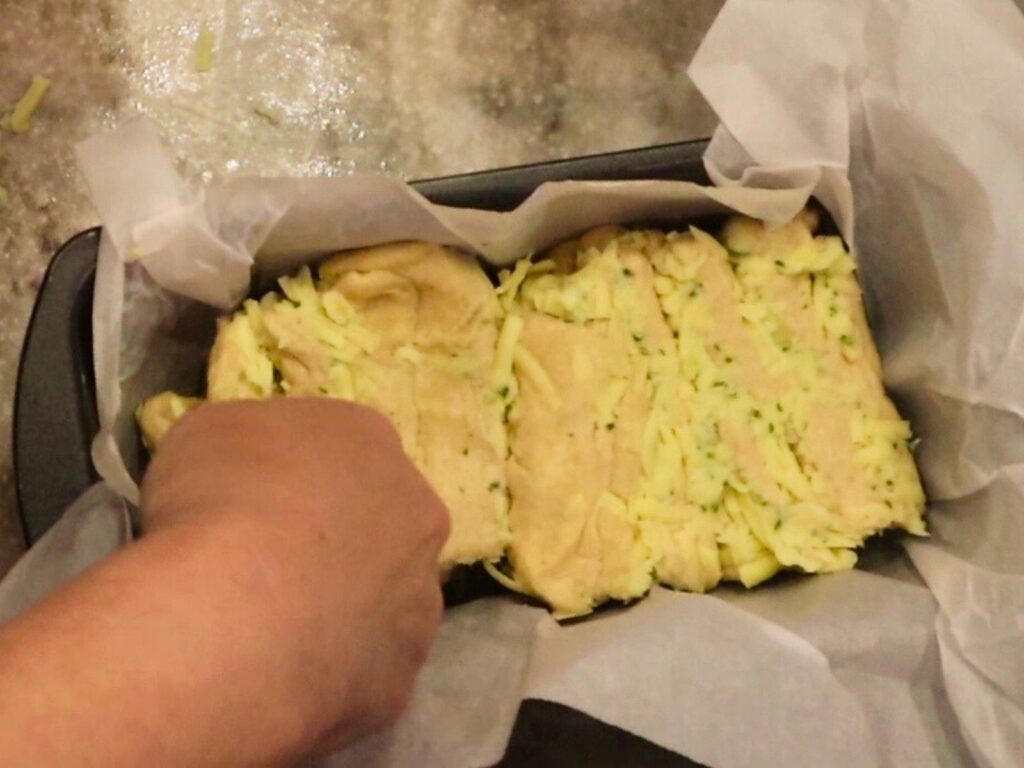
- Then, place the stack sideways into the prepared bread pan vertically (think opposite of lasagna layers.) Gently press into the pan to fill. (We want to leave some room for expansion during the second rise.
- Repeat this procedure with the other piece of dough, then lightly rub the tops of each loaf with the leftover butter mixture.
- Cover the loafs, and then let them rise for 40-60 minutes until the dough looks puffy & risen (It may not completely double, that’s ok.)
Baking
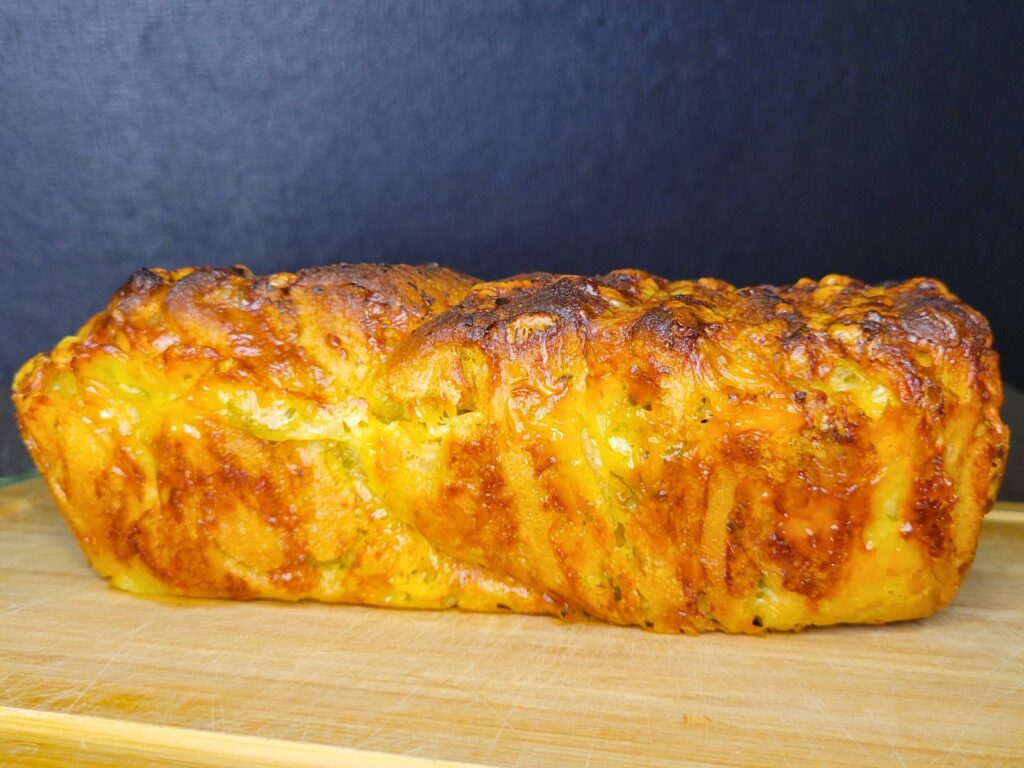
- Preheat oven to 350*F during the end of this second rise period.
- Bake for 30-40 minutes or until the internal temperature of the center of the loaf reaches 190*F.
- Remove from oven after it reaches that temperature. Then, carefully remove from pan to a wire cooling rack.
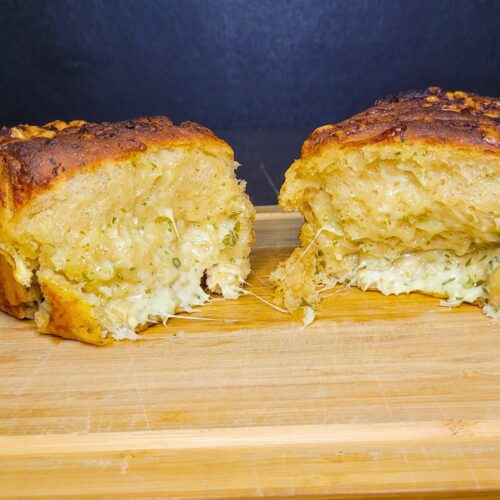
- This bread is best served still a bit warm, so you get the cheesy ooey-gooey deliciousness!
Bread Pan Size Tips
My recipes call for the smaller 4×8 bread loaf pans, because I have a tiny oven! lol. Even the 4.5×8.5 pans are a bit larger, crazy how just that half inch each way can make such a difference! So, if you only have the larger pans, I recommend to x1.5 my recipes if you are looking for a large high rise loaf of bread. The large pans will definitely still work, the loafs will just be a bit smaller. For 5×9 pans, you will want to double the recipe.
How To Store This Fresh Milled Flour Cheesy Garlic Pull Apart Bread
To store this fresh milled flour cheesy garlic pull apart bread loafs, keep in an airtight container, or bag. Then, keep on the counter for 2-3 days. For longer storage, place in a freezer safe bag and freeze for up to 4 months. (Make sure the loaf has cooled completely before freezing, best results to freeze the same day as it is baked.) To thaw, sit on the counter, and let come to room temperature.
Shop This Post
Grain Mill Nutrimill (Use Coupon Code: Grainy for $20 Off yours)
Hard White Wheat (Small Amount)
Kamut (Small Amount)
Kamut & Hard White Wheat – 10% Off With This Link!
Shop At Azure Standard Bulk Grains
Checkout Some Of My Other Recipes!
Garlic Cheese Biscuits (Red Lobster Copy Cat)
Brown Bread (Cheesecake Factory Copycat)
Fresh Milled Flour Recipe Index

Cheesy Garlic Pull Apart Bread Made With Fresh Milled Flour Printable Recipe
Cheesy Garlic Pull Apart Bread Made With Fresh Milled Flour
Equipment
- 2 4×8 bread pans *see notes for other size bread pans.
Ingredients
Ingredients To Make The Dough
- 1&1/2 cup warm water 354g
- 1 TBSP sugar or honey 13g
- 2 TBSP Light Extra Virgin Olive Oil 26g
- 1&1/2 tsp salt
- 3.5- 4 cups fresh milled flour 460g (I like to mill 330g hard white wheat, & 130g whole Kamut to get this flour)
- 2 tsp Instant Yeast
Ingredients To Make The Garlic & Herb Compound Butter
- 1 cup softened salted butter 230g OR 16oz heavy cream & a pinch of salt if making from scratch. 2sticks *(I will add my recipe for the homemade compound butter if making from scratch.)
- 4-6 cloves garlic peeled and minced
- 1-2 TBSP minced fresh parsley you can add other herbs if desired
- 8oz block of mozzarella cheese shredded
Instructions
Make The Garlic & Herb Compound Butter From Scratch
- Place 16 oz of heavy cream into a stand mixer, start slow, then turn the speed up. The cream should turn to whipped cream first, so keep going. It will eventually turn into a thicker, yellower butter consistency that separates. The solid parts is the butter, and technically the liquid is butter milk. (You can save the butter milk for another recipe, or use it in this dough in place of the water.)
- Pour off the liquid, and squeeze and rinse the solid butter a few times until the water runs clear.
- Then, mince garlic and parsley (you can add other herbs if you desire.) Add these to the butter along with a pinch of salt. Mix until incorporated.
- Cover, then set the compound butter to the side while you make the dough. This will allows the flavors to penetrate the butter throughout.
Make The Dough
- Firstly, mill the flour
- Warm the water to around 90*F, no warmer as this can kill your yeast.
- Then, in a stand mixer, add warmed water, salt, sugar, olive oil, and flour. Mix until all incorporated.
- Cover, and let sit for at least 15 minutes to allow the fresh milled flour to absorb the water. This autolyzing step will allow the fresh milled flour to start absorbing the liquid, and the bran to soften.
- Then, after this rest period, add the yeast, and mix to incorporate.
- Once, incorporated, start the kneading process. (This kneading time can vary from 7-25 minutes with fresh milled flour.) Just make sure to check on it, once it becomes nice and stretchy you are there!
- Knead until the dough is nice and stretchy.
- Cover the dough, and let rise for 1 hour, or until doubled.
Shaping
- Prepare your bread tins with parchment paper.
- After the dough has doubled in size, take it to a lightly oiled work surface. Lightly oil your hands, and bench scraper as well.
- Divide the dough in half, and flatten one half into a rectangle as if you were going to make cinnamon rolls.
- Then spread a little less than half the butter mixture all over the surface of the flattened dough. (I like to leave a little extra butter mixture to rub on the tops of the bread too.)
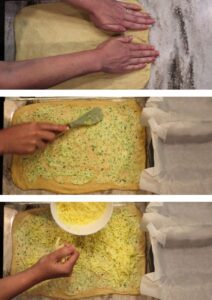
- Sprinkle on half the shredded mozzarella cheese. Then, lightly press the cheese into the butter so it sticks.
- Cut the dough into rectangles, and then stack the rectangles on top of each other. (*See photo or video)

- Then, place the stack sideways into the prepared bread pan vertically (think opposite of lasagna layers.) Gently press into the pan to fill. (We want to leave some room for expansion during the second rise.

- Repeat this procedure with the other piece of dough, then lightly rub the tops of each loaf with the leftover butter mixture.
- Cover the loafs, and then let them rise for 40-60 minutes until the dough looks puffy & risen (It may not completely double, that’s ok.)
Baking
- Preheat oven to 350*F during the end of this second rise period.
- Bake for 30-40 minutes or until the internal temperature of the center of the loaf reaches 190*F.
- Remove from oven after it reaches that temperature. Then, carefully remove from pan to a wire cooling rack.
- This bread is best served still a bit warm, so you get the cheesy ooey-gooey deliciousness!

Video
Notes
*This post contains affiliate links, which means I make a small commission at no extra cost to you! Also, as an Amazon Associate I earn from qualifying purchases. But, I will only suggest items I actually Love and Have Used!


I made this recipe to go with a lasagna. Mine was not as pretty as yours but everyone loved it!
I am so happy to hear it was a hit! That is the most important part, who cares what it looks like! Thanks so much for sharing!
This was absolutely delicious and so fun to make and eat. Thank you!
Yay! So happy to hear that! Thanks!
First time using yeast rather than sourdough. I heated the water to 90 degrees but usually autolyse closer to an hour. My question is, even at a 15 minute autolyse, won’t the water cool too much since we are adding the yeast later? Thank you!
I have never had a problem with the water getting too cold. With the bowl covered it tends to keep the warmth in. Even if the room cools to room temperature, it will still rise, it will just take a tad bit longer. 🙂
This bread was AMAZING! Brought it to a friend’s and everyone loved it. Still tasted great when I microwaved leftovers the next day. Thank you so much for making the video. I got lost reading the recipe and thought “I could figure this out so much faster if there was a video”… and there was! Also the info on pan dimensions was so helpful, the less math for me the better!
Yay! So happy to hear it was a hit! Glad I could help with the video! Thanks so much! 🙂
Hi Kara!
I have been making your four ingredient bread a lot. Do you think I could use that recipe but add this butter compound and mozzarella for a cheesey pull apart bread? That way I can kill two birds with one stone? (I love tripling your sandwich bread recipe and using it for rolls, cinnamon rolls or cinnamon swirl bread and then of course the regular bread.)
Absolutely! That dough would work great for this! Let me know how it goes. 🙂
This does not look healthy at all… oh well, you can’t eat healthy everyday! I’m going to make this today!
If you use healthy ingredients it can be! 🙂 grass fed butter, fresh garlic and herbs, and of course fresh milled flour this recipe is packed with nutrition. But, yes if you are talking calories, I am sure it is not low on the chart! Let me know how it goes! 🙂
Would fresh mozzarella work, or does it need to be a block?
I would assume fresh would work, but I have not tried it, may have to decrease the moisture just a bit in the dough. If you give it a try , let me know how it goes. 🙂
My first time I made this with fresh Mozzerella and now I swear by it. It’s delicious!
Yes! It’s got the perfect cheese pull! 🙂
I’ve made this and it’s amazing! Do you think it would be if after assembled and doing the final rise, I stuck it in the fridge for 24 hours before baking?
I would recommend to make it and put it in the fridge covered before the second rise. Then, the next day put it on the counter to come to room temp (usually about 2 hours) then bake as directed. 🙂
Love all your recipes I’ve tried so far! Looking to make a garlic bread to go with lasagna. Can this recipe be made the same, just without the cheese? Or maybe half the amount?
Yes, you can use the cheese or not! 🙂
Great, thank you!
Could you make these into bread rolls instead of the loaves?
Yes, I love to use my bread, roll, and bun recipes interchangeably!:)
Love this recipe and I’m hoping to make it for a Christmas party is this something I could freeze and reheat before the party after baking?
You can make the dough the night before, let it rise once, punch the dough down and refrigerate. The next day you can assemble and let it come to room temperature (usually about 1-2 hours) Then bake fresh. OR you could make it completely, and freeze. Let the loaf thaw on the counter night night before covered. Then the next day, you can cover or wrap in foil and bake at 200*F for about 10-12 minutes or until warm
Thank you!
I have 9 x 5 pans, so I doubled this recipe because we did Italian for Christmas dinner. Needless to say, the first loaf was gone before we even served the main dish, and everyone made sure they got to take home what was left of loaf 2. The dough was incredible to work with, the recipe was incredible, and this is going to be a permanent fixture for me for fresh garlic bread. Spectacular bread recipe!
Awesome! I am so happy to hear that it was a hit! Thanks so much! 🙂
What speed do you usually run the ankarsrum mixer for your bread?
I usually use between 2-3 o’clock on the dial for kneading bread
WOW…looks awesome….can I sub my sourdough starter for the yeast in this recipe?
Yes, you could add about 1/2 cup sourdough starter 115g and omit the yeast. Hold back some of the liquid form the recipe and only add it in if the dough seems tight or dry.
Do you think I can make it completely the night before an event at 8am?
You can make it up until the second rise, and put it covered in the fridge the night before. The next morning put in a warm place on the counter to come to room temp. Then bake.