
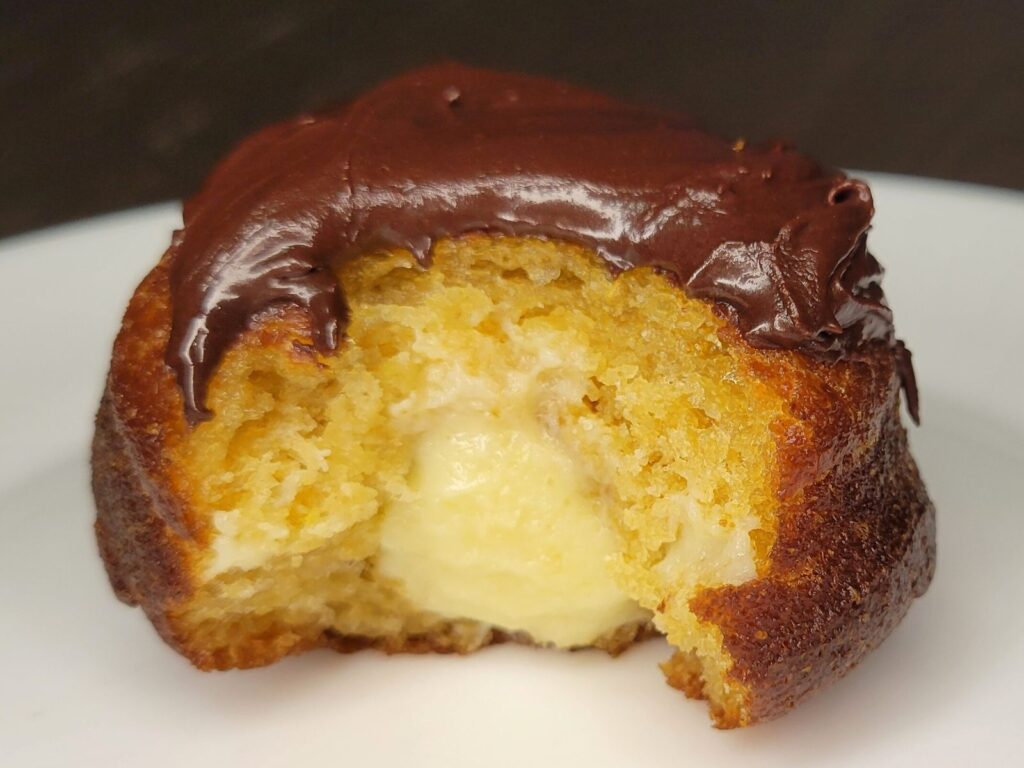
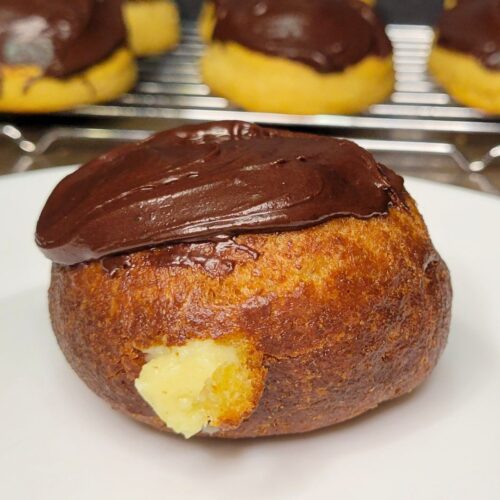
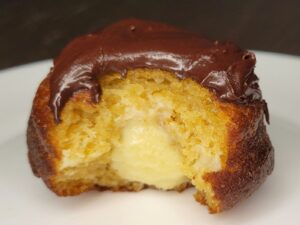
Boston Cream Donuts Made With Fresh Milled Flour
Oh my goodness these Boston Cream Donuts made with fresh milled flour are so good, you have to give them a try! Yes, you read that correctly…Raised Yeast Donuts…with Freshly milled flour! It can be done, and it is a match made in heaven. This is a Basic Yeast Donut Recipe with a Boston cream pie twist! You can use this fresh milled flour donut dough to make almost any yeasted donut recipe, so buckle up, this one you don’t want to miss!

These Boston Cream Pie inspired donuts are amazing. But, if filled donuts topped with a chocolate icing aren’t your style, then I have plenty of other donut recipes for you! HERE Also, there are many baked donut recipes there as well.
Components To Make Boston Cream Donuts With Fresh Milled Flour
The Yeast Donut Dough Recipe
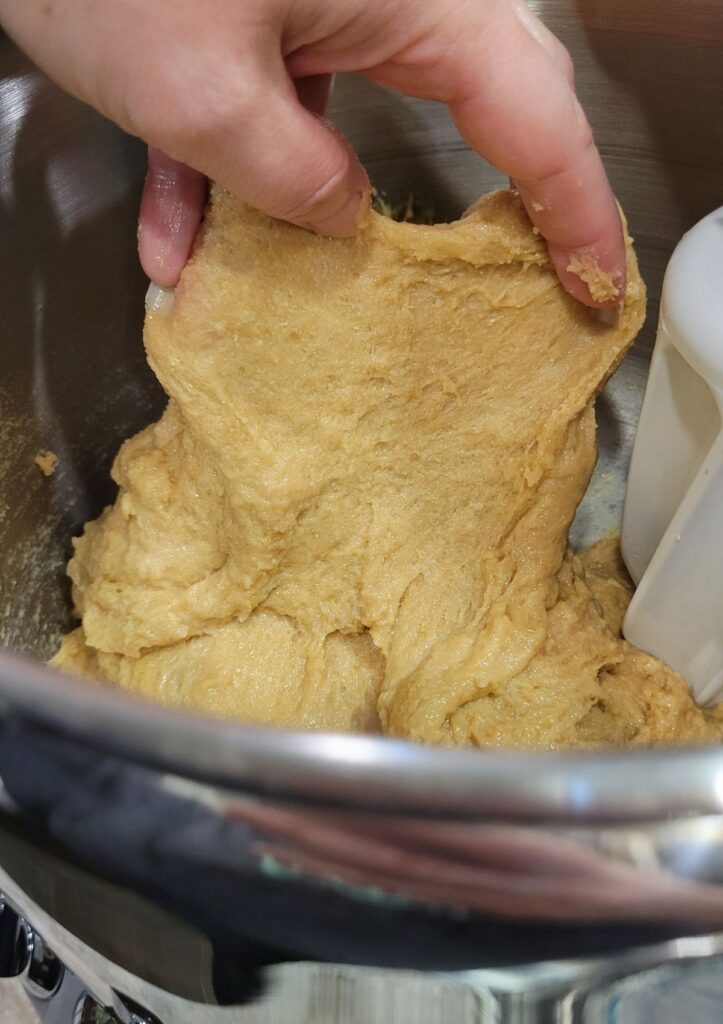
This is a basic yeast donut dough recipe you can make with fresh milled flour, and try it out with countless other donut recipes! So, when kneading, you are looking for a nice stretchy dough. Then, you can move on to the next step in the recipe.
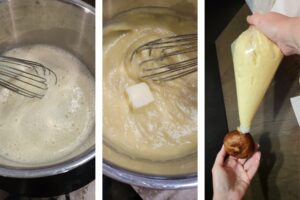
The Cream Filling
This is basically my pastry cream filling recipe. So, for more details you can find that post HERE. If you have never made pastry cream before, don’t let this scare you. I have a video tutorial for it, and we can make it together, HERE.

The Chocolate Topping
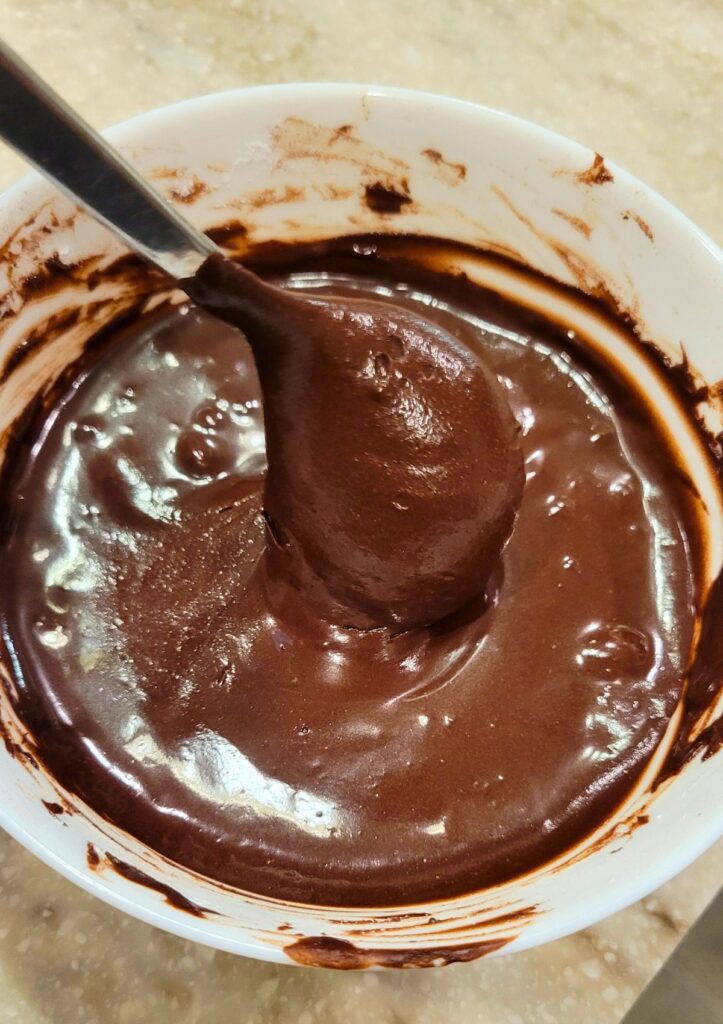
This chocolate topping is super quick to throw together, it is a basic chocolate icing, but it tastes oh so delicious! This is a thicker icing that will harden a bit as it sits.
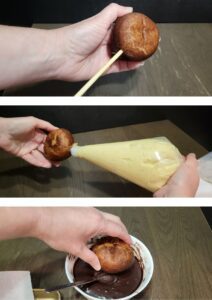
How To Fill A Donut
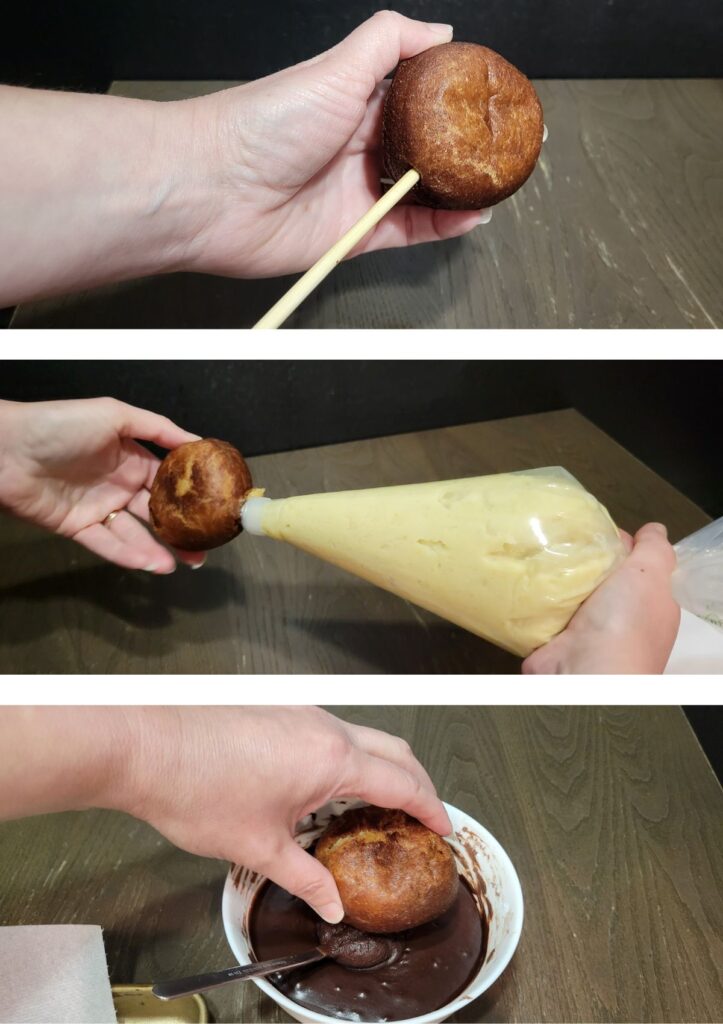
Filling donuts can be tricky, but with a few simple tools, it makes the process go so much smoother. I like to us a skewer or a chop stick to push into one side of the cooled donut to make a small hole. Then I move it around in a circular motion to make a larger pocket inside the donut without puncturing through the sides of the donut. Then, I will use my piping bag to fill the donut until that pocket is full of cream.
Donut Filling Alternative Flavor Options
This Boston Cream Donut recipe specifically calls for a cream or custard filling, and a chocolate icing topping. But, you can use this donut dough recipe for so many other filled donuts as well. There are countless flavor options for filling donuts! Here are some ideas to get your creativity started:
- Jam or Jelly: Classic choices include strawberry, raspberry, blueberry, or even apricot.
- Custard or Pudding: Vanilla, chocolate, or any flavored custard or pudding.
- Cream: Whipped cream, pastry cream, or flavored creams like chocolate or coffee would be so good.
- Nutella: A rich, creamy hazelnut-chocolate spread inside.
- Peanut Butter: Smooth or crunchy, paired with chocolate or even jelly for a PB&J-inspired donut.
- Caramel: Either as a sauce, topping, or a thick caramel filling.
- Marshmallow Fluff: Light and airy, with a sweet, marshmallow-y flavor. (I’m thinking Smore’s…)
- Lemon Curd: Tangy and citrusy, perfect for a bright burst of flavor.
These are just a few options to get you started, but donut fillings are limited only by your imagination! Let me know in the comments below which is your favorite!
How To Fry A Donut
Frying donuts can be intimidating, and I am not going to lie, I don’t like frying any foods. I do love eating the fried delicacies, but not making them. So, my husband was willing to do this step for us! Yay! Thanks Matt! You can decide which oil you would like to use for this, but we chose to use Peanut oil.

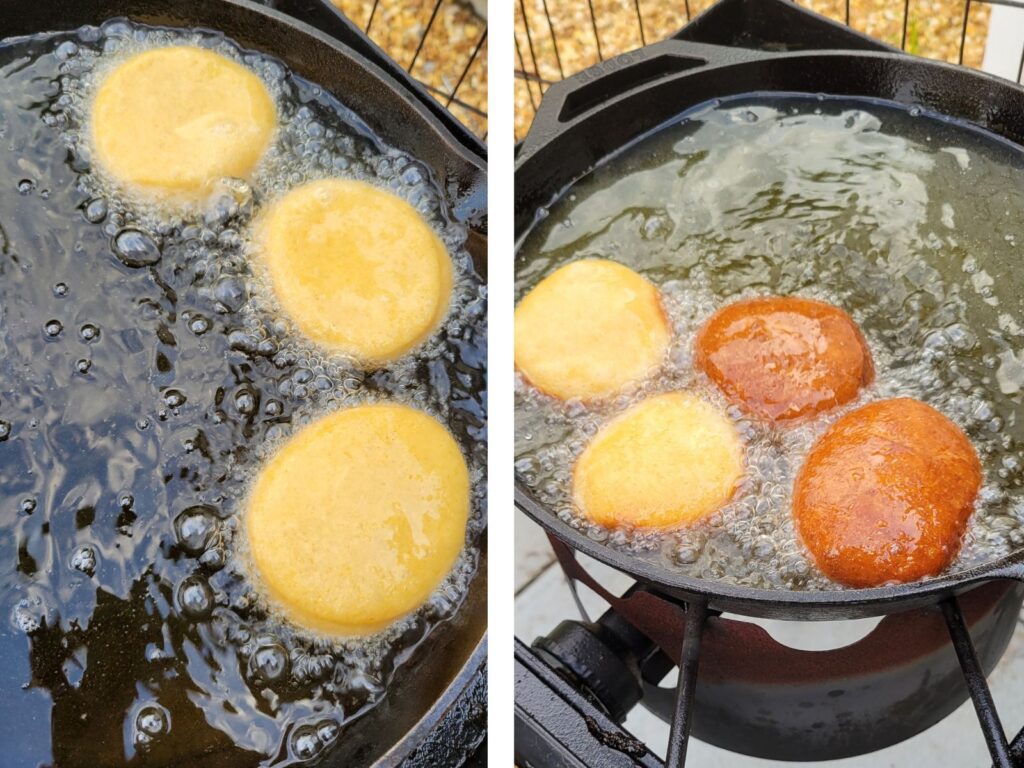
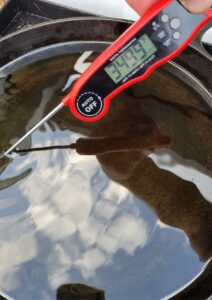
The most important part of frying is to preheat your oil at the temperature you want to fry your donuts, in this case 350*F. I recommend using a high heat safe digital thermometer that can test the temperature of the oil for you. Because, there are many variables that may cause your oil to cool down during the cooking process. If your oil is too hot, the outside of your dough will burn, and the inside will be raw. If your oil is too cold, it will absorb a lot of the oil, be greasy, and never brown. So, holding that perfect cooking oil temperature is pretty important, as best as you can.
Ingredients To Make Fresh Milled Flour Boston Cream Donuts
The Fresh Milled Flour Boston Cream Donuts Dough
- 3&1/3 cup Fresh Milled Flour 410g (I used 320g hard white wheat and 90g of Kamut) *see notes for alternative wheat varieties.
- 1/4 tsp baking soda
- 1 tsp salt
- 1/2 cup water 120g
- 1/2 cup whole milk 120g
- 1/2 cup sugar 100g
- 1 large egg
- 1/4 cup softened unsalted butter 57g
- 2 tsp instant yeast
- *oil for frying (We used about 1&1/2 quarts of peanut oil)
- 2 cups of filling – see link to my Pastry Cream Filling HERE.
Ingredients For The Chocolate Icing
- 1&1/2 cup powdered sugar 180g
- 1/2 cup cocoa powder 45g
- pinch of salt
- 1 tsp vanilla extract
- 1/4 cup whole milk 60g
Instructions To Make Fresh Milled Flour Boston Cream Donuts
Make The Donut Dough
- Firstly, mill the wheat into flour.
- Add the baking soda, and salt to the freshly milled flour, and mix to incorporate.
- In a microwave safe bowl, warm the water and milk for about 30 seconds, until warm but not too hot to touch.
- In stand mixer, add the warmed water and milk, then sugar, and egg. Stir these wet ingredients to combine.
- Then, add the flour mixture (dry ingredients) to the stand mixer. Mix until incorporated, and there is no dry flour left. Cover, and let sit for 15 minutes.
- After the dough has had time to rest, (autolyze step) then it is time to put in the yeast, and then stir to combine.
- Now that the yeast has been incorporated, it is time to add the very softened (but not melted) butter. Add the butter 1 TBSP at a time while mixing the dough. Scrape down sides as needed.
- Start the kneading process, and knead until the dough is nice and stretchy. This kneading time varies depending on your mixer, wheat, and environment, it could take anywhere from 7-20 minutes. It is best to just go by touching your dough, and looking for a nice stretch. *note the dough will be quite tacky.
- After the dough is nice and stretchy, spray the dough ball, and bowl with some nonstick oil.
- Then, cover the bowl and allow the dough to rise until double. This should take somewhere between 1-2 hours.
- While the dough is rising, prepare your pastry cream (It will need to cool before using.) or whatever filling you want to use.
Rolling & Cutting The Donuts
- Prepare 2 baking sheets with parchment paper.
- During the end of the rise period, prepare a clean work surface with a bit of oil.
- After the dough has doubled, take the dough out to your prepared work surface, and lightly oil your rolling pin as well.
- Then, gently roll the dough out to about 1/2 inch thickness. Using a 3 inch round cookie cutter (or biscuit cutter) cut into circles, and place on a parchment paper lined baking sheet.
- Collect any scraps of dough left, and reroll, then cut out again. Repeat until the dough is gone.
- Spray the dough with a bit of oil, then cover with plastic wrap. Allow the donuts to rise again for 30-45 minutes, they should appear puffy at the end of the rise.
Frying The Donuts
- Prepare 2 baking sheets with paper towels, and cooling racks on top of those. This is where you will put your donuts after frying.
- Pour about 2-3 inches of frying oil into the bottom of your pan.
- Preheat your oil towards the end of this second rise. Make sure to preheat your oil at the 350*F temperature. Using a digital heat safe thermometer, test the temperature of your oil before frying your donuts.
- Fry donuts at the 350*F for about 1-3 minutes until golden brown, then flip the donut and fry for another 1-3 minutes. Don’t put too many in the pan at once, as this will cool down your oil too quickly. Also, make sure your oil is back up to temperature before putting in another batch.
- Once they are golden brown on both sides, place them on a cooling rack with paper towels underneath to catch any excess oil. Repeat until all donuts are fried.
- Allow the donuts to cool before filling or dipping in the icing.
Prepare the chocolate icing
- Place powdered sugar, cocoa powder, and a pinch of salt in a large bowl.
- Then, add vanilla and milk, slowly whisk together until the icing is smooth.
- It should be thick and spoonable, but not like a paste. If too thick, add a tsp more milk at a time. If it is too thin, add a bit more powdered sugar. (You don’t want it to drizzle off the spoon.)
- After the Donuts have cooled it is time to assemble them.
Assembling The Boston Cream Donuts
- Fill a piping bag with a small round tip and fill bag with pastry cream (make sure it has cooled.) *See notes for alternative filling instructions without a piping bag.
- Using a long skewer or chop stick, poke a hole in one side of each donut, but not all the way through. Gently move the skewer/chopstick is a small circular motion to make a small pocket, being careful not to tear through the donut.
- Place the filled piping bag in the hole, and squeeze the bag to fill the pocket with cream. You will feel a bit of resistance when the donut is full.
- Repeat with each donut until they are all filled.
- Once the donuts are filled, then dip the top of the donut (or spoon on the icing) into the chocolate icing. Allow the icing to set for 15-20 minutes.
- Lastly, enjoy!
How To Store Your Fresh Milled Flour Boston Cream Donuts
These Boston Cream Donuts made with fresh milled flour are best enjoyed the same day. You can place them in the fridge covered for a day, but it may dry them out. For longer term storage, I recommend freezing any excess donuts the same day they are made. Then let them sit at room temperature for 1-2 hours to thaw.
Shop This Post
Nutrimill Harvest Grain Mill – Use Coupon Code: Grainy for $20 Off yours
Hard White Wheat (Small Amount)
Kamut (Small Amount)
Bulk Wheat Berries & Grains Save 10% OFF with this link
Checkout Some Of My Other Recipes
Fresh Milled Flour Recipe Index
Boston Cream Donuts Made With Fresh Milled Flour Printable Recipe
Boston Cream Donuts made with Fresh Milled Flour
Ingredients
Ingredients To Make the Yeast Donut Dough
- 3&1/3 cup Fresh Milled Flour 410g I used 320g hard white wheat and 90g of Kamut *see notes for alternative wheat varieties.
- 1/4 tsp baking soda
- 1 tsp salt
- 1/2 cup water 120g
- 1/2 cup whole milk 120g
- 1/2 cup sugar 100g
- 1 large egg
- 1/4 cup softened, unsalted butter 57g
- 2 tsp instant yeast
- *oil for frying We used about 1&1/2 quarts of peanut oil
- 2 cups of filling – see link to my Pastry Cream Filling
Ingredients For The Chocolate Icing
- 1&1/2 cup powdered sugar 180g
- 1/2 cup cocoa powder 45g
- pinch of salt
- 1 tsp vanilla extract
- 1/4 cup whole milk 60g
Instructions
Make The Dough
- Firstly, mill the wheat into flour.
- Add the baking soda, and salt to the freshly milled flour, and mix to incorporate.
- In a microwave safe bowl, warm the water and milk for about 30 seconds, until warm but not too hot to touch.
- In stand mixer, add the warmed water and milk, then sugar, and egg. Stir these wet ingredients to combine.
- Then, add the flour mixture (dry ingredients) to the stand mixer. Mix until incorporated, and there is no dry flour left. Cover, and let sit for 15 minutes.
- After the dough has had time to rest, (autolyze step) then it is time to put in the yeast, and then stir to combine.
- Now that the yeast has been incorporated, it is time to add the very softened (but not melted) butter. Add the butter 1 TBSP at a time while mixing the dough. Scrape down sides as needed.
- Start the kneading process, and knead until the dough is nice and stretchy. This kneading time varies depending on your mixer, wheat, and environment, it could take anywhere from 7-20 minutes. It is best to just go by touching your dough, and looking for a nice stretch. *note the dough will be quite tacky.
- After the dough is nice and stretchy, spray the dough ball, and bowl with some nonstick oil.

- Then, cover the bowl and allow the dough to rise until double. This should take somewhere between 1-2 hours.
- While the dough is rising, prepare your pastry cream (It will need to cool before using.) or whatever filling you want to use.
Rolling Out Dough & Cutting Donuts
- Prepare 2 baking sheets with parchment paper.
- During the end of the rise period, prepare a clean work surface with a bit of oil.
- After the dough has doubled, take the dough out to your prepared work surface, and lightly oil your rolling pin as well.
- Then, gently roll the dough out to about 1/2 inch thickness. Using a 3 inch round cookie cutter (or biscuit cutter) cut into circles, and place on a parchment paper lined baking sheet.

- Collect any scraps of dough left, and reroll, then cut out again. Repeat until the dough is gone.
- Spray the dough with a bit of oil, then cover with plastic wrap. Allow the donuts to rise again for 30-45 minutes, they should appear puffy at the end of the rise.
Frying The Donuts
- Prepare 2 baking sheets with paper towels, and cooling racks on top of those. This is where you will put your donuts after frying.
- Pour about 2-3 inches of frying oil into the bottom of your pan.
- Preheat your oil towards the end of this second rise. Make sure to preheat your oil at the 350*F temperature. Using a digital heat safe thermometer, test the temperature of your oil before frying your donuts.
- Fry donuts at the 350*F for about 1-3 minutes until golden brown, then flip the donut and fry for another 1-3 minutes. Don’t put too many in the pan at once, as this will cool down your oil too quickly. Also, make sure your oil is back up to temperature before putting in another batch.

- Once they are golden brown on both sides, place them on a cooling rack with paper towels underneath to catch any excess oil. Repeat until all donuts are fried.
- Allow the donuts to cool before filling or dipping in the icing.
Make The Chocolate Icing
- Place powdered sugar, cocoa powder, and a pinch of salt in a large bowl.
- Then, add vanilla and milk, slowly whisk together until the icing is smooth.
- It should be thick and spoonable, but not like a paste. If too thick, add a tsp more milk at a time. If it is too thin, add a bit more powdered sugar. (You don't want it to drizzle off the spoon.)

- After the Donuts have cooled it is time to assemble them.
Filling & Assembling The Donuts
- Fill a piping bag with a small round tip and fill bag with pastry cream (make sure it has cooled.) *See notes for alternative filling instructions without a piping bag.
- Using a long skewer or chop stick, poke a hole in one side of each donut, but not all the way through. Gently move the skewer/chopstick is a small circular motion to make a small pocket, being careful not to tear through the donut.
- Place the filled piping bag in the hole, and squeeze the bag to fill the pocket with cream. You will feel a bit of resistance when the donut is full.
- Repeat with each donut until they are all filled.
- Once the donuts are filled, then dip the top of the donut (or spoon on the icing) into the chocolate icing. Allow the icing to set for 15-20 minutes.
- Lastly, enjoy!
Notes
*This post contains affiliate links, which means I make a small commission at no extra cost to you! Also, as an Amazon Associate I earn from qualifying purchases. But, I will only suggest items I actually Love and Have Used!


I’m curious if these can be fryed in an air fryer vs oil?
I did try air frying these, and they were ok. It made them a bit drier and a bit denser more like a roll than a donut. The flavors still tasted delicious! Let me know if you give it a try!
? May I put the dough in the fridge without cutting it? I am doing five batches and I dont have the room space to have all donuts in fridge. Would I proof dough first 1 hour and put in fridge? Or simply proof do put in fridge no proof, pull dough out let sit 1 hour, cut, and proof again? Thanks again.
You can the the dough rise on the counter for the first rise, then punch down, cover, and place in the fridge. The next day you can cut them, and let come to room temp (1-2 hours)
I made these a couple of weeks ago. They were amazing.
Thank you for ALL YOU DO.
Yay! I am so happy to hear that! Thanks! I have another yeast donut recipe coming out this Tuesday!