
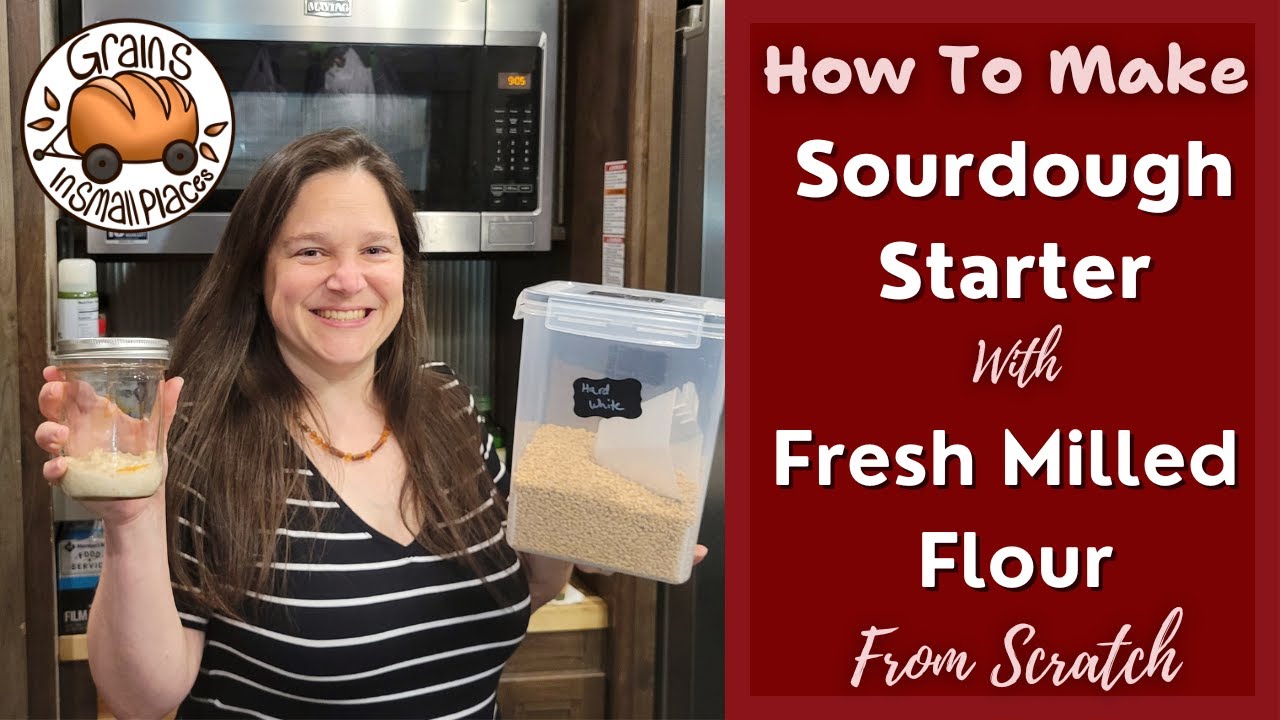
How To Make Sourdough Starter With Fresh Milled Flour
How To Make Sourdough Starter With Fresh Milled Flour, I share my step by step method to make this super simple! I did not realize the amount of people interested in learning how to make their very own sourdough starter from scratch beginning with the simple wheat berry!
In this post I show you how you can make your very own sourdough culture with fresh milled flour. So, let’s dive right into it!
What Do You Need To Start A Fresh Milled Flour Sourdough Starter?
There are only a few simple items that you will need to get started, and the great part is most of these may already be in your kitchen! Here are the items I recommend:
- A clean glass jar, with a lid. But, you don’t want the lid to be sealed completely. Your starter is alive, and it needs to breathe.
- Clean, unchlorinated water. I recommend bottled spring water if you are unsure if your water is chlorinated. Most city/county water is chlorinated. Chorine can kill your cultures.
- Kitchen scale that weighs down to the gram. I like to use a digital kitchen scale, You can find mine, HERE. This will come in handy during the feeding of your starter, but also later for the recipes. Most sourdough recipes are written in grams.
- Fresh Milled Flour. I like to use hard white wheat, but really you can use any freshly milled wheat berry. (I recommend you use hard white or hard red, because this is the flour you will need to make sourdough breads in the future, when your culture is ready.)
That’s it, just a few simple things to get started.
A Sourdough starter is alive, so it makes sense when we think about the things it requires to live and grow. It needs water, food, and air (needs to breathe.)
Cautions While Making A Fresh Milled Flour Sourdough Starter
There are a few things to consider when making your own sourdough starter. If you use good hygiene and safety practices, then there should not be anything to be concerned about. Here are some things to look out for.
What To Watch For
- Always observe your sourdough starter before using for signs of mold. This typically appears as pink, yellow, or orange fuzzy spots on the surface. (However, it could appear as any color.)
- Don’t use your sourdough discard during the first week of making it from scratch. The good and bad organisms are battling, and it may not be safe to consume or bake with your new sourdough starter, until you see it doubling consistently.
- Make sure to keep your sourdough starter in a place where pets can not get into it. Sourdough starter can be dangerous for dogs and cats to ingest. If this happens, please contact your veterinarian right away.
- I don’t advise to keep your sourdough starter in the oven or microwave, because this increases the chances of someone turning on the oven or microwave, and this will cook your starter. There are times this can be resurrected, but typically it means you are starting a new one.
- Don’t pour your sourdough starter down your drain, it is best to scrape any discard you are not using into the trash. This will save your plumbing, I promise!
- DO experiment and have fun with sourdough recipes, even if they don’t turn out the first time, keep going. You will start to learn how your sourdough starter behaves and what it likes and doesn’t like.
Troubleshooting Fresh Milled Flour Sourdough Starter Problems
Hopefully everything will go according to plan while you are making your sourdough starter with fresh milled flour from scratch. However, occasionally there are some things that can go wrong. So, let’s go over some of those together. Here are some common issues:
- No Bubbling: If your starter isn’t bubbling, it might not be active yet. Check the feeding schedule—maybe it needs more frequent or consistent feedings.
- Watery Consistency: If it’s too watery, you might be using too much water in your feedings. Adjust the flour-to-water ratio to make it thicker.
- Mold Growth: Mold is a definite no-no. Make sure your container, hands, stirring utensils are all clean. Throw all of this away, and start over from scratch.
- Lack of Rise: If your starter isn’t helping your dough rise, it might not be strong enough. Ensure you’re feeding it consistently and at the right ratios.
- Temperature Troubles: Sourdough starters love warmth. If your kitchen is too cold, it might slow down fermentation. Consider finding a warmer spot or using a heat mat.
- Inconsistent Feedings: Regular, consistent feedings are crucial. If you neglect your starter, it might lose strength or develop issues.
Remember, sourdough can be a bit fickle or a diva, but with some TLC and a watchful eye, you’ll likely get it back on track!
What Do I Do With Sourdough Discard?
So, during this beginning phase, it will seem like you are throwing away and wasting a lot of your sourdough starter. I know, I understand, I don’t like to waste things either. But, it is important to note, that while you are beginning this culture, it is having it’s own little battle inside.
The Battle Inside Your Sourdough Starter
The first week or two, you should not use your sourdough discard. This is because of that battle between the good and bad bacterias & yeasts. It may not be safe to consume this discard, not until it starts doubling consistently. Then, it is ready to start using in your discard recipes, because this consistent doubling action is an indication that the good bacteria and yeast has won! YAY!
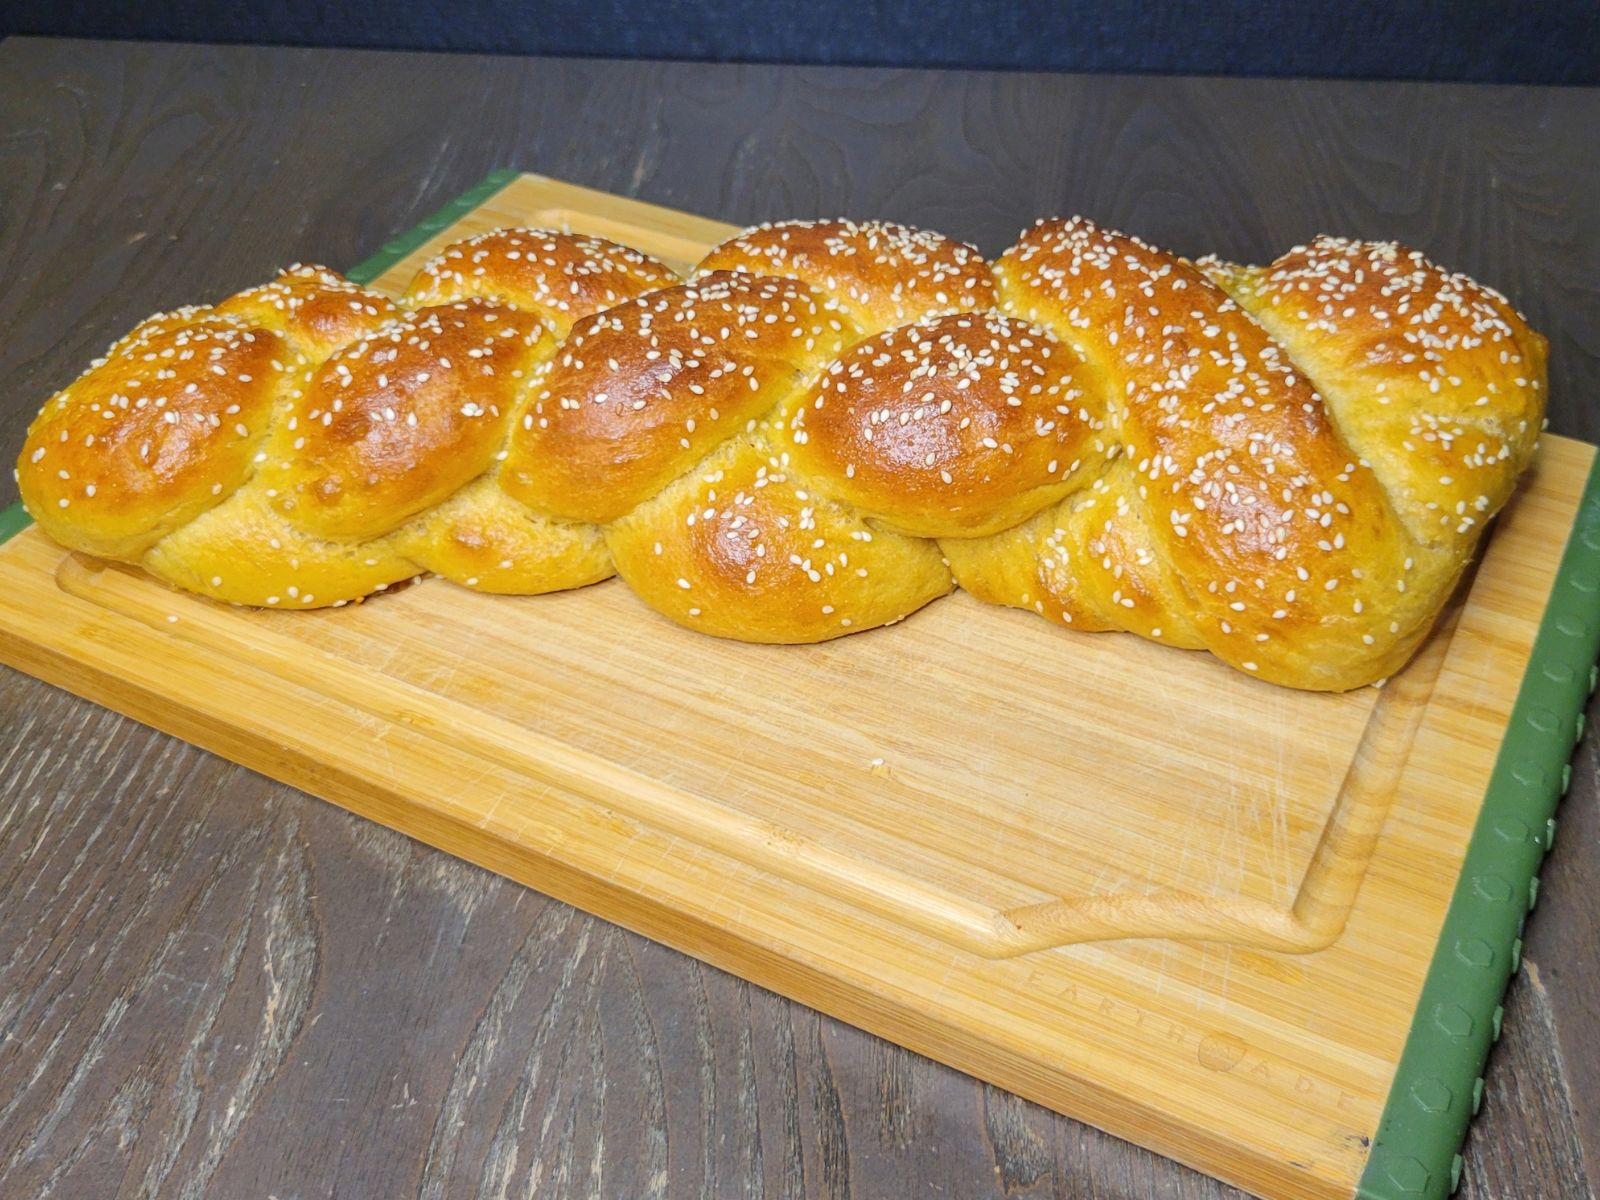
If you want to see me making this sourdough sandwich bread, you can meet me on YouTube, I would love to have you! MY YOUTUBE CHANNEL
Don’t Throw Your Sourdough Discard Down The Sink!
Also, another important note that will save your plumbing in the future. Make sure to never throw your sourdough discard down the sink drain. Even if you run tons of water with it. This will create a thin layer after thin layer over time that almost resembles concrete in your pipes. Just toss it in the garbage until you can start using it in recipes.
Ingredients To Make Fresh Milled Flour Sourdough Starter From Scratch
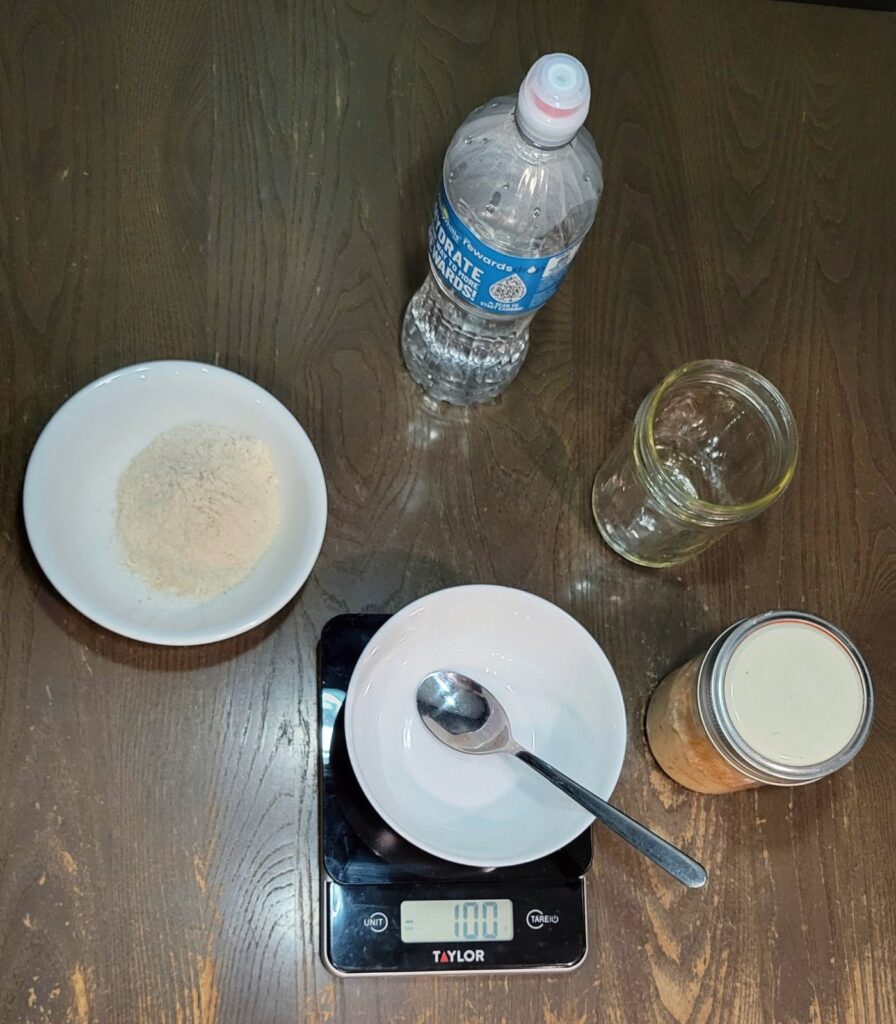
- 50 grams of clean, filtered water (I like to use bottled spring water if unsure if it is unchlorinated.)
- 50 grams of fresh milled flour (I recommend hard red or hard white wheat)
Instructions To Make Your Own Sourdough Starter With Fresh Milled Flour
First Three Days
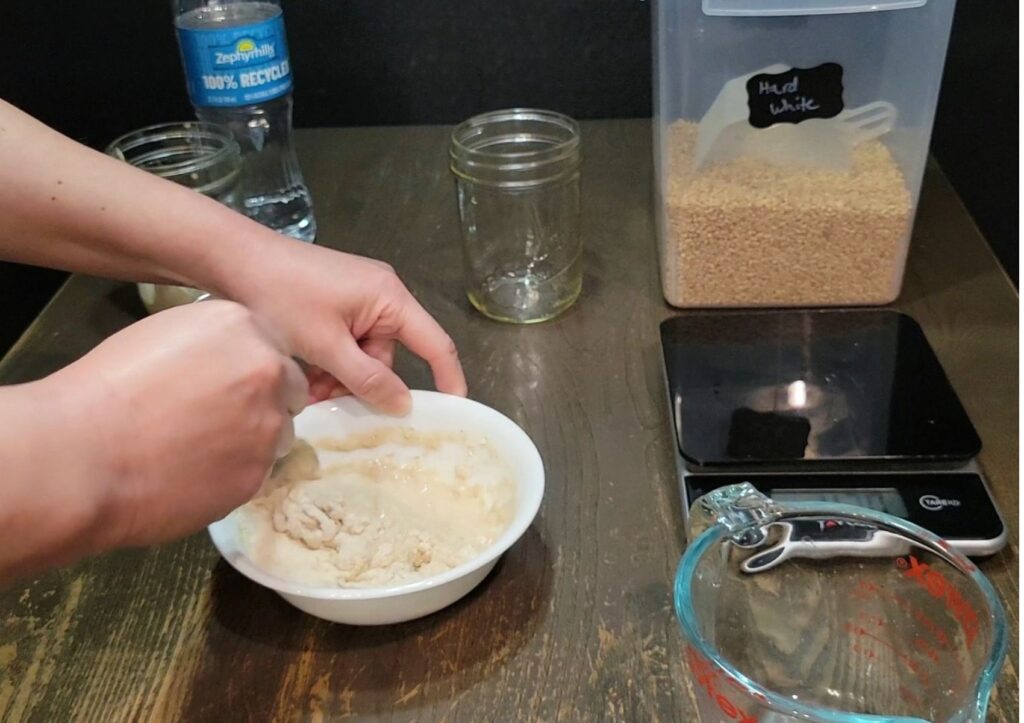
- DAY ONE– Mix together 50 grams of water and 50 grams of fresh milled flour. Stir until no dry flour is left. Cover loosely and let this mixture sit for 24 hours. It is helpful to mark your jar at the top of your starter each time you feed it. Also, make sure you are keeping it somewhere at room temperature. (Not near any other ferments or cultures, they like to cross contaminate each other!)
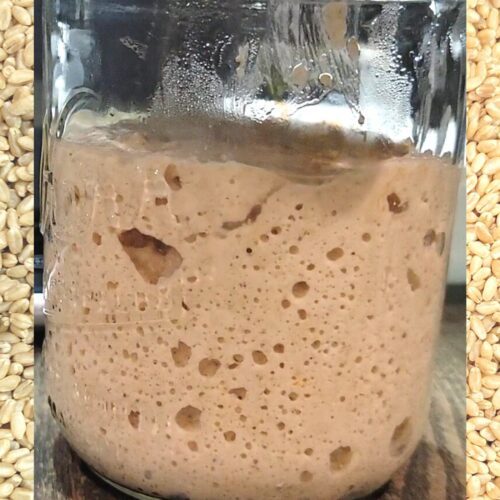
- DAY TWO– Observe your starter, smell it, check it for any fuzzy mold. It should start to smell like it is fermenting. This day we are just checking on it, and nothing else. Continue to let it sit for another 24 hours.
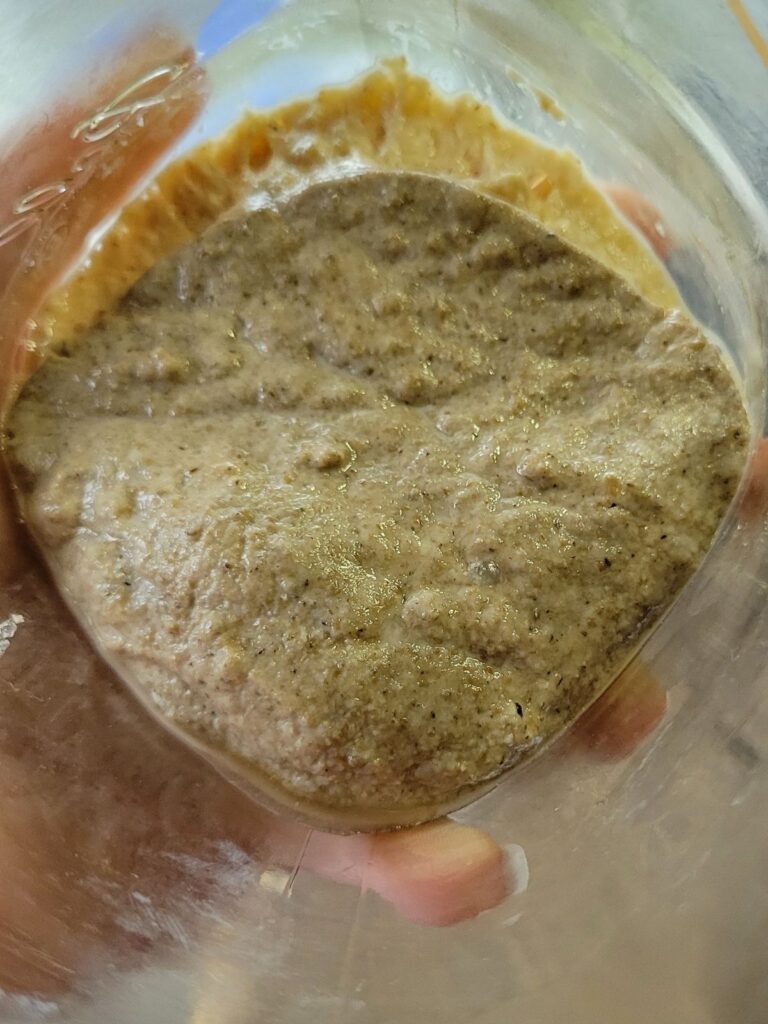
- DAY THREE– Take 50 grams of your sourdough starter, add 50 grams of water into a small clean bowl, then stir. Add 50 grams of fresh milled flour, and stir to incorporate. Put in a new clean jar. Empty the rest of the sourdough starter into the trash (not the sink) and clean the jar for the next day. *You should start seeing a bit of activity on this day. It may start to smell somewhat sweet or fruity. It may have even risen at this point. (This is typically a false rise, and it will seem to lay more dormant after this first “false rise.” This large false rise usually occurs around day 3 or 4.)
Day Four Through Six
- DAY FOUR TO DAY SIX-Take 50 grams of your sourdough starter, add 50 grams of water into a small clean bowl, then stir. Add 50 grams of fresh milled flour, and stir to incorporate. Put in a new clean jar. Empty the rest of the sourdough starter into the trash (not the sink) and clean the jar for the next day. Repeat Each Day. It may go through times of very putrid smells, and may not rise at all during this phase. But, I promise, it is doing something. Inside there is a battle going on.
- DAY SEVEN– Now is the time that we will start feeding twice a day. You may be one of the lucky ones, and already have a doubling starter. But, even if you do, I recommend still feeding twice a day for 3-7 more days. This will make your sourdough starter nice and strong!
Day Seven To Fourteen
- DAY SEVEN TO DAY FOURTEEN– Take 50 grams of your sourdough starter, add 50 grams of water into a small clean bowl, then stir. Add 50 grams of fresh milled flour, and stir to incorporate. Put in a new clean jar. Empty the rest of the sourdough starter into the trash (not the sink) and clean the jar for the next feeding. Repeat Each Day, twice a day. (as close to 12 hours apart as you can.)
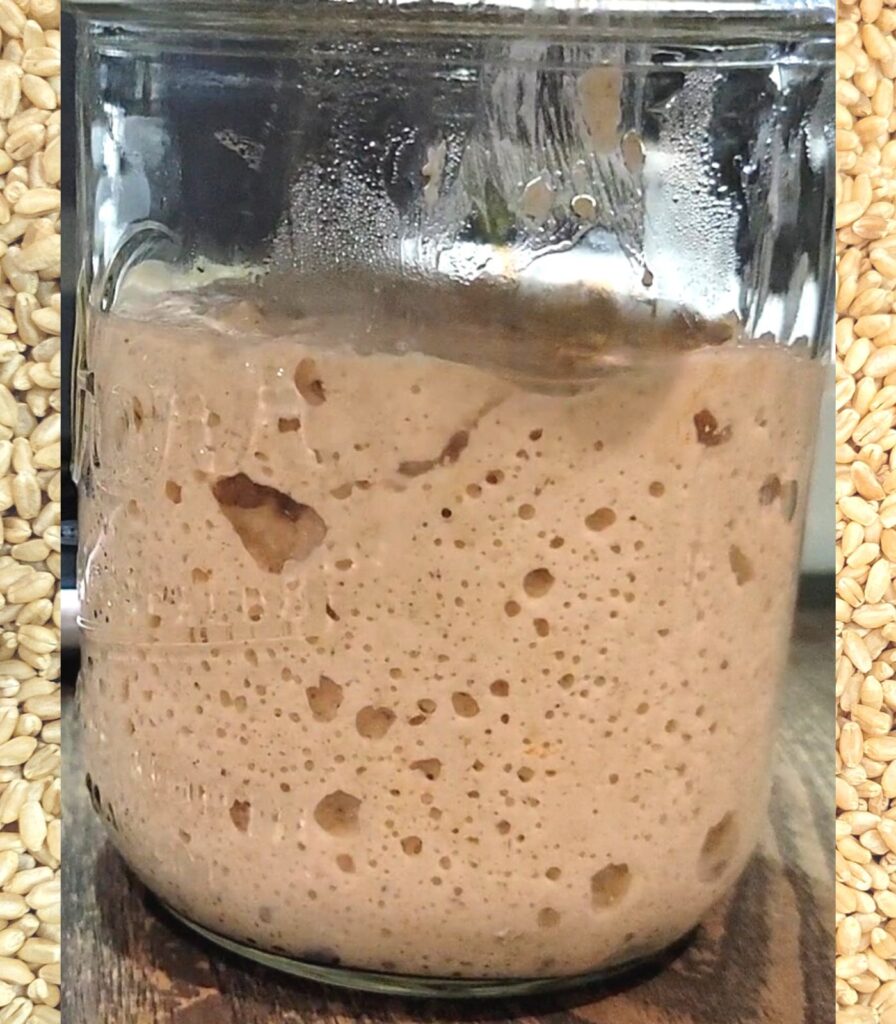
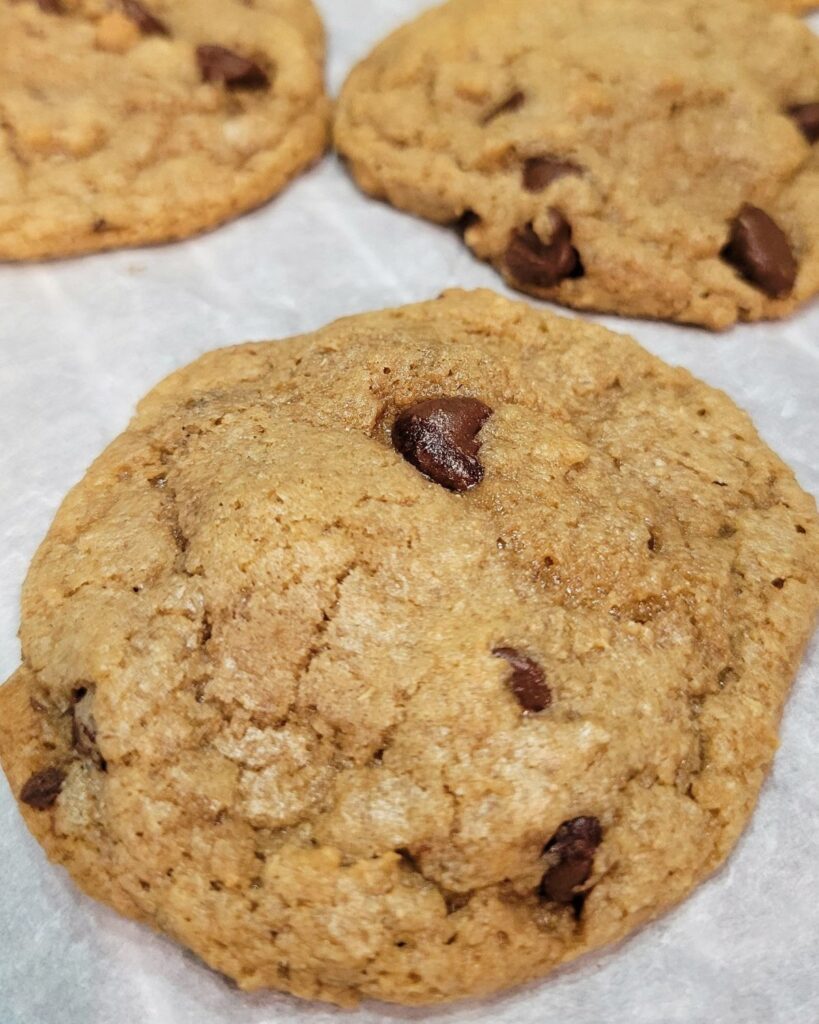
- DAY TEN– By day 10, as long as you have been consistent with your feeding your starter should be consistently doubling between each feeding. If this is the case, then your sourdough starter is ready to start using in any discard recipe! (If not, then keep up the good work of discarding, and feeding twice daily 12 hours apart.) I recommend these Sourdough Brown Butter Chocolate Chip Cookies, YUM! Just not quite ready to leaven bread yet…
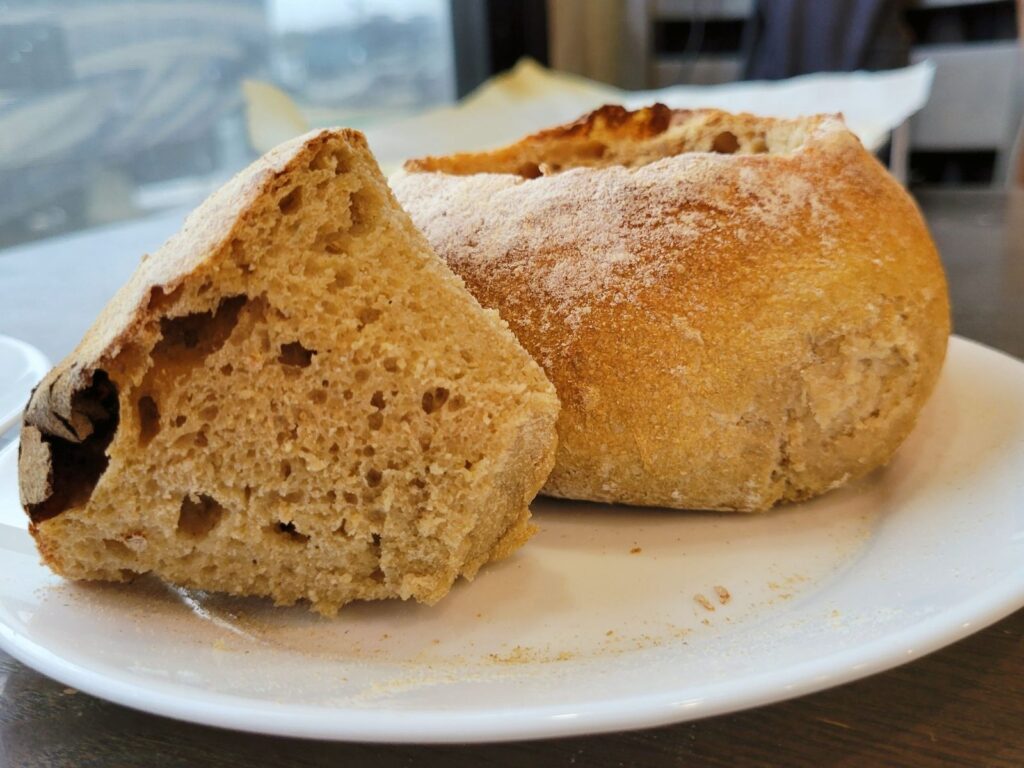
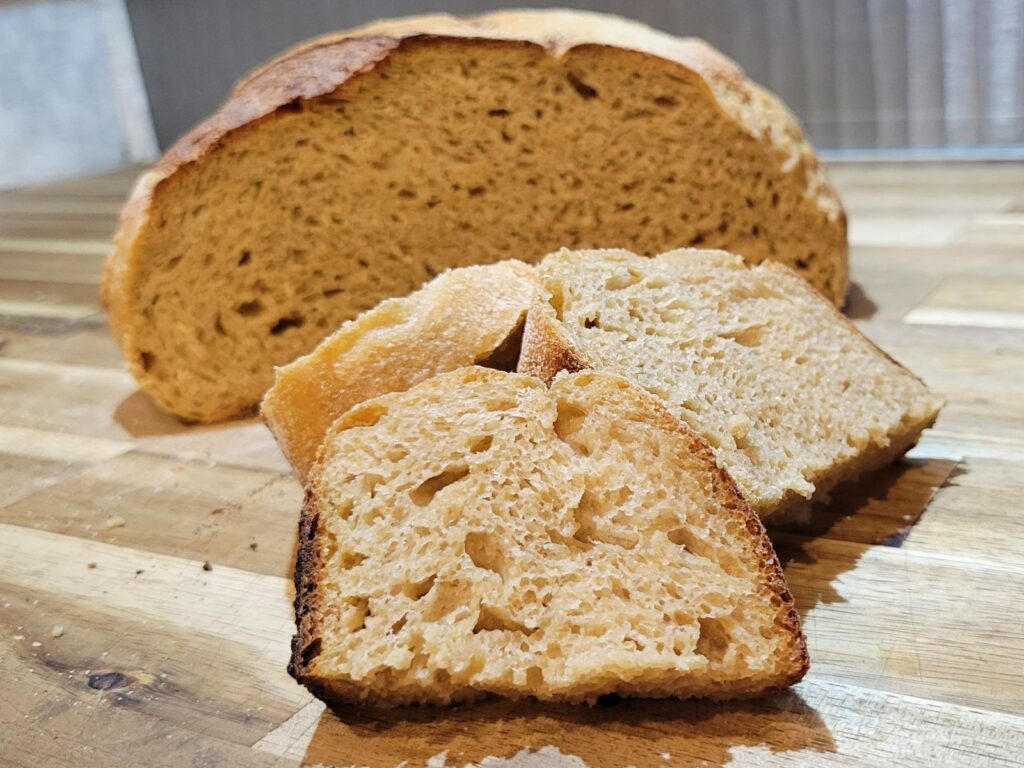
- DAY FOURTEEN– Ok, as long as things have gone according to plan, and you did all the hard work, you should be ready to try your first loaf of bread! To know if it is ready to make bread, it should be at least doubling within 6-8 hours of your feeding. Your sourdough starter is letting you know it is strong enough to raise some bread, now it is mature, and it only gets better the older it gets. So, your first loaf of bread may not be perfect, but it will be a great point to jump on in!
Ready To Use!!!
- Now that you are ready to use your sourdough starter, make sure you are feeding it with enough food & water to use in a recipe, and still be able to keep 50 grams to feed for the next day. You never want to use up all your starter in a recipe. Then, you will have to start all over! (For example, if I want to make my cookies I mentioned above tomorrow, it calls for 120g of starter. So, I will make sure to feed my starter the night before extra 60g flour+60g water+50g starter = 170g total. I can use 120g for the recipe, and still have 50g to feed for tomorrow. So, just add up an make sure you have enough for whatever you want to bake the next day, and still have 50g remaining.)
Every Day Sourdough Starter Maintenance
- MAINTENANCE– Now that your starter is nice an active, you can leave it at room temperature, and feed (and discard) it at least once per day. It may be ideal to feed it twice a day, this is for optimum results. If that is not something you are able to do, or you are going on vacation, then you can place your sourdough starter in the fridge. Once it goes in the fridge, this will change the flavor a bit to be a bit more sour or acidic. Make sure to feed it (and discard) at least once per week, but the less often it is fed, the more sour it will get.
- HOOCH-If your sourdough starter gets hungry, or is in the fridge for a bit, then it may form a black liquid on top. This liquid is called “Hooch.” This is not dangerous, or bad. Just pour it off into the trash, and discard and feed. It is letting you know it is hungry!
- MOLD-If at any point you notice anything fuzzy OR pink, yellow, or orange on your sourdough starter this is likely mold. Unfortunately, your whole starter has been contaminated, and it needs to be thrown in the trash. Even if you think you can scrape it off the top, it is already all throughout your starter, and isn’t visible. Mold means it is not able to save.
Preserving Your Sourdough Starter For Long Term Storage
Once your sourdough starter is mature & active, you may want to consider drying some out for long term storage. This give you piece of mind that you always have a back up incase something were to happen to your precious sourdough starter. I have a whole post on how to do this HERE.
Shop This Post
Grain mill Nutrimill (Use Coupon Code: Grainy for $20 Off yours):
Hard White Wheat (Small Amount)
Bulk Hard White Wheat (Bulk)
Checkout Some Of My Other Recipes
How To Dry Out Your Sourdough Starter For Long Term Storage
Sourdough Brown Butter Chocolate Chip Cookies
Sourdough Bread (Artisan Style Boule)
Chocolate Cupcakes Made With Sourdough Discard
Strawberry Cupcakes – Sourdough Discard
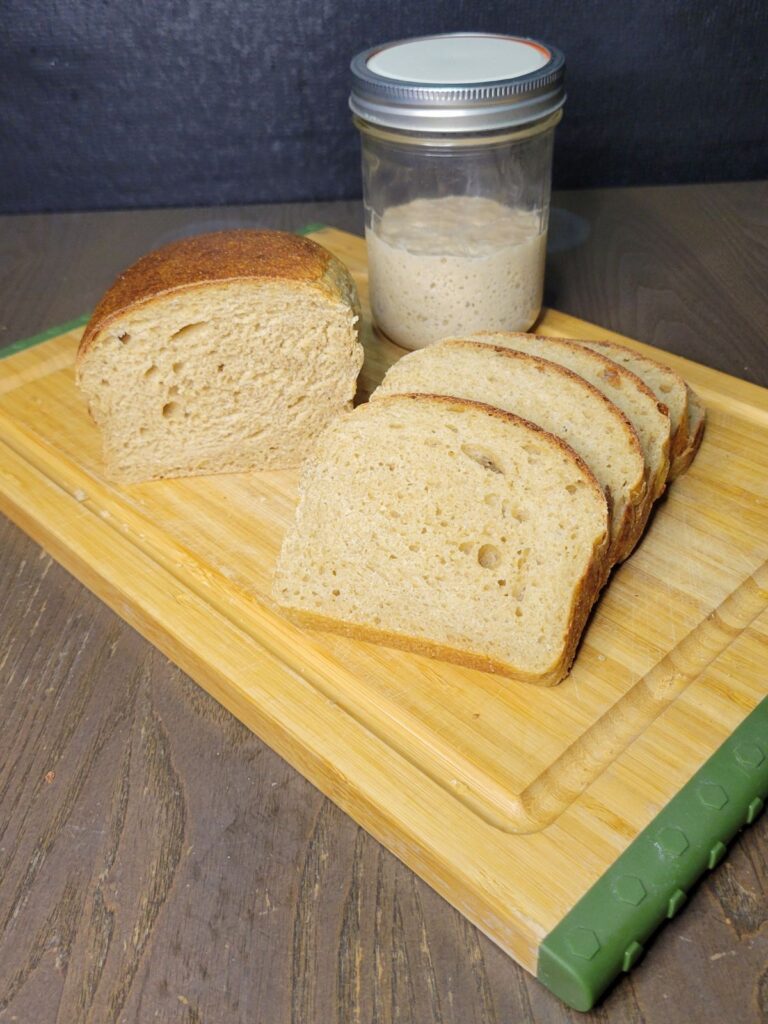
Sourdough Starter With Fresh Milled Flour
Equipment
- 1 glass mason jar a pint jar should be fine to start with.
Ingredients
- 50 grams clean, unchlorinated filtered water I like to use bottled spring water if unsure if it is unchlorinated.
- 50 grams fresh milled flour I recommend hard red or hard white wheat
Instructions
- DAY ONE- Mix together 50 grams of water and 50 grams of fresh milled flour. Stir until no dry flour is left. Cover loosely and let this mixture sit for 24 hours. It is helpful to mark your jar at the top of your starter each time you feed it. Also, make sure you are keeping it somewhere at room temperature. (Not near any other ferments or cultures, they like to cross contaminate each other!)
- DAY TWO- Observe your starter, smell it, check it for any fuzzy mold. It should start to smell like it is fermenting. This day we are just checking on it, and nothing else. Continue to let it sit for another 24 hours.
- DAY THREE- Take 50 grams of your sourdough starter, add 50 grams of water into a small clean bowl, then stir. Add 50 grams of fresh milled flour, and stir to incorporate. Put in a new clean jar. Empty the rest of the sourdough starter into the trash (not the sink) and clean the jar for the next day. *You should start seeing a bit of activity on this day. It may start to smell somewhat sweet or fruity. It may have even risen at this point. (This is typically a false rise, and it will seem to lay more dormant after this first “false rise.” This large false rise usually occurs around day 3 or 4.)
- DAY FOUR TO DAY SIX-Take 50 grams of your sourdough starter, add 50 grams of water into a small clean bowl, then stir. Add 50 grams of fresh milled flour, and stir to incorporate. Put in a new clean jar. Empty the rest of the sourdough starter into the trash (not the sink) and clean the jar for the next day. Repeat Each Day. It may go through times of very putrid smells, and may not rise at all during this phase. But, I promise, it is doing something. Inside there is a battle going on.
- DAY SEVEN- Now is the time that we will start feeding twice a day. You may be one of the lucky ones, and already have a doubling starter. But, even if you do, I recommend still feeding twice a day for 3-7 more days. This will make your sourdough starter nice and strong!
- DAY SEVEN TO DAY FOURTEEN- Take 50 grams of your sourdough starter, add 50 grams of water into a small clean bowl, then stir. Add 50 grams of fresh milled flour, and stir to incorporate. Put in a new clean jar. Empty the rest of the sourdough starter into the trash (not the sink) and clean the jar for the next feeding. Repeat Each Day, twice a day. (as close to 12 hours apart as you can.)
- DAY TEN- By day 10, as long as you have been consistent with your feeding your starter should be consistently doubling between each feeding. If this is the case, then your sourdough starter is ready to start using in any discard recipe! (If not, then keep up the good work of discarding, and feeding twice daily 12 hours apart.) I recommend these Sourdough Brown Butter Chocolate Chip Cookies, YUM! Just not quite ready to leaven bread yet…
- DAY FOURTEEN- Ok, as long as things have gone according to plan, and you did all the hard work, you should be ready to try your first loaf of bread! To know if it is ready to make bread, it should be at least doubling within 6-8 hours of your feeding. Your sourdough starter is letting you know it is strong enough to raise some bread, now it is mature, and it only gets better the older it gets. So, your first loaf of bread may not be perfect, but it will be a great point to jump on in!
- Now that you are ready to use your sourdough starter, make sure you are feeding it with enough food & water to use in a recipe, and still be able to keep 50 grams to feed for the next day. You never want to use up all your starter in a recipe. Then, you will have to start all over! (For example, if I want to make my cookies I mentioned above tomorrow, it calls for 120g of starter. So, I will make sure to feed my starter the night before extra 60g flour+60g water+50g starter = 170g total. I can use 120g for the recipe, and still have 50g to feed for tomorrow. So, just add up an make sure you have enough for whatever you want to bake the next day, and still have 50g remaining.)
- MAINTENANCE- Now that your starter is nice an active, you can leave it at room temperature, and feed (and discard) it at least once per day. It may be ideal to feed it twice a day, this is for optimum results. If that is not something you are able to do, or you are going on vacation, then you can place your sourdough starter in the fridge. Once it goes in the fridge, this will change the flavor a bit to be a bit more sour or acidic. Make sure to feed it (and discard) at least once per week, but the less often it is fed, the more sour it will get.
- HOOCH-If your sourdough starter gets hungry, or is in the fridge for a bit, then it may form a black liquid on top. This liquid is called “Hooch.” This is not dangerous, or bad. Just pour it off into the trash, and discard and feed. It is letting you know it is hungry!
- MOLD-If at any point you notice anything fuzzy OR pink, yellow, or orange on your sourdough starter this is likely mold. Unfortunately, your whole starter has been contaminated, and it needs to be thrown in the trash. Even if you think you can scrape it off the top, it is already all throughout your starter, and isn’t visible. Mold means it is not able to save.
Video
*This post contains affiliate links, which means I make a small commission at no extra cost to you! As an Amazon Associate I earn from qualifying purchases. But, I will only suggest items I actually Love and Have Used!


Thank you Kara for this video! I used it daily while creating my first starter. If you’re inclined, I’d definitely be interested in how to dry starter as a backup.
Welcome! I am so glad to hear it was helpful! I will keep that in mind! Thank you so much! Happy Baking!
I just found you and I LOVE YOU. I love your story, your energy and your knowledge. Thank you for sharing your thoughts, ideas, experiences and mostly the detail!
Awww thank you so much! I am so happy you found me!
Hi Kara! Thank you for this video! I followed instructions exactly and my starter is doing great! I’ve made two loaves so far and they have been delicious! I keep my starter on the counter and feed twice a day most days. I have been saving the discard in a jar and keeping in the refrigerator. Is this what i use for your discard recipes? It accumulates quickly with feeding twice a day. Is that what i should be doing with the discard when feeding?
I am so happy to hear it was helpful! Yes, you can use that in discard recipes. Also, if it is well established now, you can switch to feeding once per day.
Thank you so much for your video and step by step post! I have been so nervous to start my starter from scratch because I couldn’t find much on freshly milled flour. I am on Day 10 and I am not doubling yet. I feel like it is fairly thick when I mix it up. Should I add more water or is it ok that it is thick?
Welcome! I am happy to hear it is helpful! Mine starts out thick, then thins out by the next day. At day 10, you can start feeding twice daily, and that should do the trick. Also, just make sure you are not using chlorinated water, as that can kill off the organisms. Let me know how it goes!
I have been feeding twice a day since day 7 and I am using bottled water. I will keep with it and hopefully it starts to double soon.🤞🏻
Ahh gotcha, it should start doubling soon, some can take up to 14 days.
I started my starter, I’m on day 7 as of today, May 13, however we are leaving for a week on Thursday. My starter is doing great too I will add.
Is there a way to preserve my starter until I get home?
You can put it in the fridge once it is consistently doubling. Feed it heavy 1:2:2 ratio, let it rise on the counter. Then, put it in the fridge before it falls again. Cover, and let it sit in the fridge. I like to feed twice per week with a heavy feeding when it is in the fridge. But, it will do fine for 1 week without feeding. Just feed it heavy again once you get home. I hope that helps! Enjoy your trip!
Thank you. I’m not sure about the ratio 1:2:2. Can you please explain? I’m a newbie to fmf and especially sourdough starter.
Thank you
Sure! So, a ratio of 1:1:1 would be equal amounts of starter, water, and flour by weight. (For example 50g of starter, 50g water, 50g flour.) That being said, a ratio of 1:2:2 would be 1 part sourdough starter, 2 parts water, 2 parts flour. (example 25g of starter, 50g water, 50g of flour.) I hope that clears it up. Let me know if you have any other questions. Happy Baking!
Thank you for explaining. I thought that’s what it was but wanted to be sure.
welcome!
Hi! I have a healthy starter made with King Arthur flour, I am wanting to begin my fmf journey and am wondering if I can transition my current starter over by just feeding it fmf from now on? Or is it best to start a new starter using fmf right from the beginning?
Yes, you can transition yours over, I have some info on switching it over too! https://grainsinsmallplaces.net/how-to-feed-sourdough-starter-with-fresh-milled-flour/
When you’re needing to feed the starter extra in order to use it for a recipe, how do you decide what ratio to feed it? In the instructions you mention doing 60g each of flour and water and still 50g starter as an example for your sourdough cookies. What decides that ratio? What if a recipe calls for a larger amount of starter?
I have to play it by ear, if I only have 50g of starter, but my recipe the next day is going to require a larger amount, I will feed it with a heavier ratio. I try to stick with 1:1:1 ratio, unless I am making bread the next day, then I feed 1:2:2 to help make the starter stronger to be able to raise the bread. Sometimes if I don’t have a lot of starter left, I will just feed it so I have the amount I need for the recipe, and still some left for feeding to keep for the next day after. I hope that makes sense!
Hi, I have a King Arthur Sourdough starter I purchased about 10 years ago that I have been using. I have always used King Arthur Flour but I have recently started using fresh milled flour. I have continued using all purpose flour in the feeding of the starter and making my levain for the sourdough sandwich recipe that I use. I would like to start feeding the starter with fresh milled and making my levain with fresh milled. I tried it last week but the bread came out very heavy. Any advice?
Hi! Fresh milled flour sourdough is a whole new ballgame! LOL. It has a mind of it’s own. So, somethings I find that are very different is that is ferments much quicker, and it likes a bit more moisture. Also, the kind of wheat you use affects the outcome. I recommend a strong hard white or hard red, or mix of the two. Especially at first. I have a recipe that is a great base, then you can go from there to fine tune it to how your family likes it. But, it doesn’t call for an overnight ferment, because I have found since it ferments much faster, it tends to over ferment. I hope that helps. Here is my recipe and technique. https://grainsinsmallplaces.net/sourdough-fresh-milled-flour-easy/
Thank you so much for all your fresh milled flour knowledge shared!
My pleasure! I am so glad it is helpful! 😊
Kara, I’m on day 8 of my starter and I’ve been keeping the bottle of spring water that I have been using for my starter in the fridge. So I’ve been feeding my start cold spring water, not considering how this would throw off the process. Should I start over?
It is fine to keep it cold, it will just ferment a bit slower. On day 8, you can start feeding 2x a day and it should get pretty active pretty quickly. You can just leave the spring water at room temperature, at least that is what I do. 😊
I’m on day 19 and my starter is not doubling. It rises to about a rubber band hight above my rubber band. I am using bottled water. On day 2, it almost rose out of the jar, but since then nothing. How long should I keep feeding it twice a day in hopes that it will double? It’s about 72-76° in our kitchen normally. Any advice would be very much appreciated.
Hmmm, seems like it should be active by now, Are you discarding at each feeding? I would recommend either feeding a bit of fresh milled Rye if you have any, OR discard 3/4 of what you have, and do a heavy feeding. So feed about double the amount of fresh milled flour and water to what you have left of discard. Either of those options should activate it. Let me know how it goes! 😊
The day I left that comment, it started doubling. Haha. I do have another question now. If I want to get more starter, so I can have enough To make your sandwich loaf, how do I do that? Do I still need to discard some, or can I just add to it to give me more starter?
You can feed it double to get a larger amount, this will actually make your sourdough starter stronger. (Example, if you have 50g of starter, you can feed 100g flour & 100g water.) You can skip the discard, as long as you make sure you are at least feeding the same weight of fresh flour or more. So, if you have 50g of starter, you need to feed at least 50g of flour and 50g of water. I hope that makes sense! Happy Baking! 😊
Thank you for this video and recipe! I finally have a successful starter. When you put it in the fridge and need to feed it – do you take it out and let it come to room temperature before feeding? And then after feeding I’m guessing you do as before when you wait for it to rise before putting it back in the fridge again? Thank you!
I pull it out and feed it right away, then let it double before putting it back in. 😊
I am on day 16 of following your instructions step by step. My wheat is straight from the field, cleaned and milled. Bottled water, consistent feeds at the same time etc – it’s been barely doubling. What can I do differently??
If it needs a boost, I would try adding in some fresh milled rye, it really loves that. OR if you don’t have rye, I would try a heavy feeding, so feed double the weight of flour and water to starter. So, for example, use 25g of starter, 50g flour and 50g of water, this typically will give a nice boost, and make it stronger. Let me know how it goes! 😊
My starter was doing great until day 7 and doing double feedings. Now it not bubbling as much or doubleing in size. Any suggestions?
It might be in that slow period, they all go through it, typically lasts a couple days, and starts between 3-6 days. I would discard, and feed twice per day, and that should do it. Make sure it is not in a cold place, that will slow things down as well.
I am on day 11. It hasn’t risen since first day but is spongy & smells good. Will it eventually rise? I can’t add rye [trying this as celiac]. Thx!
What grain are you using?
It’s a mix from unsifted.com. Basic blend of whole grain wheat.
Today is day 14, still didn’t rise. I put it in a cupboard that has a heater running underneath ( under the cabinet) so that cabinet stays warmer from the heat register. I put in the warm fresh milled flour tonight hoping it will help.
Ok, if it still doesn’t give activity even after the warmth, then I would suspect it could be your water.
I’m on day 10 of my starter. It has not been rising [except first day] but seems spongy, smells good. Just keep going until it starts to double? 9th is is my third attempt. I quit too soon before I think.
Thank you!
Sounds like you are in the right direction, make sure it is in a warm spot and not to cold. you can place it in the microwave with a warm cup of water near it to keep it warm. But, yes continue discarding, and feeding. You can do this twice daily now. But, making sure it’s not too cold.
Thank you! Just posted another same question…couldn’t find my other one!
I’ll try a warmer spot, thx
sounds good! 🙂
I’m on day 13, seeing activity but not doubling. Help?! What do I do for it to double? Is it too cold?
It could be too cold, try keeping it in the microwave with a hot cup of water to keep the temp up. 🙂
Thanks, I fed 25g starter, 50 water, 50 flour last night. It’s in the microwave now. Do I just keep 2 feedings a day until I get what I need?
Yes, keep discarding, feeding until it starts to double consistently. Keeping it warm should help. Make sure you aren’t using chlorinated water, because that can kill the cultures.
Hi, I have tried the sourdough starter and I am struggling the get any sort of doubling/rising out of it. It smells sour and has lots of bubbles but I haven’t seen a doubling yet. I was wondering if there was any tips or advice you had on what to do.
Make sure it is in a warm place, if it is cold in your house, you can place the jar in your microwave or oven with a hot cup of water. Also, make sure you are not using a chlorinated water.
I have tried the microwave trick several times. I’m on well water and using the water from our Berkey.
Have you had a chance to watch the video? You are discarding and feeding each time, right? Make sure your lid isn’t tight and it can breath as well. Also, do you have any rye you could give it?
If not, I have used this culture with great success in the past if you want to try it. https://amzn.to/4hNGum4
Hi Kara! I thank you so much for your thorough tutorial on making a sourdough starter using FMF using whole wheat berries. I am on my second feeding of day 10. My starter is looking great! Consistently doubling since day 4! I am having a difficult time understanding what to do with it now in regards to getting enough starter or discard to actually use in some of your recipes. Would you be able to give a couple of examples, please. I have been taking 50g starter (discarding the remaining in the trash), adding 50g water and 50g FMF– hard white wheat berries. So, if a recipe calls for 120g starter or discard (your brown butter chocolate chip cookies) I’m not sure what to do, especially if, say, the next day after making that recipe I want to make another recipe calling for 60g starter (your long ferment zucchini bread). I’m probably overthinking this but I think an example would help me. Thank you so very much!
Awesome! So happy to hear that! I just feed the night before and make sure I have enough. So, if I want to make the 2 recipes you mentioned tomorrow , I would just add those together plus 50g leftover for feeding. (120g+60g+50g= 230g total) I would feed 80g water + 80g starter + 80g flour = which will give me a total of 240g. That way I know I have enough. OR if you plan to bake everyday with it, you can just feed it 100g flour and water to keep it easy and always have 300g of starter. This works with as much as you want to store on hand at a time as long as you are feeding the same amount in weight of each one. I hope that makes sense. 🙂
Thank you so very much Kara! I am so excited to see your reply and greatly appreciate that you took the time to do that!! I was so excited to try your cookie recipe that I ventured out on my own to increase my starter to give me enough discard for that recipe (plus a little more!). I made up the cookie dough last night and put it in the fridge for the longer fermentation. Just baked up a cookie sheet of them and, yes, they are scrumptious!!!!!! They came out just lovely!
If I may ask another question, now that I can start keeping my discard, is it okay to keep it out on the counter along with my starter or does it need the fridge to keep it from spoiling since it doesn’t get fed like the starter does? I remembered reading that by putting the starter in the fridge (once it’s mature) it will change the flavor to a more robust sourdough. I am assuming that would be the same for the discard as well? I think I prefer the more subtle flavor– at least for treat or quick bread type items– bread might be a different story! Right now I just have one jar labeled starter and one labeled discard each on the counter. Again, thank you so much for sharing your knowledge and for sharing your recipes!!!
Yay! I am so happy to hear the cookies were a hit! Those are one of my most requested cookies to bring to a gathering! 🙂
You can leave it on the counter, but it will need to be fed if you don’t use it up. It continues to ferment and gets very sour. The fridge just slows down the fermentation, so you have a longer time to use in between a feeding. I hope that makes sense.
Hello- I’m on day 13 and my starter is not making any progress. On day 3, it had a false rise and since then nothing. I have fed it twice a day since day 7. I started off having it a high cabinet but then moved it to the microwave with a hot cup of water after reading some of your comments. I use room temp filtered water that we get from our local water store, and I mill my flour fresh every day. I’ve even done a double feed a few times thinking that may kick start something but it didn’t. I can’t help but think I’m doing something wrong. Do you have any suggestions?
Have you had a chance to watch the video? You are discarding and feeding each time, right? Make sure your lid isn’t tight and it can breath as well. Also, do you have any rye you could give it?
If not, I have used this culture with great success in the past if you want to try it. https://amzn.to/4hNGum4
Hi! So I’m very new at all this, I didn’t even think about not using tap water, and the effects t would have. And i know my water is chlorinated, I live in Florida. I’m on day 5, and I’m not seeing anything with my starter, do i need to just start from scratch, or can i salvage it?
If there hasn’t been any activity yet, then I would start over. The Chlorine will kill the good organisms that need to grow. You can use spring water, OR fill a open container with your water, and let it sit out overnight. This will allow a lot of the chlorine to dissipate out.
I have starter that a friend gave me. Can I feed it fmf?
Yes, you can transition it over to fresh milled flour, here is my post I wrote on that if helpful. https://grainsinsmallplaces.net/how-to-feed-sourdough-starter-with-fresh-milled-flour/