What To Do With Fresh Milled Rye – Make Pumpernickel
What To Do With Fresh Milled Rye – Make Pumpernickel Bread of course! Well, even if you don’t like the taste of a strong hearty Rye bread, you will still LOVE this Pumpernickel Bread Recipe! However, don’t fret, because if you do in fact love the taste of a strong Rye bread, this recipe can be altered for that as well.

What Actually Gives Rye & Pumpernickel That Iconic Strong “Rye” Taste?
What Actually Gives Rye & Pumpernickel That Iconic Strong “Rye” Taste? However, it is not the Rye Flour, it is actually the Caraway seeds that gives the bread recipe that punch you recognize. So, most people either love it or hate it. We have 2 on each side of this argument in our family. I am on the side of a lighter non “Rye” taste. So, I was a little reluctant to try to make a Pumpernickel Bread Recipe. But, my two family members that love Rye, have been asking for it. So, after some research on Rye and Pumpernickel Breads, I cam up with a compromise. I am glad I did, because this has become a very popular bread option for our family!

I like to brew tea to make my Pumpernickel, mix the tea, water, and flour and let sit for 1-2 hours to help the gluten to develop before kneading.
What Does The Word “Pumpernickel” Mean Anyways?
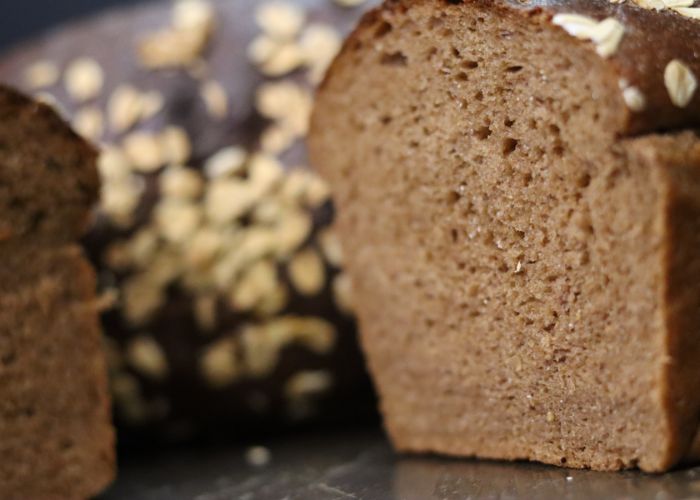
Pumpernickel Means A coarse, dark, sour bread made of unsifted rye flour. So, that means Fresh Milled Rye Flour is the way to go! Also known as black bread, brown bread, or even “break wind bread.” Maybe because of all that good fiber in it! Pumpernickel seems to be of German Origin. So, while my recipe for Pumpernickel may not be a traditional or original recipe, it is a delicious recipe that everyone in my family will devour!
Is Pumpernickel Good For You?
Yes, Pumpernickel is very goof for you! So, for it to be considered true pumpernickel, it needs have whole-grain rye flour. Commercial Flours have the bran and germ sifted out. And, it is these very parts of the rye berry that give pumpernickel its rich chocolate color and wonderful nutrition. Also, this tasty bread is high in fiber and loaded with vitamins and minerals. Lastly, in general, Pumpernickel is known to be cholesterol free and low in fat.
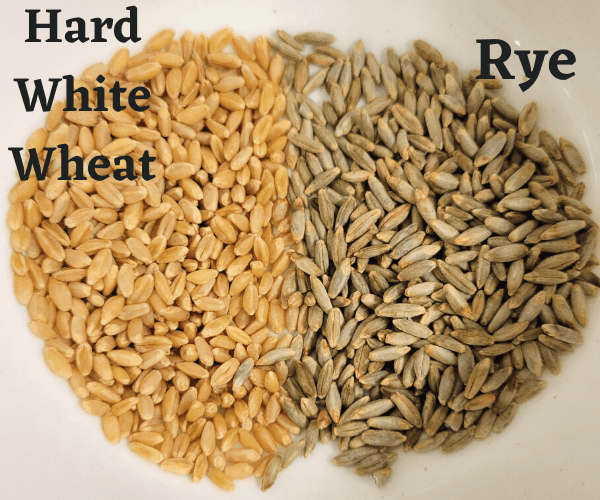
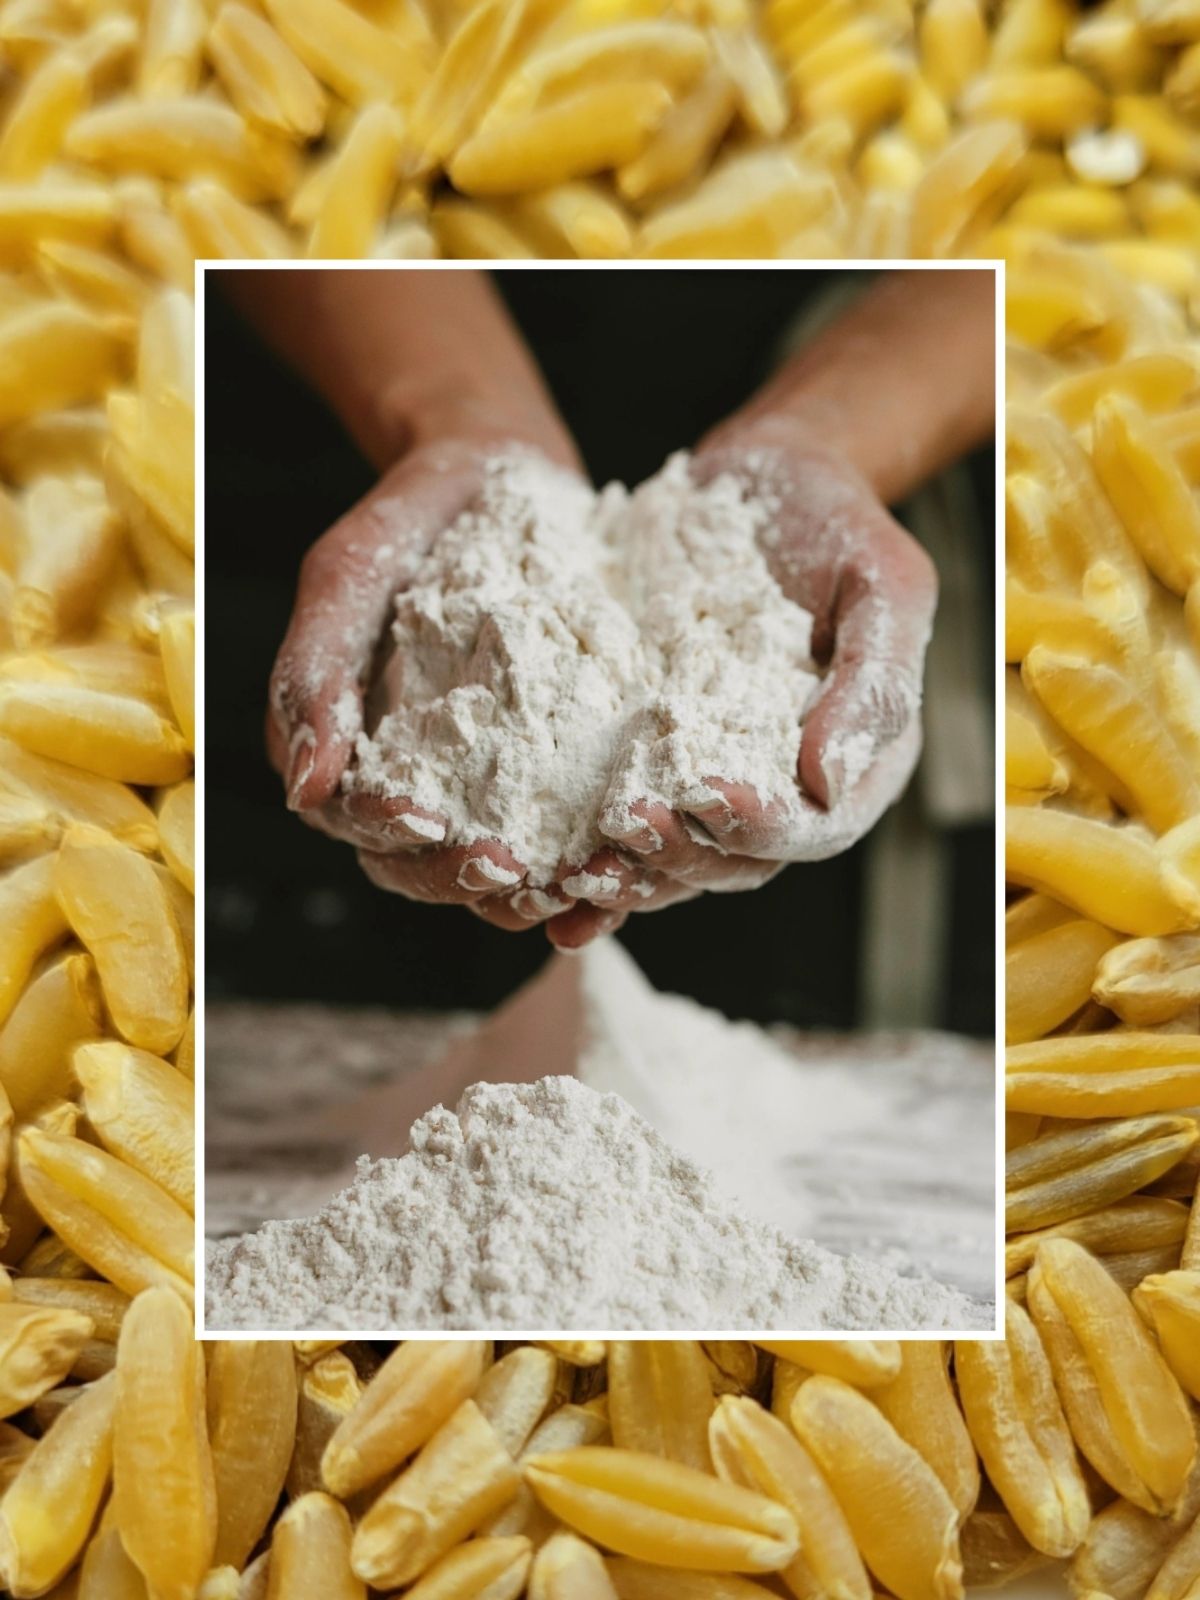
What Is Whole Rye?
Well, at one time Whole Rye was considered to be a weed that invaded the wheat fields. But, because of it’s hardiness, it worked it’s way into the fields, and on to our tables. Often eaten by those who are looking for an improved wheat bread, with a little more robust flavor. Whole Rye can be ground into a flour just like wheat, but it does not contain a lot of gluten, so often times, to make a yeast risen bread, a wheat variety that has a higher gluten is added to make a lighter airier bread.
Ingredients For This Fresh Milled Rye Pumpernickel Recipe
- 1 cup Brewed Warm Black Tea (235g)
- 3/4 cup water (175g)
- 4 TBSP melted butter
- 1/8 cup Molasses
- 2 TBSP sugar
- 1 TBSP heated milk
- 1 tsp salt
- 1 egg
- 2 TBSP cocoa powder
- 2 cups Fresh milled Rye flour 210g
- 2 & 3/4 cup Fresh milled Hard white flour 325g
- 2&1/4 tsp instant yeast
- *optional if you like a strong Rye flavor – 1 TBSP Caraway Seeds
Instructions For Making This Fresh Milled Rye Pumpernickel Bread
- Brew 1 cup of Black tea. Combine water to make a total of 1&3/4 cup liquid.
- Mill Your Fresh Milled Rye & Hard Wheat Berries to get flour.
- Next, combine Fresh milled flour, tea, and water until no dry flour is left. Let sit for 1-2 hours for the gluten to start to develop and let fresh milled flour absorb all the liquid. (You can skip this step, you may just need to knead longer)
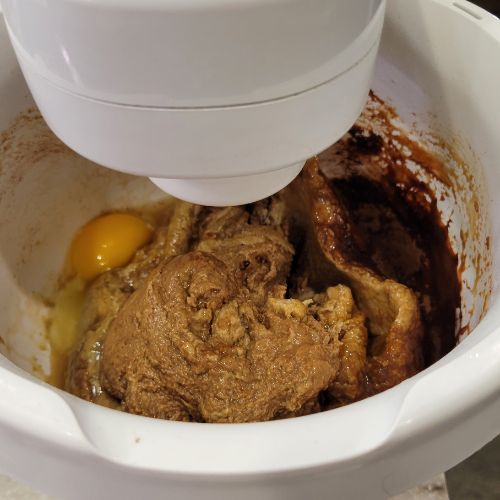
- While that mixture is sitting, heat up molasses, milk, sugar, salt, and butter in a heat safe dish. Pour this mixture into the flour/tea mixture.
- Next, add cocoa powder and mix, it will look separated, just keep slowly mixing, it will come together.
- Scrape down the sides as needed.
- Add egg and mix to combine. *optional if you like a strong Rye flavor – add Caraway Seeds (I omit these for my family)
8. Lastly, add the yeast and combine.
9. Knead dough until it passes the window pane test. HERE is an example of the window pane test
10. Let dough rise, covered for 1-2 hours or until doubled in size.
Shaping The Fresh Milled Rye Pumpernickel Bread
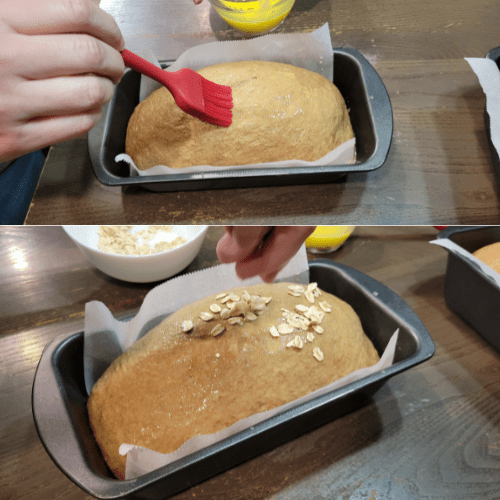
11. Next, After dough has doubled, divide the dough in half if you are making 2 one pound loaves.
12. Press each piece flat, then roll up to shape. Make sure there is some surface tension.

13. Cover, and then allow to rise about 40 minutes. (Until the dough has doubled, and looks puffy.
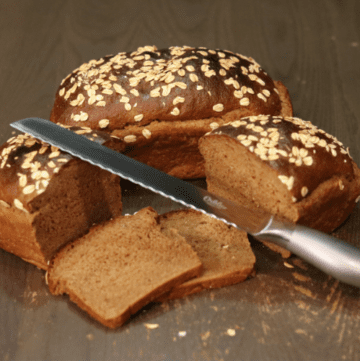
14. *optional for shine & topping – Brush loaf or rolls with an egg wash, then sprinkle with rolled oats.
15. During the second rise, preheat oven to 400*F
16. Then, Once doubled after the second rise, bake for 25-30 mins.
17. Lastly, Remove from pan and let cool before slicing.
Vegan Sandwich Bread Recipe
Here is my simple recipe for Vegan Sandwich Bread. No, we are not vegan, but sometimes you need a bread without a lot of ingredients. There are many reasons for this including, but not limited to:
- Making bread for someone with allergies
- Grocery Budget
- Ingredients may be out of stock or hard to find
- Ingredients may be priced higher than expected
- Don’t have an ingredient on hand
- Vegan diet
- And other dietary needs
So, here is that recipe:
How To Make Sandwich Bread With No Eggs, Milk, or Butter
How To Store Fresh Milled Flour Pumpernickel Rye Bread
To store these fresh milled flour Pumpernickel bread loafs, keep in an airtight container, or bag. Then, keep on the counter for 2-3 days. For longer storage, place in a freezer safe bag and freeze for up to 4 months. (Make sure the loaf has cooled completely before freezing, best results to freeze the same day as it is baked.) To thaw, sit on the counter, and let come to room temperature.
If You Want To Learn More About Milling Your Own Flour, I have a Fresh Milled Flour 101 post. So, I recommend Starting There!
Shop This Post
Flour Grain Mill Nutrimill Use coupon code: Grainy for $20 off Nutrimill or Bosch
Checkout Some Of My Recipes
Einkorn Chocolate Chip Cookies
Fresh Milled Rye Flour Pumpernickel Recipe
Pumpernickel From Fresh Milled Rye Flour
Equipment
- 2 4×8 bread tins
Ingredients
- 1 cup Brewed Warm Black Tea 235g
- 3/4 cup water 175g
- 4 TBSP melted butter
- 1/8 cup Molasses
- 2 TBSP sugar
- 1 TBSP heated milk
- 1 tsp salt
- 1 egg (2 eggs if you want to egg wash)
- 2 TBSP cocoa powder
- 2 cups Fresh milled Rye flour 210g
- 2& 3/4 cup Fresh milled Hard white flour 325g
- 2&1/4 tsp Instant yeast
*optional if you like a strong Rye flavor – 1 TBSP Caraway Seeds
Instructions
- Brew 1 cup of Black tea. Combine water to make a total of 1&3/4 cup liquid.
- Mill Your Wheat Berries to get flour
- Combine Fresh milled flour, tea, and water until no dry flour is left. Let sit for 1-2 hours for the gluten to start to develop and let fresh milled flour absorb all the liquid. (You can skip this step, you may just need to knead longer)
- While that mixture is sitting, heat up molasses, milk, sugar, salt, and butter in a heat safe dish. Pour this mixture into the flour/tea mixture.
- Next add cocoa powder and mix, it will look separated, just keep slowly mixing, it will come together.
- Scrape down the sides as needed.
- Add egg and mix to combine.
- *optional if you like a strong Rye flavor – add Caraway Seeds
- Lastly, add the yeast and combine.
- Knead dough until it passes the window pane test. HERE is an example of the window pane test
- Let dough rise, covered for 1-2 hours or until doubled in size.
- After dough has doubled, divide the dough in half if you are making 2 one pound loaves.
- Press each piece flat, then roll up to shape. Make sure there is some surface tension.
- Cover, and allow to rise about 40 minutes. (Until the dough has doubled, and looks puffy.
- *optional for shine & topping – Brush loaf or rolls with an egg wash, then sprinkle with rolled oats.
- During the second rise, preheat oven to 400*F
- Once doubled after the second rise, bake for 25-30 mins.
- Remove from pan and let cool before slicing.
Notes
*This post contains affiliate links, which means I make a small commission at no extra cost to you! As an Amazon Associate I earn from qualifying purchases


Made this today and it was amazing! I couldn’t find my black tea, so I just used coffee.
Next up, gingerbread cinnamon rolls.
Thank you! Coffee works great too, I just never have any, lol. I am so glad you enjoyed it!
Hi, I tried making this today. Unfortunately, I couldn’t get the dough stretchy. I kept kneading it in my kitchen aid mixer for long time. I am not sure what went wrong. This is my first time baking a bread with rye flour. I know it is low in gluten. May be that’s the problem? I am afraid to bake that dough as it is not stretchy. It breaks.
Rye by itself won’t develop enough gluten to remain strong and stretchy. I like to use mostly hard red or hard white and then add Rye into it. If you are wanting that strong Rye taste, I recommend adding in the carraway seeds. i hope that helps! Happy Baking!
I couldn’t get the window pane with this dough as you described in recipe. I decided to keep the dough in fridge for 2 days and going to try to bake today. Will see how it goes.
Hmmm, what wheat berries did you use? are you hand kneading or what mixer did you use. I would love to know how it goes after in the fridge. The rise times will be much longer, but it should knead up nicely. I recommend watching some of my videos about kneading and working with fresh milled flour. I have a more recent one about Focaccia, and I show the stages of the dough and what it looks like, etc. If interested here is a link to that video. https://youtu.be/3nDorxqEgaU
I used hard white wheat. I kneaded in kitchen aid. I think I may have over kneaded it. I felt the dough was starting to get stretchy so I continued kneading which caused the dough to start breaking again. I ended up using the dough to make naan like flatbreads. They were pretty good. Thanks for the reply!
It is possible that it over-kneaded if it went from stretchy to breaking apart again. Next time, once it is stretchy and not wanting to tear easily, I would let it rise. and continue, even if it isn’t a perfect window pane. Just looking for nice stretchy dough that wants to stay together. Great thinking to turn them into something else delicious!
Can you please make a video of you making this bread? Thanks!
I will keep that into consideration, I would recommend watching this sandwich bread video if you haven’t already. I show the kneading and dough consistency. Also, my focaccia video is very informative as well for fresh milled flour yeast doughs. https://youtu.be/zfX-Qr5Q_X8
I’m so glad I found your blog. It’s become one of my favorites!
Thank you so much! I appreciate it!
Hello, i just want to say I really enjoy your recipes and your site!
For me this recipe failed !! I did use coffee instead of tea other than that i went exactly by your instructions! It was very wet! I let it rest 2 hours ! Then added other ingredients and started kneading it, it was very wet after I kneaded a while i added more flour at least a cup kneaded again! Took out of my mixing bowl put flour on the counter need a little more flour into it helping to get it more usable. Finally, I let it rise divided it out and put in loaf pans. It rose OK not great I cooked it and it’s hard as a brick! I live in lower AL. Usually very humid here and humidity was down so I can’t figure out. What went wrong. Do you have any suggestions? Thanks , Stephanie.
Oh no! I am sorry to hear that. It absolutely could be the more humid climate, but also, even the moisture content in the wheat berries is different. I do like to work with a wet dough, as I find that gives the lightest fluffiest results. But it is much wetter than traditional bread dough. If you watch one of my bread dough videos, it may give you an idea of the moisture content of my dough, and how you might want yours to look during each step. Here is a video showing that. Hope that helps! https://youtu.be/zfX-Qr5Q_X8
Hi – how long do you have to knead it for? thanks! Sheryl
The kneading time can vary greatly! If you are using a kitchen aid or mini stand mixer, it may take 20-25 minutes. If using a Bosch or Ankarsrum mixer it may be half that. If by hand, I recommend kneading 10 minutes, and then letting it rest for 15 minutes again, and then kneading another 10-15 minutes. Really you want to knead it until the dough becomes smooth, and stretchy and doesn’t tear when you stretch it (Passes the Window Pane test). Here is a link to my video about the window pane test. Hope that helps! Happy Baking! https://youtu.be/G7dWEzCWkgU
How many loaves does this make? Currently waiting on mine to rise and unsure if it’s 1 or 2 sandwich loaves. Love love love all your recipes. I was between this one and another and my 12 year old said “stick with grains in small places. You know all her recipes turn out terrific”.
This recipe makes Two smaller 1 pound loafs. I make mine in the smaller 4×8 pans, not the 4.5×9 pans. I hope that helps!
Thank you! They came out delicious. Hubby said this is his favorite bread so far. I used coffee instead of tea and the strong flavor was very good. DD is baking your pumpkin donuts this afternoon with fresh pumpkin from the garden. So thankful for your site and recipes!
I am excited to try this! Do you know if you could use hard red wheat in place of the hard white?
Yes! You can use hard red in place of the hard white in pretty much any of my recipes that call for hard white! I hope you love it! Let me know how it turns out! Happy Baking!
I’m really confused why this was so sticky and impossible to shape. I followed the directions to a T and triple checked them. I used the exact ingredients listed and weighed them. I kneaded and was pleased to get the stretchiest (although, very very wet) dough ever and a great windowpane. But this was so incredibly sticky that shaping was a nightmare. I couldn’t get a nice smooth loaf. Then, it took twice as long to bake. Are you sure this recipe is supposed to be that wet?? Also, I noticed that your recipe says it’s for 2 loaves but the instructions only reference 1 loaf- should I have made 2 loaves? Is that why it took so long to bake?
If you go nice stretchy dough, that is a great thing! I do like to work with a wet dough, because it gives me the lightest, squishiest, airy bread. (more like store bought bread texture.) I do recommend using oil on your work surface, and your hands to shape, that should help a lot! This recipe was for two 4×8 bread tins. I will go and specify that, thank you for pointing it out. But, yes too much dough would cause it to take longer to bake. If you are in a humid area, or your wheat berries could have a higher moisture than mine, there are a ton a variables that could affect the dough. The best thing I can recommend is to watch some of my videos, and that will show you what texture the dough should look like. Here is one, but I have a ton of tutorial videos for working with fresh milled flour. I hope that helps! https://youtu.be/Ythxqi_gu0w
Do you think you’ll be making a video of this bread soon? I’d love to watch it before trying my hand at one that has so many others questioning what went wrong when they tried it.
Thanks
That is a possibility, I can put it on my list. I recommend trying some of my other bread recipes first, and see what to expect with the dough. I work with a wet dough, and I find that is what yields me the soft fluffy bread. But, it is a bit different from traditional white bread dough. So, if you master some of my beginner breads, that will help you to understand the techniques. I recommend watching this video to start out. I have many others as well! I hope this helps! https://youtu.be/zfX-Qr5Q_X8
quick question I am making this now kneaded about 20 min in ank when I turn machine off the dough starts falling ( not holding any kind of shape). I make a lot of your breads so am assuming this dough will look like the others. so I added 1/2 more cup of flour..I guess the question is when done kneading should you see the dough fall or does that mean it needs more flour
It is ok if the dough falls after kneading. I like a wet and sticky dough. However, I have been hearing lots of reports that in a lot of areas, the humidity has been pretty high, so that can be affecting it. However, my dough is pretty soft and lax before it rises. I would cover, and let it rise. Let me know how it goes! Thanks!
Kara, I’ve made two batches of this. The first came out almost perfect–I did the 1.5x recipe as suggested, but it was too much for my pan, and looked like Cousin It when it came out of the oven. It also had a big hole in the center of the bread. But it IS DELICIOUS. Holy cannoli! Cannot get over the flavor. I tried making some more yesterday, because I wanted to take some to my parents. This time, I was distracted, but the dough was so much wetter than I remembered. It was more like batter than dough. Then, when I baked it, it deflated and looked horrendous. What should I do? I was so sad, but I remembered you saying you save a lot of your misfires and make croutons or bread crumbs or other things, so I froze them for now.
Hmmm, not sure what could have gone wrong, but I do know that the weather and humidity do like to play with our breads, lol. The hole in the center may be due to shaping. I have a short video on that that may help. https://youtube.com/shorts/-igyZHChw7A?si=6KEb78MnR2WQ8oJ9
Yes, I like to make croutons with mine leftover loafs, I have a quick recipe for that here. https://grainsinsmallplaces.net/easy-homemade-croutons/
To make bread crumbs, I like to allow the bread sliced to air dry for a day or two, then just blend them up, and you have bread crumbs. I keep those in the freezer so I have them anytime I need them. I hope that helps!
What needs done to turn this recipe into just rye bread…instead of pumpernickel?
If you add the Carraway seeds to it, that gives the taste of that traditional Rye bread flavor.
Hmmm… At 7,300’, so made per recipe with high altitude adjustments of:1) substituted honey for sugar (slightly wetter dough); 2) scant teaspoon salt; 3) only 2 teaspoons regular yeast; and 4) baked at 375. Had windowpane or very nearly after ~30 min in KA, and all looked good going into baking. Then they cratered somewhat (~3/4”) during baking. Maybe not windowpane enough (I got nervous about over-kneading) or still too much yeast for my altitude? Sigh. Still learning.
If they fell in the oven, that is typically from too long of a second rise time (overproofing). Try shortening the second rise, and I think you have it!
These turned out so well! I was nervous because of the mixed reviews but it was delicious! Left it a single recipe and baked in the smaller pans. I tried not to over knead since some people seemed to have a problem with that. We loved it!
Awesome! I am so happy to hear that! Thanks so much! 😊
Really good.
Thanks! 🙂
I have made your sandwich bread and it turned out great! So I thought I would try this one as I love pumpernickel bread. But I had problems with the dough. I never got a good window pane. I kept kneading (in Ankarsrum). It was extremely wet. I thought that would “take care of itself” in the 1-2 hour resting. It doubled in 1 hour so I put it on my counter with oil to shape. It was almost not able to shape it was so wet. Not like the wet of the sandwich bread, but almost as wet as batter. I shaped as best possible, and put it in the pan. I am in the South, but this time of year the humidity is low and we are in a drought. Thoughts?
Hmmm, typically that sounds like it does need a bit more hard white wheat flour in it. It should be close to the sandwich bread dough texture, but it is a bit more of a sticky dough.
I have made your sandwich bread and it turned out great! So I thought I would try this one as I love pumpernickel bread. But I had problems with the dough. I never got a good window pane. I kept kneading (in Ankarsrum). It was extremely wet. I thought that would “take care of itself” in the 1-2 hour resting. It doubled in 1 hour so I put it on my counter with oil to shape. It was almost not able to shape it was so wet. Not like the wet of the sandwich bread, but almost as wet as batter. I shaped as best possible, and put it in the pan. But even after only 5 minutes and testing for dimple, it wouldn’t spring back, but just sank. I am in the South, but this time of year the humidity is low and we are in a drought. Thoughts?
I think this question came in twice, see the previous answer for this. 🙂
I’m happy with how this bread turned out although I was very skeptical during the process. The dough was very wet and didn’t look like it was the right consistency compared to other doughs I have made. I used a Kitchen Aid and kneaded for about 25 minutes. Although it still looked very gloopy to me, I did not add any more flour and just continued on. I let it rise almost 2 hours. Shaping it was a bit of a mess but using olive oil was helpful. Followed the remainder of the instructions and ended up with nice loaves! I used carraway seeds and we really enjoyed the taste of the bread.
Awesome! Nice job trusting the process. This is a wet and sticky dough, but that is what makes it such a wonderful soft texture. Thanks for sharing! 🙂
Could I replace the egg with a vegan alternative for this recipe? I want a specific rye recipe and have had no luck with your other recipe that is vegan so wanted to try a different one 🙂
Hmmmm, I am not sure if an egg replacement would give the rise. There is no leavening agent in this, the rise comes from the heat and the eggs. But, if you give it a try let me know how it goes! 🙂
This may be a silly question, but do I leave the caraway seeds whole or grind them? It appears whole since it’s not stated otherwise, but I’m wondering if grinding them with the flour would help evenly distribute the flavor. Thoughts? Can’t wait to try this!
We leave ours whole, they tend to soften in the dough and add that pop of flavor throughout. You can add more if you really love the taste of them.
Hubby has been wanting rye bread, but decided on the pumpernickel instead. So this is my next bread to try. My question is: Can I use the Tangzhong method with this recipe?
Yes, you can add some of the Tangzhong paste to this recipe, I love to add it to any recipe I want soft fluffy bread from.
Have followed recipe all the way to letting it rise. Seems wet, using Kitchenaid and it is always a toss up on the kneading part, but will see how it does on the rise.
Oh by the way great sale on the Bosch. Just the incentive I needed to purchase it. Thanks.
Let me know how it goes, I have some tips on working with a kitchen aid, and what to do if you have wet dough often in this video. https://youtu.be/tdnCrbOsVag
However, the dough should be a bit wet and sticky, that is what makes the brand soft and fluffy.
Was way wetter than I thought it should be. But worked thought the process of putting into pans to rise again. Ended up with 2 loafs that were about 3″ tall. The bread is soft and taste is great. Next bread will be with my new Bosch mixer. Can hardly wait. Thank you for all your help.
Awesome! I am so excited for you! 🙂