Tangzhong Method – Fresh Milled Flour Bread- Super Soft!
Have you ever heard of the Tangzhong Method for making Fresh Milled Flour Bread super soft and fluffy, and lasts longer? I almost couldn’t believe this one simple step could make such a difference, but it is unbelievable! Let me show you how you can level up your bread even more!

You do not HAVE to use the Tangzhong method to get wonderful fluffy results with fresh milled flour, HERE is my video on how to make super soft FMF sandwich bread without the Tangzhong method.
FMF=Fresh Milled Flour

What Is The Tangzhong Method?
The Tangzhong Method is a Chinese method of making bread softer, fluffier, and that will last longer. The method involves cooking a small amount of the fresh milled flour in a bread recipe with some milk or water into a paste, then allowing it to cool a bit. After it has cooled, you put that paste into your dough, and wow what a difference!
How Does The Tangzhong Method Work?
Cooking the small amount of flour before hand, allows the starch in the freshly milled wheat flour to gelatinize. This allows the flour to be able to absorb more liquid than normal, which results in the softer fluffier bread. Also, this tangzhong method allows the bread to last longer after baking. So, it is a method of preservation without adding artificial preservatives.
When To Use The Tangzhong Method With Fresh Milled Flour?
I have been experimenting with this method for a while, and I recommend using the Tangzhong method for your fresh milled flour breads, rolls, and buns. But, I do think just about any FMF recipe could benefit from this “paste.” So, basically, any dough you want to be softer and fluffier.

Ingredients To Make Soft Fresh Milled Flour Sandwich Bread With The Tangzhong Method
- 6&1/8 cup fresh milled flour, divided 735g (Hard wheat for this. I use 615g hard white wheat and 120g of Kamut.) *See notes for alternatives
- 1 cup milk 250g (can sub for water if needed)
- 1 cup water 240g
- 4 TBSP softened butter, unsalted 57g (can sub for oil)
- 4 TBSP Honey 84g (can sub for sugar)
- 2&1/2 tsp sea salt (If using salted butter, decrease to 2&1/4 tsp salt)
- 2 eggs 100g
- 1 TBSP lemon juice 15g
- 4 tsp instant yeast (Use 4&1/2 tsp if using active dry yeast)
Instructions To Make Soft Fresh Milled Flour Sandwich Bread With The Tangzhong Method
Make The Tangzhong Paste
- Firstly, mill the flour. I mill 735g total of wheat berries to get my fresh milled flour. But, this flour will be used in two different places in the recipe.
- So, let’s use part of the flour to make the paste.
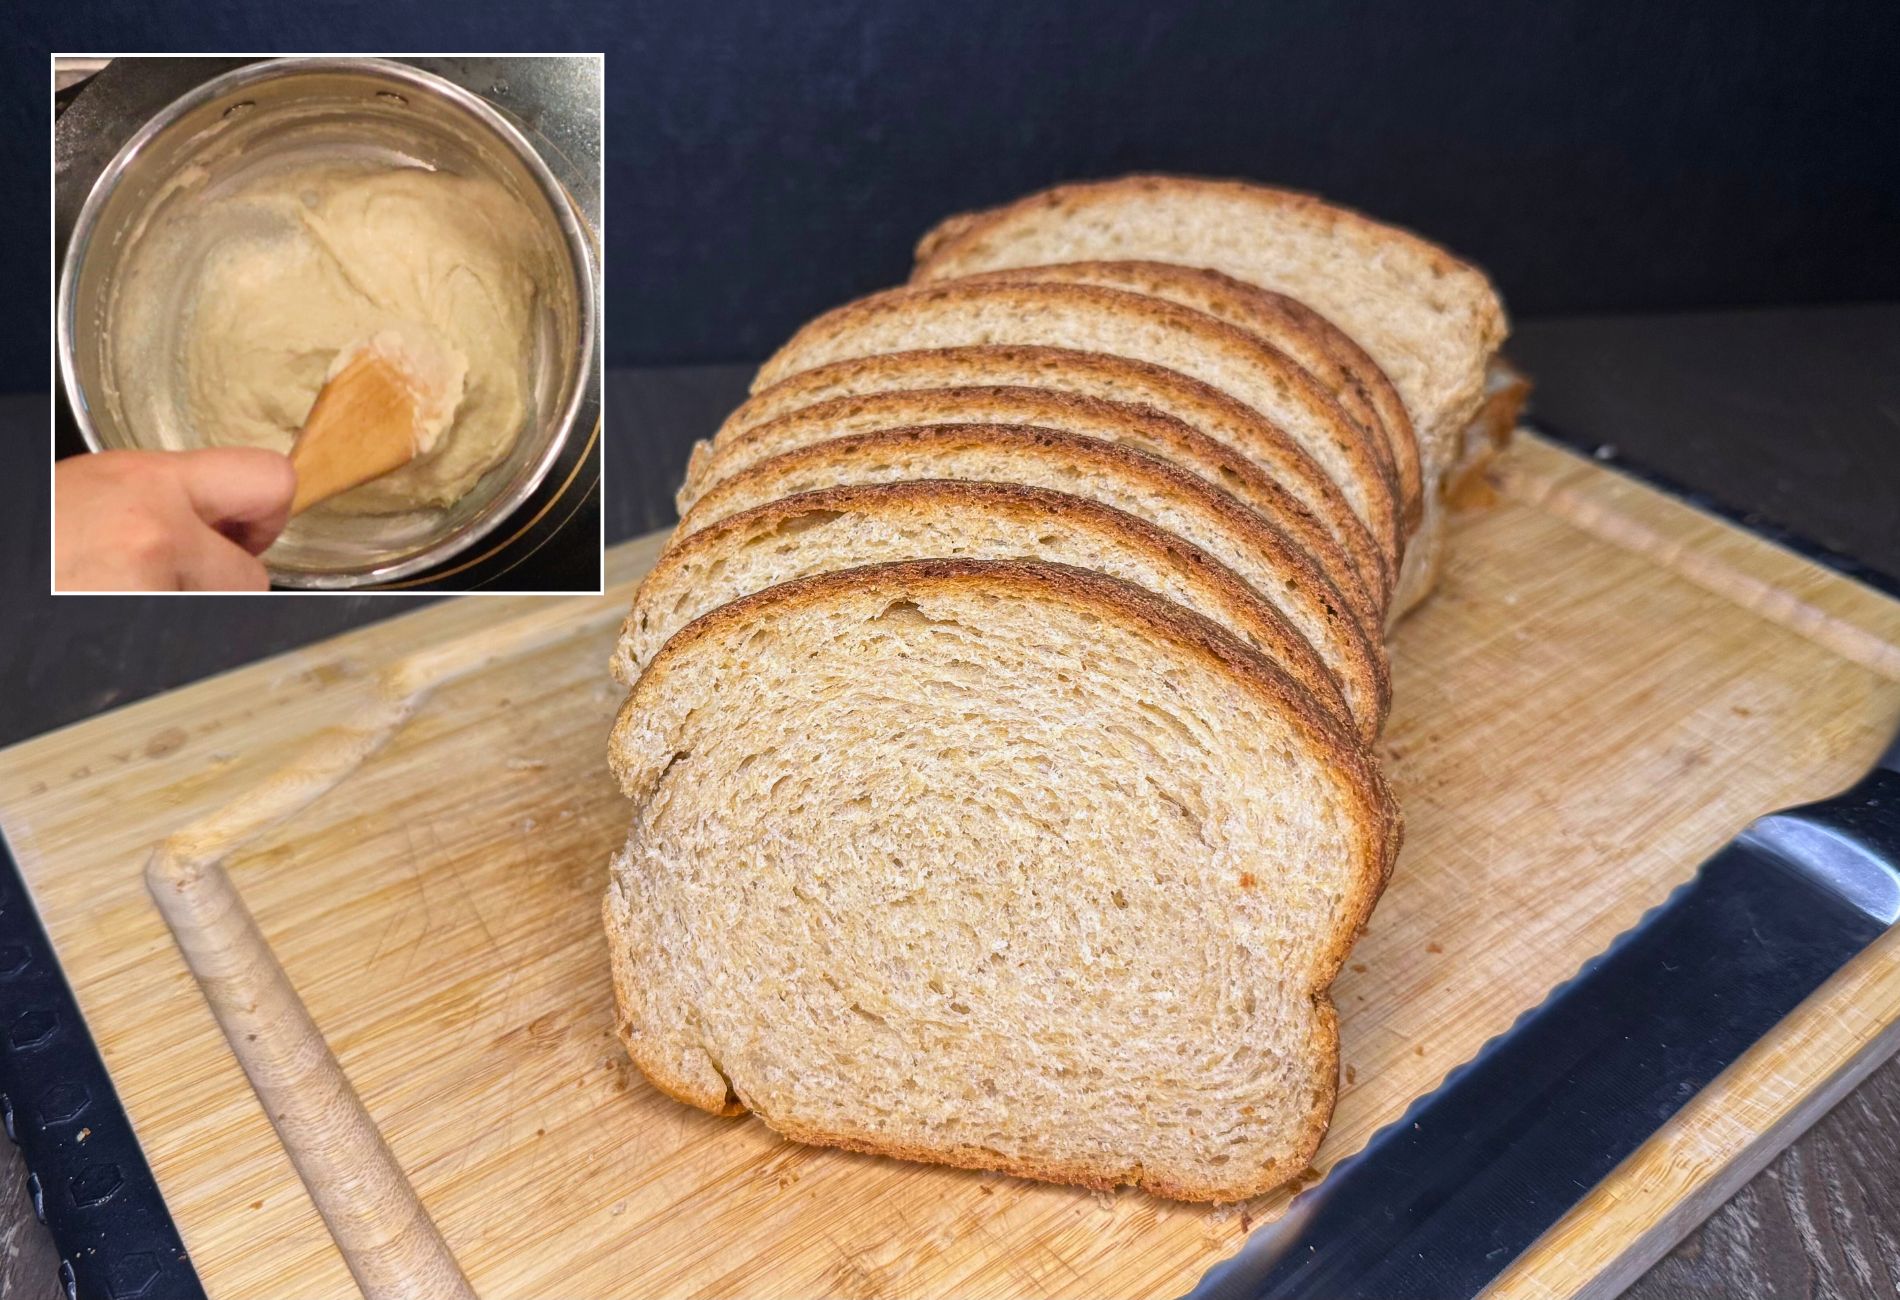
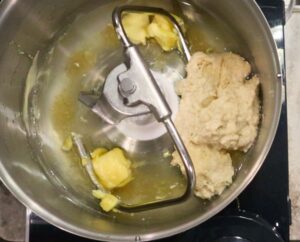
- Put 1/2 cup of fresh milled flour (60g) and 1 cup milk (250g) into a sauce pan, stir to combine.
- Heat this mixture on medium-high heat until it forms a paste. This should only take about 3-5 minutes. Once it forms a paste, remove from the heat, and allow it to cool at room temperature.
Make The Dough
- While that mixture is cooling, put the water, softened butter, honey, salt, eggs, and lemon juice into your mixer.
- Mix these ingredients to incorporate. Then add in the paste mixture.
- Then, add the remaining flour into the mixing bowl, and mix to combine until no flour is left. Cover, and let this mixture sit for about 15 minutes. This is the autolyse period and it allows the fresh milled flour to absorb the liquid and the bran to soften. Because the yeast is not in the mixture yet, you can do this autolyse period for longer if you prefer.
- After the autloyse period, then put in the yeast, and mix to incorporate.
- Once the yeast is added, Start the kneading process. Make sure not to knead the dough with the cover on your mixer, this will overheat your dough, and cause it to break down.
- Knead until the dough is nice and stretchy. Typically, 6-8 minutes in a Bosch style mixer, 16-20 minutes in an Ankarsrum style mixer, or 25-30 minutes in a Kitchen aid mixer (allow extra time for a Kitchen Aid style mixer to have breaks in between kneading to prevent overheating of the mixer.) These kneading times will vary for everyone, this is just the most common times for these style of mixers.
- Once the dough is nice and stretchy, and doesn’t easily tear. Then, cover and allow it to rise until double. This can take somewhere between 1-2 hours. (Instant yeast or warmer rooms will be closer to 1 hour. Active dry yeast or cooler rooms will be closer to 2 hours.)
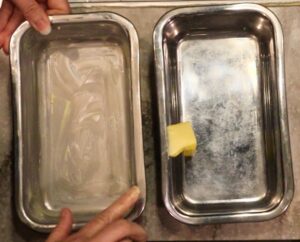
- While the dough is rising, prepare your bread pans with parchment paper, or softened butter.
Shape & Bake The Loaves
- Once the dough has doubled in size, place some olive oil on your counter, and hands. Then, divide the dough in half.
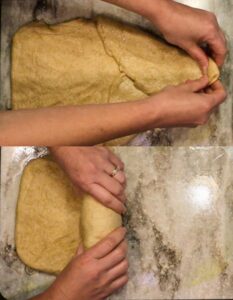
- Shape the dough into 2 bread loaves with some surface tension. I like to flatten each piece of dough, then fold two corners into make a triangle tip. Then, lightly pull (not so tight that it rips the dough) to create tension, and roll the triangle into the dough all the way up until it forms a loaf. You can pinch the ends together. After shaping, the top should have a tight tension on the top of the loaf, this helps with the rise also. *see video
- Put each shaped loaf into each prepared bread pan, cover, and then allow to rise a second time. 40-50 minutes. (*Tip- usually the second rise time is close to half the the first rise time.)
- During the end of the second rise, preheat the oven to 350*F.
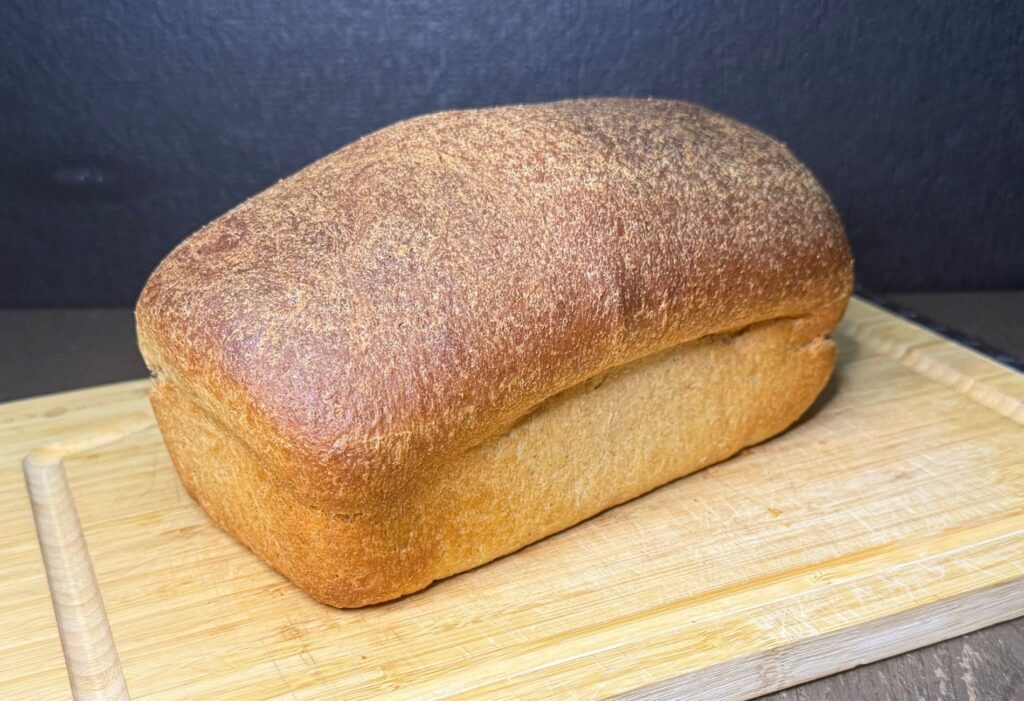
- Once the loaves have risen, they should appear nice and puffy, then bake for 38-43 minutes. Check the center of the loaf to make sure they are done. The internal center of the loaf should be at 190*F for yeast breads.
- Once they have finished baking, remove from the oven, and carefully dump them out of the bread pans onto a cooling rack. I like to place mine on their sides as the cool.
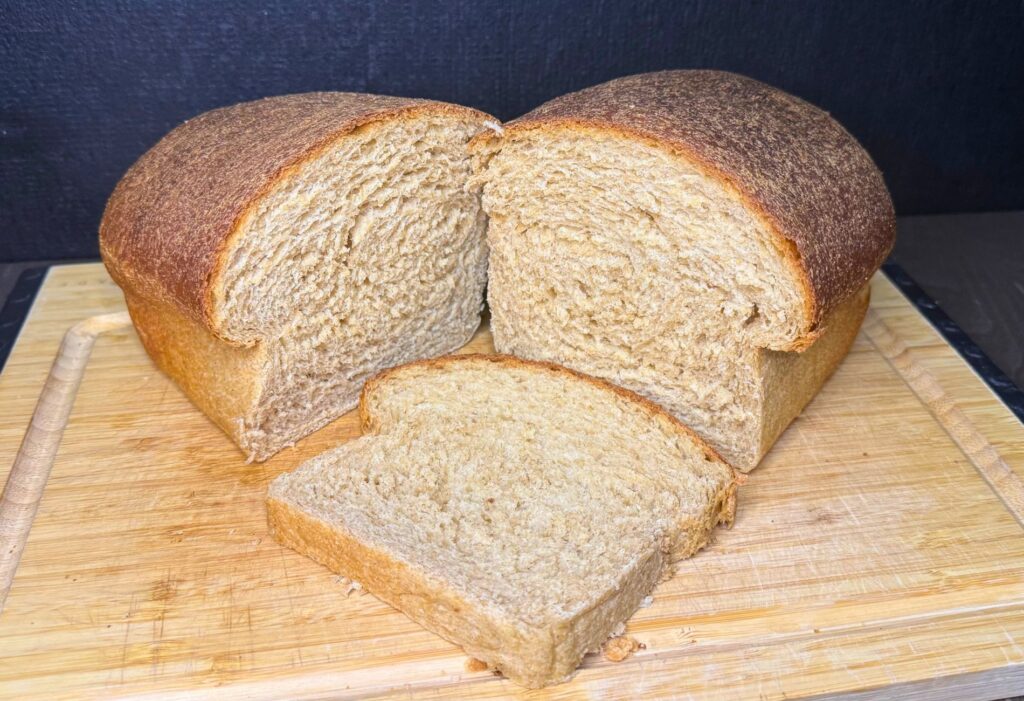
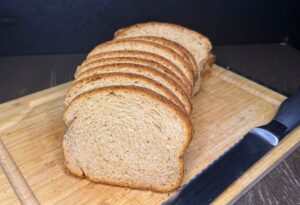
- Once the loaves have cooled, you can slice and enjoy. If you slice into them while they are still hot, this can cause them to be crumbly the next day or gummy. So, try to resist cutting them while hot.
How To Store Fresh Milled Flour Bread Made With The Tangzhong Method
To store fresh milled flour bread made with the Tangzhong method, it will last a little longer on your counter than bread without using this method. However, we still love to allow the loaf to cool completely, then slice it and place it in a freezer safe container or bag. Freeze for up to 4 months. To thaw, just place however many slices you want on the counter to come to room temperature, usually about an hour or so.
Shop This Post
Classic Grain Mill (Save $20 OFF with coupon code: GRAINY)
Grain Mill Harvest Nutrimill (Save $20 OFF with coupon code: GRAINY)
Bosch Universal (Black & Stainless)($20 OFF Coupon Code: Grainy)
My Cook Book (Paperback Version)
Grain Bin Sticker Labels – Save 10% with coupon code – GRAINY
Shop My Site Wheat Berries & Coupon Codes
Baja Gold Salt SAVE 10% OFF with Coupon Code: Grainy
Checkout Some Of My Other FMF Recipes
FMF Soft Sandwich Bread (Non- Tangzhong Method)
Pumpkin Roll With Cream Cheese Filling
Fresh Milled Flour Recipe Index
Fresh Milled Flour Bread Tangzhong Method Video Tutorial

Tangzhong Method With Fresh Milled Flour Bread Printable Recipe
Tangzhong Method with Fresh Milled Flour Bread
Ingredients
- 6&1/8 cup fresh milled flour, divided 735g (Hard wheat for this.) I use 615g hard white wheat and 120g of Kamut. *See Notes for alternatives
- 1 cup milk 250g can sub for water if needed
- 1 cup water 240g
- 4 TBSP softened butter unsalted 57g (can sub for oil)
- 4 TBSP Honey 84g can sub for sugar
- 2&1/2 tsp sea salt If using salted butter, decrease to 2&1/4 tsp salt
- 2 eggs 100g
- 1 TBSP lemon juice 15g
- 4 tsp instant yeast Use 4&1/2 tsp if using active dry yeast
Instructions
- Firstly, mill the flour. I mill 735g total of wheat berries to get my fresh milled flour. But, this flour will be used in two different places in the recipe.
- So, let's use part of the flour to make the paste.
- Put 1/2 cup of fresh milled flour (60g) and 1 cup milk (250g) into a sauce pan, stir to combine.
- Heat this mixture on medium-high heat until it forms a paste. This should only take about 3-5 minutes. Once it forms a paste, remove from the heat, and allow it to cool at room temperature.

- While that mixture is cooling, put the water, softened butter, honey, salt, eggs, and lemon juice into your mixer.
- Mix these ingredients to incorporate. Then add in the paste mixture.
- Then, add the remaining flour into the mixing bowl, and mix to combine until no flour is left. Cover, and let this mixture sit for about 15 minutes. This is the autolyse period and it allows the fresh milled flour to absorb the liquid and the bran to soften. Because the yeast is not in the mixture yet, you can do this autolyse period for longer if you prefer.
- After the autloyse period, then put in the yeast, and mix to incorporate.
- Once the yeast is added, Start the kneading process. Make sure not to knead the dough with the cover on your mixer, this will overheat your dough, and cause it to break down.
- Knead until the dough is nice and stretchy. Typically, 6-8 minutes in a Bosch style mixer, 16-20 minutes in an Ankarsrum style mixer, or 25-30 minutes in a Kitchen aid mixer (allow extra time for a Kitchen Aid style mixer to have breaks in between kneading to prevent overheating of the mixer.) These kneading times will vary for everyone, this is just the most common times for these style of mixers.
- Once the dough is nice and stretchy, and doesn’t easily tear. Then, cover and allow it to rise until double. This can take somewhere between 1-2 hours. (Instant yeast or warmer rooms will be closer to 1 hour. Active dry yeast or cooler rooms will be closer to 2 hours.)
- While the dough is rising, prepare your bread pans with parchment paper, or softened butter.
- Once the dough has doubled in size, place some olive oil on your counter, and hands. Then, divide the dough in half.
- Shape the dough into 2 bread loaves with some surface tension. I like to flatten each piece of dough, then fold two corners into make a triangle tip. Then, lightly pull (not so tight that it rips the dough) to create tension, and roll the triangle into the dough all the way up until it forms a loaf. You can pinch the ends together. After shaping, the top should have a tight tension on the top of the loaf, this helps with the rise also. *see video
- Put each shaped loaf into each prepared bread pan, cover, and then allow to rise a second time. 40-50 minutes. (*Tip- usually the second rise time is close to half the the first rise time.)
- During the end of the second rise, preheat the oven to 350*F.
- Once the loaves have risen, they should appear nice and puffy, then bake for 38-43 minutes. Check the center of the loaf to make sure they are done. The internal center of the loaf should be at 190*F for yeast breads.
- Once they have finished baking, remove from the oven, and carefully dump them out of the bread pans onto a cooling rack. I like to place mine on their sides as the cool.

- Once the loaves have cooled, you can slice and enjoy. If you slice into them while they are still hot, this can cause them to be crumbly the next day or gummy. So, try to resist cutting them while hot.
Video
Notes
*This post contains affiliate links, which means I make a small commission at no extra cost to you! Also, as an Amazon Associate I earn from qualifying purchases. But, I will only suggest items I actually Recommend!


I have been using FMF for over a year and have a pretty tried and true recipe with a good rise and great flavor, but dense. I used this recipe in hopes of a softer fluffier bread. And it was definitely softer, but I hardly got any rise in the oven and my centers dipped in. I followed the recipe and my prior knowledge of making bread, but don’t understand what went wrong.
If the centers dipped in, that is usually a sign that the bread over proofed. Try shortening the second rise time and that should take care of it. 🙂
I’m new to fmf but I’m really enjoying it and your recipes and videos have been incredibly helpful! I’m trying this recipe for the first time, I thought I could sub honey granules 1:1 for honey but the weight was different. 84g of honey granules was quite a bit more than 84g of honey. I switched to honey to make sure it would be ok but if I were to sub honey granules next time, how should I do that? Thank you!
You can use 4 TBSP honey granules which usually is about 50g (closer to what sugar would weigh, because the honey has moisture in it, it weighs more.)
Is the honey required? I haaaate sweet tasting bread, I’ve left it out of fmf loaves recently and it came out good just not as soft as I’d like cause I use lid a bread machine so it doesn’t autolyse as long as doing it by hand. So I’d like to try this in my zojirushi but it seems to be for two pans …
So is honey required? What does the vinegar do (just curious), and would I reduce the amounts for a bread machine 2lb loaf or divide this? Just curious if this method can even be used with a zojirushi 2lb loaf machine lol. Sorry for all the questions I’m just so desperate to make a loaf that I love to eat since my hubby got me a mill and a bread machine and I’ve made so many and they will eat them ok but I just can’t stomach how crumbly or sweet they are. Thankyou for any help!
The honey is not required, just adds flavor. The vinegar doesn’t change the flavor, it lets the loaf last a bit longer on the counter. I don’t have a bread machine to know for sure on that, but you could use it for the kneading part. It will most likely need 2 kneading cycles, just watch for nice stretchy dough.
I’m excited to try this recipe! However, I can’t have eggs. Is there a substitute, or can I leave it out?
Thank you,
Carol
You can use sunflower lecithin, or leave the eggs out, and add an additional amount of water to account for the eggs (maybe 50-60g more water) Let me know how it goes!
I usually use sunflower lecithin at 1T per egg substitution with your Everyday sandwich bread recipe. And turns out great usually. This recipe has egg too and wondering if I use sunflower lecithin instead like I do with your other recipe if it’ll turn out good or if it’ll mess up the moisture?
Also, can I use your Everyday sandwich bread recipe to do the tangzhong method and just take out a certain percentage of flour and liquid from that recipe to do the Tangzhong method step?
Yes, you can do both! Take out about 8% of the total flour by weight, and multiply that weight by 4. Then remove the weight of that liquid from the original recipe.
My loaves are cracking toward the top. Do you know what I could be doing wrong, others have turned out great but the last 4 have cracked
They may need a little more liquid, or a little less flour. OR if the dough wasn’t nice and stretchy, it may need more gluten development. OR it could a few other things, but these are the more common reasons.
The bread tastes great. I used red fife. But a little discouraged. I’m new to milling flour and trying to convert from AP flour. I spent all day in the kitchen making this but, the bread didn’t fully rise while it was baking and it is kinda crumbly. It tastes like a great bread. But not as light and fluffy. I’m wondering what I did wrong? I did add a little more Kamut then the recipe called for
Or maybe the yeast isn’t working? Otherwise it tastes great.
If too much flour was added that can make it crumbly, or if not enough hard wheat was used, it may not have had enough gluten to make the bread soft. But, a bad rise is most likely to be caused by the yeast. Either the yeast is starting to go bad, or if the paste was added to the dough too hot with the yeast, the heat can kill off the yeast.
This is by far the best sandwich loaf I have made in my 2+ years of using FMF! Thank you for doing the work to figure out the Tangzong method- it is so worth it!!
Yay! I am so happy to hear that! Nice job! Thanks so much! 🙂
I 100% agree with this!
I love your recipes but I keep having loaves come apart on the top during the 2nd rise or in the oven. Can you help me figure out what I’m doing wrong? I’m brand new to milling and baking my own bread and am getting fairly disheartened with the kneading process and how my loaves are turning out.
It is most likely the gluten not developed. It might need kneaded longer to make a nice stretchy dough that holds together when you stretch it gently. It may just be that your wheat is low in protein, so it needs a little help with the gluten development. If it is the wheat, then you can add a small amount of vital wheat gluten (like 1 TBSP) to the mix, and that can help if you prefer. If you have a different hard wheat, try that and see if you have different results, that could be the issue. I got a batch that seemed lower in producing gluten in the past, and it needed a boost of either extra kneading, or the gluten added. I try not to add it, but if my wheat is consistently doing this, it tell me, it needs a post in gluten.
I can’t thank you enough for this recipe and detailed video. I’ve been milling for a year and a half. I was almost ready to throw in the towel. I’d tried so many recipes and different methods and they just weren’t right. This recipe and this method is it! Thank you. It’s moist. It stays together. It’s delicious.
Awesome! I am so happy to help! We have been LOVING this method! Thanks for sharing! 🙂
I halved this recipe. Used hard red and white cuz that’s all I had on hand. Ended up a soupy mess and had to add a lot more flour to get it to any sort of dough consistency. I autolysed for an hour. Then Kneaded for 2 hours. Half KitchenAid and half by hand. So much oil went into the dough or it would go right back to stuck to everything (counter and me) the bread came out nice and soft which I loved. But it falls apart so easily I couldn’t cut it with my bread slicer. Not sure what happened here.
Hmmm it sounds like what you are describing is some soft wheat was in there. Soft wheat will not really develop gluten even after long kneading periods of time, also it doesn’t absorb as much liquid as the hard wheats.
It’s a five star recipe, zero complaints! I’ve made it 4 times now and I’m truly flabbergasted at the texture! I’ve abandoned my sourdough sandwich bread recipe for this and never going back!
Yay! I am so happy to hear that! We LOVE this new method too!
Thank you so much for sharing your knowledge and experience with everyone! I absolutely love every recipe I have tried from your channel. I have no need to look elsewhere. I am a fan for life. I appreciate your time and energy that you put into your channel.
Shalom and Blessings,
Katrina
Yay! Thank you so much! I am so happy to hear that! Thanks! 🙂
Can this dough be made into cinnamon rolls?
Yes! This dough works great for cinnamon rolls! 🙂
Is it possible to use half the yeast and do a long ferment? I have histamine intolerance and sourdough is bothering me, but helps me digest the gluten better. I’m thinking a longer ferment with yeast might be my answer! What do you think? Will half the yeast work for long ferment? Thank you!
I would suggest trying this method, which I love for bread, rolls, buns, etc. I like to make the dough and shape it. Then before the second rise, I cover and put in the fridge overnight. The next day I let the dough come to room temperature (usually 1-2 hours depending on how warm/cold your house is.) Then bake as directed.
Can I triple this batch? I have an 8qt Zacme
Yes, you can make a triple batch, but only double the yeast. The kneading times may take a bit longer with a large batch of dough. I believe it should fit in the larger Zacme mixer, but I don’t have one to test. Let me know how it goes! 🙂
Tried this recipe and the taste and softness of the bread was great! However, I think my yeast might have been overactive (if that is a “thing”). I got the window pane test to work after much working of the dough in my Kitchen Aid and kneading by hand. It was almost tripled in size after only one hour of proofing the 1st time (in my oven on bread proof setting). I used red star active dry yeast which I keep in my fridge and it has been in there for over a year. I used olive oil when shaping the two loaves to avoid stickage… the dough was beautiful in texture and feel at this point. The second proof was about an inch rise over the top of my (4.5″x8.5″) bread pans after about 30 minutes so I put it in to bake at that point. When baking, the bread “mushroomed” really badly. It was up to temperature in the center after 28 minutes of baking so I took them out and let them cool out of the pans on their side. The sides caved badly. From all appearances, it looked like I overproofed but my times were under what you suggested. The crumb and moisture of the bread was mostly perfect. Just the sides where it caved in was dense and a bit gummy. Flavor was really good tho 🙂 I used sprouted organic hard white wheat and kamut… is it possible that the tangzhong method with sprouted wheat is too much moisture retention? Is it possible to have overworked the dough…? Not sure why it ballooned so drastically during the bake… and rose rather quickly during the proofs.
The proofing times I mention are at room temperature, so a proofing box will speed up the rise time. Baking for 28 minutes seems a little short, and the sides caving in and the gummy center tell me they needed to bake a little longer. This recipe does make two pretty big loaves, sometimes if I want 2 smaller loaves I will make 4 buns or rolls with a small portion of the dough and still get two nice size loaves.
Also, using sprouted grains and flour can have more moisture, so maybe hold out a little of the liquid when using that, and only add it in if the dough seems dry or stiff.
So thankful for this recipe and the video! I think my bread was coming out more dense bc I was adding flour when it was sticky. Your explanation of allowing it to be wet so it could absorb more moisture during the first rise changed so much for me. The tangzhong method… I won’t be going back to how I did it before! Thank you for the help!
Yay! Yes, I almost never add more flour. So glad to hear this was helpful! Thanks! 🙂
Love this recipe! I do have a question about how to get a smooth rise. Every time I’ve made this bread, the taste is great but my loaf doesn’t look pretty. It ends up a little lumpy. Suggestions for how I can get a good smooth rise? Maybe I let them over-rise. I didn’t realize that could cause a collapse.
If they are lumpy, it sounds like it rose, then collapsed. That would indicate over proofing, try shortening the second rise. If it’s not rising well at all, then that is usually an issue with the yeast. Try a new batch, and also make sure the paste is not too hot when you go to put it in, if it’s too hot, that can kill the yeast.
Do you punch down after the first rise? I’m new to breadmaking so if I don’t see instructions specifically mentioned, I have to ask. Lol. Also what size/brand bread pans are pictured in this recipe? Looking forward to trying this as I haven’t had the best luck with loaves turning out quite right.
You can punch the dough down after the rise if you prefer (I think it’s kind of fun, lol) But, not really necessary, as when you remove the dough from the bowl it was rising in, and flatten the dough to shape, it will remove a lot of that excess air the same way. These bread pans are two 4.5×8.5 bread pans. Let me know how it goes.
Will do. Like many others, I’ve struggled with FMF breads. Always tasty but always more like the density of cake than a good sandwich bread(our main use for bread). But I never was very experienced with breadmaking in general beforehand so I kinda dove head first into the shallow end of the pool. Lol. Thanks for the reply.
PS-Sorry to ask about the bread pans as after I posted my comment, I saw you had them linked. Can’t wait to try this recipe though.
Yes! You got this, also I recommend giving the video a watch and you can even pause as you go so we can make it together. https://youtu.be/uvHXu3R6WH8?si=ZvHlQxnvSYm8hVb7