
Crusty French Bread Baguette Made With Fresh Milled Flour Magic
Step into the world of artisanal baking to uncover the secrets behind creating the perfect crusty French bread baguette, made with the finest fresh milled flour. Picture the lovely aroma that fills the air as the golden loaves emerge from the oven. And with a crisp exterior hiding a soft, pillowy interior just waiting to be eaten. I want to show you some tips and tricks for this simple recipe.

Do I Need A Mixer To Make Bread?
No, a mixer is not essential for bread-making, but having one will definitely simplify the process. However, this recipe is designed specifically for the gratifying experience of hand kneading. Of course, using a mixer is still an option, but the experience of kneading the dough by hand creates a connection and invaluable lessons unmatched by any amount of reading.
An Invaluable Technique to Shorten Your Kneading Time
Get ready to revolutionize your bread-making routine with a game-changing technique. Because, I want to share with you the number one technique I find that surpasses any other tricks you’ve encountered. And here’s the secret: time! Time is your best friend when working with freshly milled flour. So, even before you dive into the hand kneading process, combine all the ingredients (except the yeast), cover the mixture, and let it rest at room temperature for a minimum of 30 minutes. This step allows the fresh milled flour to start absorbing the liquid, and to kickstart the gluten formation effortlessly, which eliminates the need for excessive hand kneading! Prepare to witness the transformation of your dough with the power of time, without even breaking a sweat! lol

Kneading Fresh Milled Flour Bread By Hand
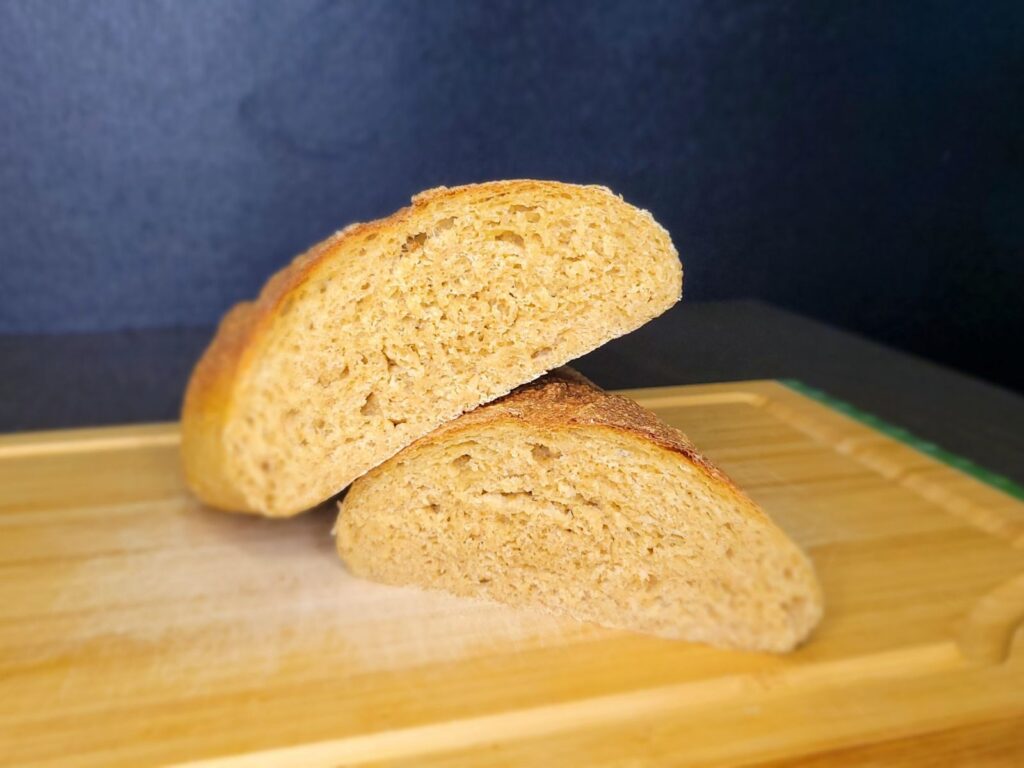
Some will tell you it is impossible to knead fresh milled flour bread by hand, but I am here to tell you it is possible, and it can be very rewarding. Also, achieving a window pane is possible with fresh milled flour, even when you knead it by hand. If you are wondering what a window pane is, HERE is a great video on that. But anyways, I digress… If you follow the steps in this recipe post, you can be confident you will have a rewarding kneading experience, and the beautifully delicious outcome: exquisite crusty French bread baguettes crafted with your own hands, using fresh milled flour. Get ready for a truly rewarding baking adventure!

Do I Need To Shape My Bread Dough?
Yes! Shaping your bread dough is another important step that should not be overlooked. Because shaping creates essential surface tension, resulting in a superior rise during baking and maintaining a desirable smooth outer surface. This technique of creating surface tension plays a significant role in achieving the perfect texture and appearance of your bread.

Do You Need to Score Bread? The Question Is Finally Answered
The question of whether scoring bread is necessary or not can be a controversial one. Well, the answer is finally here! It comes down to personal preference! I know that may seem like an underwhelming answer, but it is actually the perfect answer! While scoring bread is not always mandatory, it does serve a purpose in the baking process. By making deliberate cuts on the dough’s surface, scoring allows the bread to expand and release steam during baking, resulting in a beautifully risen loaf with an attractive appearance.
However, on the other hand, many individuals have come to love the rustic, organic cracks that naturally form on an unscored loaf. So, I say, you be you, and decide for yourself which way you prefer. After all, it’s the beauty of baking—having the freedom to make choices that align with your own creative vision or simply let nature take its course. So, whether you choose to score your bread for that classic look or let it unfold naturally, both paths lead to delightful and satisfying results.

How Do I Get My Bread To Have A Crusty Exterior?
Achieving a crusty exterior on your bread requires a few key techniques. Firstly, introducing steam into the oven during the first stages of baking is crucial. You can achieve this by placing a tray of hot water in the oven or by using a dedicated steam function, if available. The steam helps to keep the surface of the dough moist, allowing for a longer rise, and a better crust development. Secondly, higher heat for baking helps create the ideal environment for a crust formation. Lastly, be sure to bake your bread for the recommended duration, as an extended baking time promotes a crispier crust. So, again the three tips to getting a crusty bread exterior are:
- Add steam to your oven
- Bake the bread at a higher heat
- Don’t take the bread out too early

Ingredients To Make French Bread with Fresh Milled Flour
- 4-4.5 cups of Fresh Milled Flour 480g-540g (plus a bit extra for your kneading surface) (I milled 3.5 cups of hard white wheat)
- 1&1/2 tsp salt
- 1 TBSP sugar
- 2 Cups warm water 470g
- 1 TBSP Instant Yeast
That’s it! Just a few simple ingredients is all it takes to make a delicious crusty French Bread Baguette!
Instructions To Make Fresh Milled Flour Crusty French Bread Baguette
- Firstly, Mill the flour (make sure to mill a little extra for your work surface for kneading later)
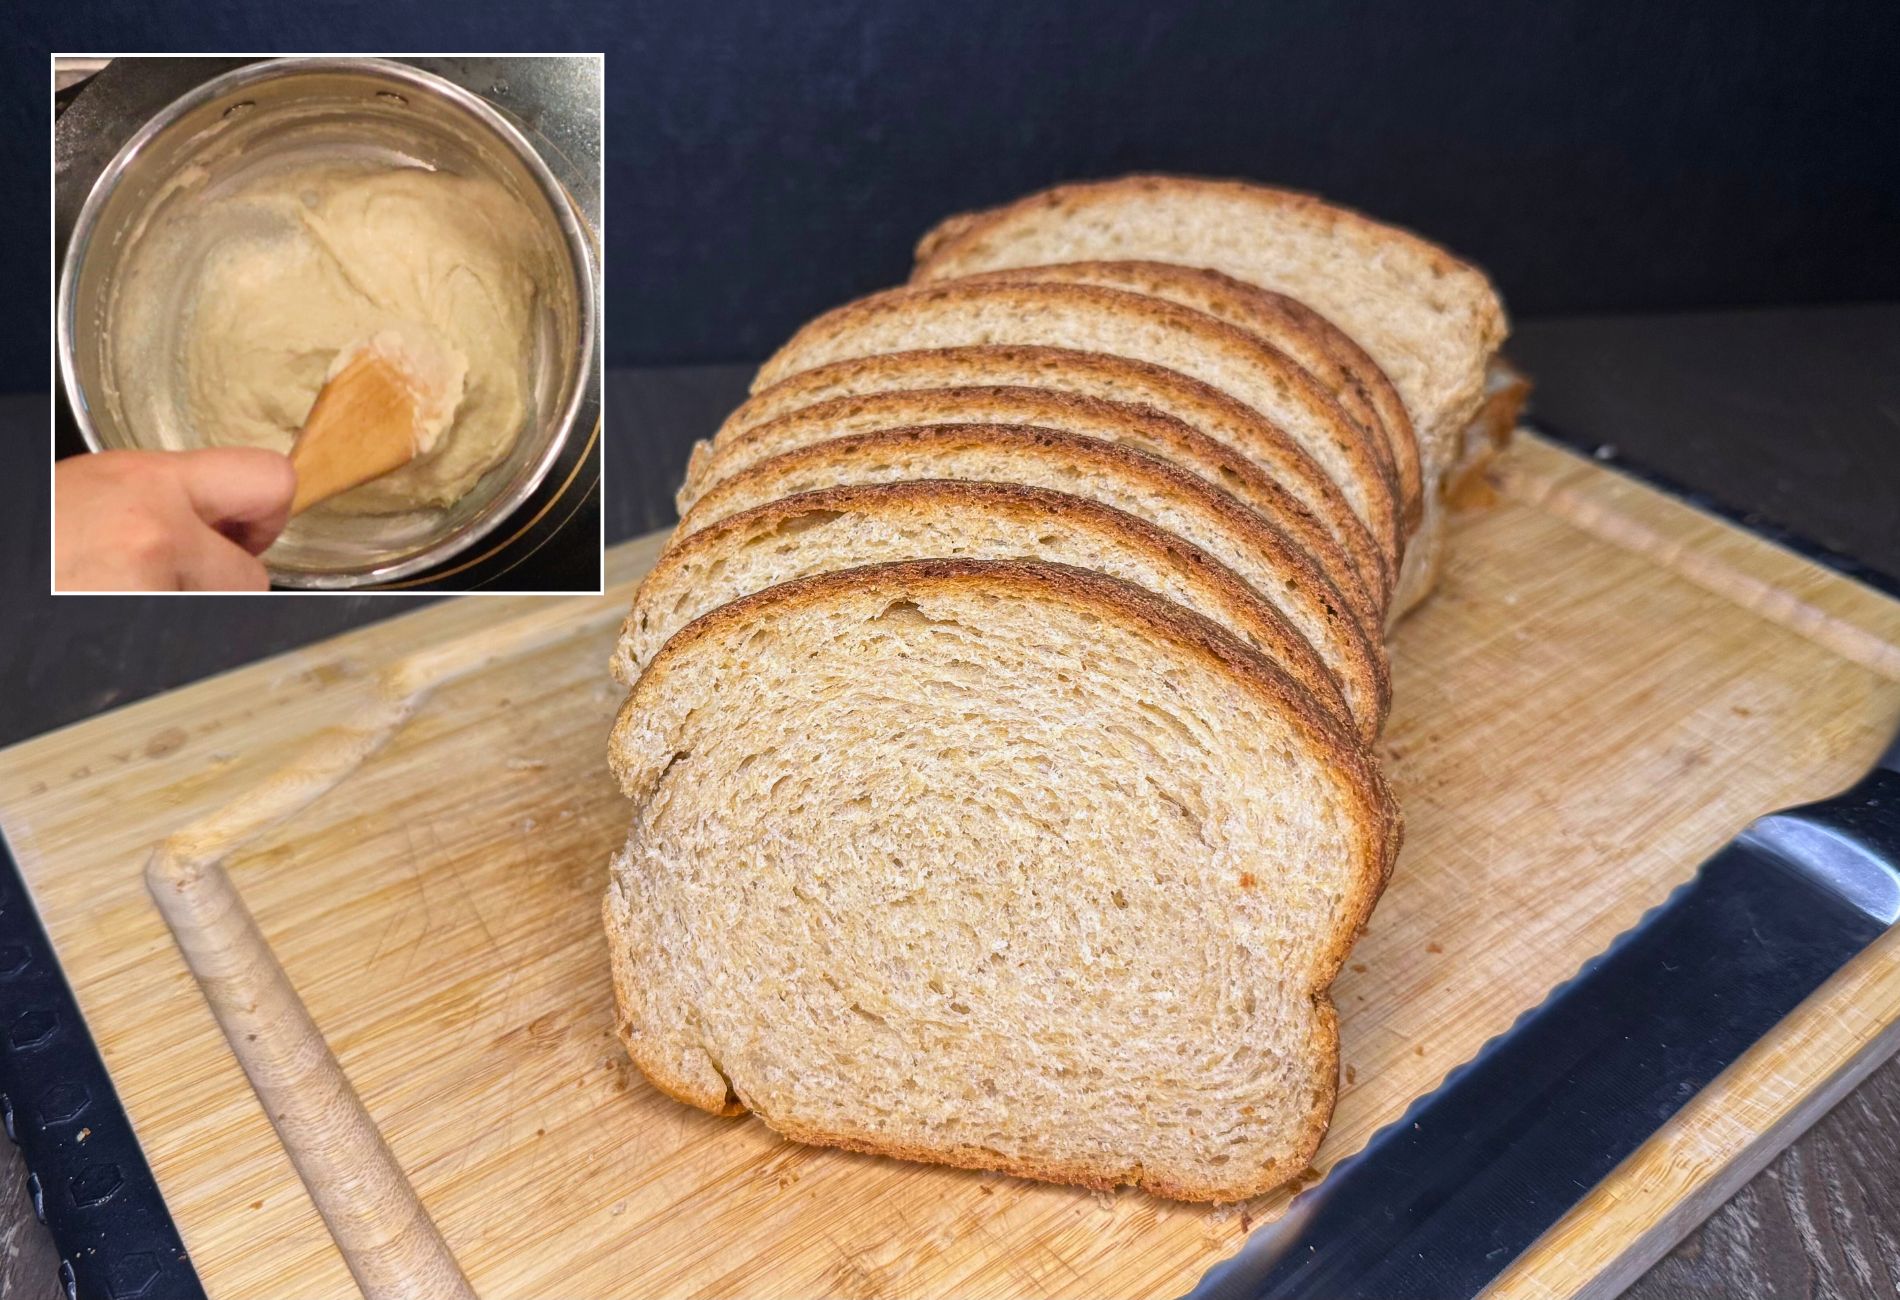
- Add salt & sugar to your flour (after you have set aside the extra flour for kneading). Mix.
- Make a well in the flour to add in the warm water. Then, pour the water into the well. Mix until it is all incorporated, and no dry flour is left.
- Cover the bowl, and let it rest for at least 30 minutes.
- After the initial rest, add the yeast, and mix to combine. Cover, and allow to rest 10 more minutes.
- Then, turn the dough out on a lightly floured surface.
- Knead the dough for about 100 stroked adding in small amounts of flour as needed. This step may take about 10 minutes. (Try not to add in too much flour, but enough that it is not a sticky gloppy mess. A little sticky is good.)
- After the kneading period, cover and let it rise for 30-40 minutes at room temp.
- Now that the dough has risen, put a little neutral oil on the work surface, and divide the dough in half. Shape into 2 mini baguette loaves making sure to have some surface tension on the top. (They should look smooth.)
- Fill a small oven safe bowl or tray with about 2 cups of water. Place it in the bottom of your oven. This will create steam during the bake, and lengthen the rise time in the oven. (If you have a steam oven, you can skip this step.)
- Line a baking sheet with parchment paper, and place the mini baguette loaves on them. Lightly spritz the loaves with some water just to moisten the exterior.
- Then, using a sharp knife, cut slits on the top of the bread loaves to your liking. (I usually just do 3 at a slight diagonal.)
- Put the bread into an unheated oven with the tray of water at the bottom. Preheat the oven to 400*F with the bread inside.
- Bake for 25-35 minutes, until the loaves are firm on the exterior and the internal temperature reaches at least 190*F.
- Take the bread out, and place it on a cooling rack right away to cool. Leave the tray of water in the oven to cool down before removing.

How To Store Crusty French Bread Made With Fresh Milled Flour
Properly storing your crusty French bread made with fresh milled flour is essential to maintaining its texture and flavor. Here’s a simple guide to help you store your bread effectively:
- Cool Completely: Allow your bread to cool completely on a wire rack before storing. This helps to prevent condensation, which can lead to a soggy crust.
- Wrap in Paper: Instead of using plastic, wrap your bread in a clean, breathable paper such as parchment paper or wax paper. This helps to preserve the crust while allowing the bread to breathe.
- Store at Room Temperature: Crusty bread is best stored at room temperature. Avoid storing it in the refrigerator, as the cold temperature can dry out the bread and make the crust lose its crunch.
- Consume Within a Few Days: Freshly baked bread is best enjoyed within the first couple of days. As time passes, the crust will gradually lose its crispness, and the inside will taste stale. If you can’t finish the bread within a few days, consider freezing it for longer-term storage.
- Freezing Option: To freeze the bread, wrap it tightly in plastic wrap or aluminum foil and place it in a freezer safe container or bag. Thaw the bread at room temperature when you’re ready to enjoy it. Reheat it in a preheated oven for a few minutes to restore the crust’s crispness.
By following these storage guidelines, you can prolong the enjoyment of your crusty French bread, keeping it fresh and delicious for as long as possible.

Shop This Post
Checkout Some Of My Other Fresh Milled Flour Recipes
Fresh Milled Flour Recipe Index
Fresh Milled Flour French Bread Printable Recipe

Crusty French Bread Baguettes made with Fresh Milled Flour
Equipment
- 1 lined baking tray
- 1 large oven safe bowl or tray
Ingredients
- 4-4.5 cups of Fresh Milled Flour 480g-540g + plus a bit extra for your kneading surface (I milled 3.5 cups of hard white wheat)
- 1&1/2 tsp salt
- 1 TBSP sugar
- 2 Cups warm water 470g
- 1 TBSP Instant Yeast
Instructions
- Firstly, Mill the flour (make sure to mill a little extra for your work surface for kneading later)
- Add salt & sugar to your flour (after you have set aside the extra flour for kneading). Mix.
- Make a well in the flour to add in the warm water. Then, pour the water into the well. Mix until it is all incorporated, and no dry flour is left.
- Cover the bowl, and let it rest for at least 30 minutes.
- After the initial rest, add the yeast, and mix to combine. Cover, and allow to rest 10 more minutes.
- Then, turn the dough out on a lightly floured surface.
- Knead the dough for about 100 stroked adding in small amounts of flour as needed. This step may take about 10 minutes. (Try not to add in too much flour, but enough that it is not a sticky gloppy mess. A little sticky is good.)
- After the kneading period, cover and let it rise for 30-40 minutes at room temp.
- Now that the dough has risen, put a little neutral oil on the work surface, and divide the dough in half. Shape into 2 mini baguette loaves making sure to have some surface tension on the top. (They should look smooth.)
- Fill a small oven safe bowl or tray with about 2 cups of water. Place it in the bottom of your oven. This will create steam during the bake, and lengthen the rise time in the oven. (If you have a steam oven, you can skip this step.)
- Line a baking sheet with parchment paper, and place the mini baguette loaves on them. Lightly spritz the loaves with some water just to moisten the exterior.
- Then, using a sharp knife, cut slits on the top of the bread loaves to your liking. (I usually just do 3 at a slight diagonal.)
- Put the bread into an unheated oven with the tray of water at the bottom. Preheat the oven to 400*F with the bread inside.
- Bake for 25-35 minutes, until the loaves are firm on the exterior and the internal temperature reaches at least 190*F.
- Take the bread out, and place it on a cooling rack right away to cool. Leave the tray of water in the oven to cool down before removing.
Video
*This post contains affiliate links, which means I make a small commission at no extra cost to you! As an Amazon Associate I earn from qualifying purchases. But, I will only suggest items I actually Love and Have Used!


Hello, your recipe looks delicious. Could I use hard red wheat flour with some soft white wheat flour? I don’t have hard white grains.
You can substitute hard red for hard white. If you add soft white, just add a little, because it doesn’t form the gluten you need for a strong bread structure. But, both hard red and hard white do. Hope that helps! Happy Baking!
Thanks for this recipe! I like the unique and quick process (putting it in a non preheated oven, etc). Also, sometimes I don’t want to clean my mixer and it can be satisfying to knead by hand. I used the bread to make stuffing for Thanksgiving and have enjoyed the loaves a few other times. Excellent!
My pleasure! I am so happy to hear you enjoy it! It is a great go to bread! Thanks so much!
When you list the weight of the flour, is that the weight of the berries before milling or the weight of the ground flour?
The weight of the wheat berries should give you the same weight in flour. So, I weigh my wheat berries, and mill that I need for the recipe. (This is not the same as volume. The volume measured out of wheat berries will be different than the volume of flour.) I hope that makes sense! Happy Baking!
My loaves are in the oven! Does the oven preheating count in the bake time? I’m assuming so since ovens make take different times for that.
I had to use active dry yeast so I held back some water, sugar and the yeast and proofed it as I rested the dough. Adding that yeast water mixture in and then not letting it set left me with terribly sticky dough. I am one who tends to add too much flour in my normal pre fresh milled flour baking so it was frustrating for me not to know when to stop adding as it was just so sticky and would seem like it was improving then would get sticky again. Hopefully I didn’t add too much! My dough also never seemed as smooth as yours and I’m wondering if maybe my flour wasn’t ground fine enough? Hoping they still turn out! They’ll partially be used to top french onion soup!
Yes, it counts in the bake time. But, since all ovens are a bit different this is just a guide. Go with step (14. Bake for 25-35 minutes, until the loaves are firm on the exterior and the internal temperature reaches at least 190*F.) so you know they are baked all the way. Some ovens will be less some will be more. For the stickiness, it does take some practice to work with a sticky dough. It should be sticky, so try not to add too much flour, or the loaf will be dense. A trick is to use oil on your hands, or wet your hands helps really well too (you may need to re-wet your hands as you go.) But, also a bench scraper can help as well. I hope that helps!
Can we use the mixer if want? I have arthritis in my hand and am worried about not kneading enough
Yes! You can absolutely use a mixer for this recipe, I was just showing a recipe that could be done with hand kneading for those that don’t have a mixer, or prefer not to use one. Happy Baking! Let me know how it turns out!
Thank you for the recipe! I was wondering if I could substitute sourdough starter for the instant yeast in this recipe?
Yes! you can add about 1/2 cup (115g) of starter instead of the yeast, and the rise time will vary depending on your sourdough starter and the warmth and humidity. Let me know how it turns out! Happy Baking!
Can I use a bread machine(Zojirushi)?
You can use the bread machine to knead the dough, it may need to run through 2 kneading cycles, just check for the stretchiness of the dough. Let me know what you think! Happy Baking!
I’m looking forward to trying this recipe! Two questions for you…
1. About how long do you have to knead this in your Ank mixer?
2. How do you go about adding the water in your counter top oven (that’s what I’m using now too)?
Thank you Kara!
It really depends on the day. On average I knead between 15-20 minutes after a 15 minute Autolyse. For the oven, I will put one oven rack into the lowest level and place the black enamel baking pan that came with the oven and fill that with water. Then the other oven rack, I put a couple slots above. I hope that helps! Happy Baking 🙂
Ok yes so so helpful! Are you baking on a stone or something else?
Thank you
I don’t have a stone, but if you do I would suggest that! I just use my baking sheet.
I had company coming and wanted fresh bread. Did this recipe for french bread. BUT after letting it rise for 30-45 minutes I divided it in two and put in oiled zip lock bags and in fridge overnight. Next morning out on counter for one hour and continued to shape and rise in my bread pan. It turned out so good. My company could not stop raving about how great the taste. Going to keep doing this way. In fact have two loafs rising now.
Yay! I Am so happy to hear it was a hit! Thanks 🙂
Thank you Kara for all your videos. I learned how to bake bread and the best rolls from you. Now I would like to try to make French bread. Do you think it would turn out if I did not separate the dough and baked a larger loaf?
Thank you so much! I am so happy to hear that! Yes, you can make a larger loaf, my oven just won’t fit a larger loaf in it! Let me know how it goes! 🙂
I’m sure it doesn’t take long for your oven to heat to 400, but mine honestly takes a half an hour. Will that affect how my bread turns out?
Mine does heat up fast because it is a small countertop oven. You can always preheat sooner, so that it is ready to go when the loaves have risen.
This bread was delicious! Thank you for your recipes, they always turn out like you show. Excited for you in your new homestead, very exciting!
Yay! Thank you so much! 🙂
I don’t have a standing mixer yet so I kinda rushed this recipe. Probably could have used more rest and kneading time. Even still, it was so forgiving and was lovely and delicious! Excited to do again!
Glad to hear it still was a hit! Thanks! 🙂
Do you think I can add some Khorasan, too, or stick to hard white wheat only? I want to make this a regular bake in my house. Thanks for everything, and praying for all the details in your move and exciting adventures ahead!
Yes, you can do 80% hard white and 20% Kamut in this. Thanks so much! 🙂
I am planning to use this recipe with sourdough starter tomorrow. My 5 year old is asking for it. Curious, what milk do you have and how do you like it? Thank you for all your delicious recipes!
I used to use A2 milk, but now we have our Jersey cows, and use their milk for everything. Check them out here if you want to meet our cows! https://youtu.be/rGKmAPWKw1M
My 5 year old asked for baguette, so I’m giving this recipe a try tomorrow. I’ll be using sourdough starter instead of yeast. Thank you for sharing all your delicious recipes!
Also, I’m curious to know, what mill do you have, and how do you like it?
I have had a few mills, currently I am using my Nutrimill Harvest. But, I also love the Nutrimill Classic, and the Impact for beginners as well. This is the one I am currently using- Walnut Harvest Grain Mill: https://collabs.shop/o7fgoh
I followed the recipe, weighing all the ingredients but ended up needing about 3/4 cup more hard red flour. I also had to knead it for the normal amount of time in my kitchen aid (25 minutes) which may have been because I didn’t add all the flour until the end. I let it rise for 30 minutes and divided it and put it in oiled ziplock bags in the fridge over night. Next morning I shaped and let it sit on the counter for about an hour before cooking. They were great!
Glad to hear they were a hit! Thanks for sharing you alterations. Next time try holding back some of the liquid, and only add it in later if the dough seems stiff or dry.
My French bread dough was too wet, I added more flour, after baking it is still gummy. Im sad!!
Try holding back some of the liquid and only add it in if the dough seems stiff or dry. Often times gummy results is caused by slightly underbaking, so it may have needed more time in the oven, or the other most common issue that causes gummy bread is something affected the rise, either proofing, the yeast used not strong enough, or something like that. I hope that helps