How To Make Vegan Sandwich Bread With Fresh Milled Flour
How To Make Vegan Sandwich Bread With Fresh Milled Flour This recipe is so soft, and doesn’t require any eggs, milk, or butter. I developed this sandwich bread from my regular every day sandwich bread to try and conserve our egg, milk, and dairy usage. Because grocery prices are on the rise, and this can be a helpful way to save on your grocery budget. Also, I wanted to make a Fresh Milled Flour Vegan Sandwich Bread Option available. So, let’s get to baking this delicious, soft, cheap bread!
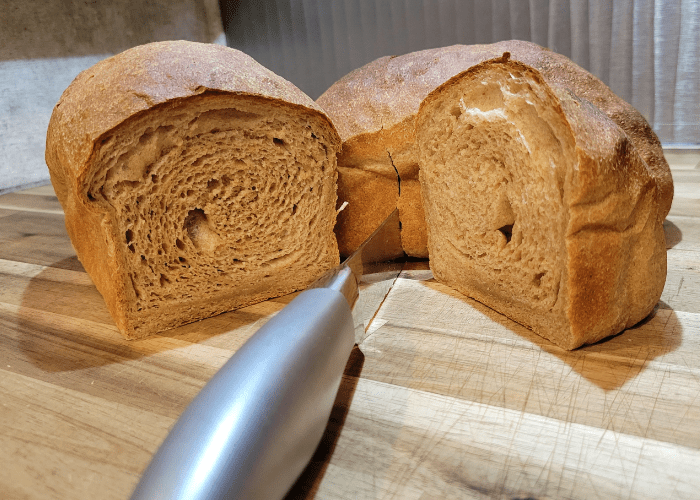
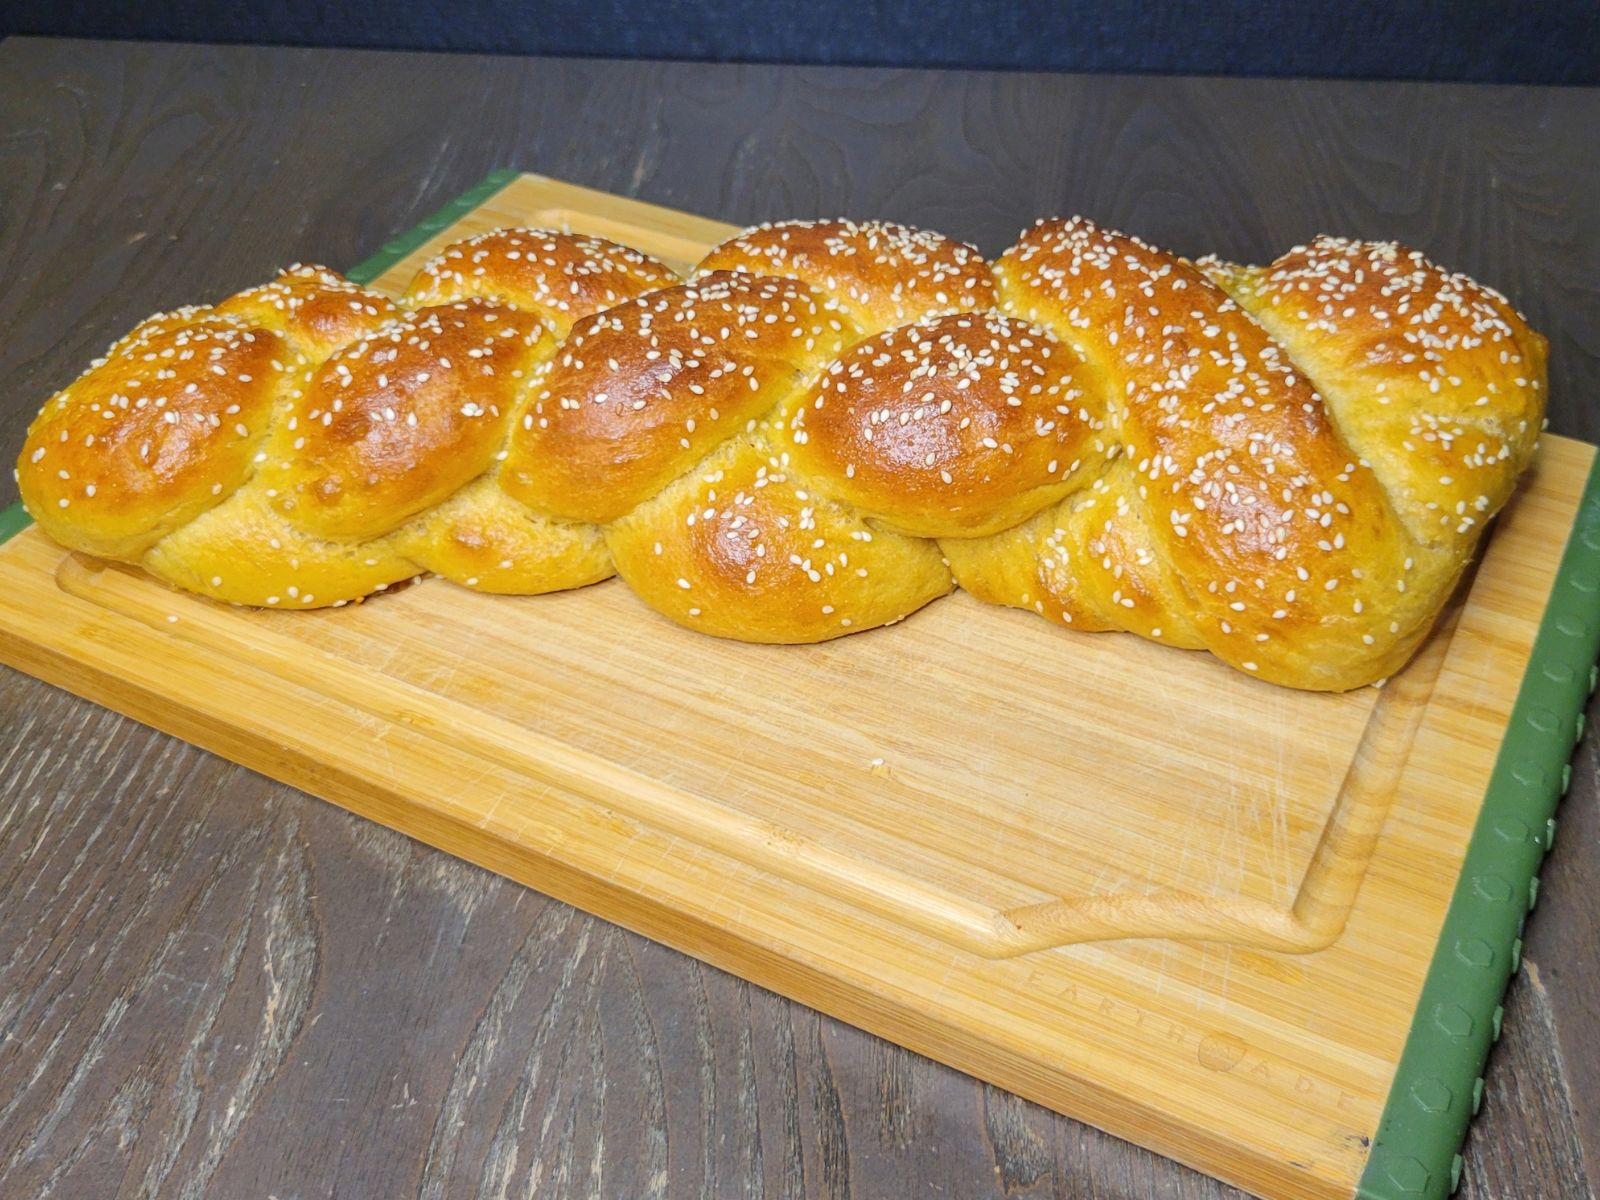
The shaping on this loaf was a little loose, but you can still see that soft and airy texture. This bread was made with half hard white wheat and half hard red wheat.
How To Save Money With Rising Grocery Costs
Rising grocery costs is becoming a major concern for most of us across the globe, but especially here in the US. Not only are grocery costs skyrocketing, but some items are becoming difficult to find at all! Lately, early 2023, a carton of eggs upwards of 3 times the average price or more of this time last year. Some areas of the US, like California, are seeing these prices even higher than that! I can’t imagine being able to continue my normal baking recipes with a dozen of eggs costing over $10!

These very few ingredients can save you money at the grocery store! Here is some raw cane sugar (which can be omitted completely or replaced with honey. Also, Light Extra Virgin Olive Oil, and some sea salt. Of course, this recipe calls for Fresh milled flour and yeast as well!
Will The Egg Shortage Last Long?
Hopefully, with Spring just around the corner, the egg shortage issues will subside, and the egg prices will come back down a little. I don’t believe that egg prices will fall all the way down, because of the rising cost of feed and supplies. However, it should give some relief when homesteader chickens start laying again. This will bring more eggs back on the market. So, if you have a homesteader or farmer near you who sell eggs in the spring and summer, then buy local! And, be happy to pay a little more than last year, so they can continue feeding and caring for their chickens.
Easy Vegan Sandwich Bread Recipe With Little Ingredients
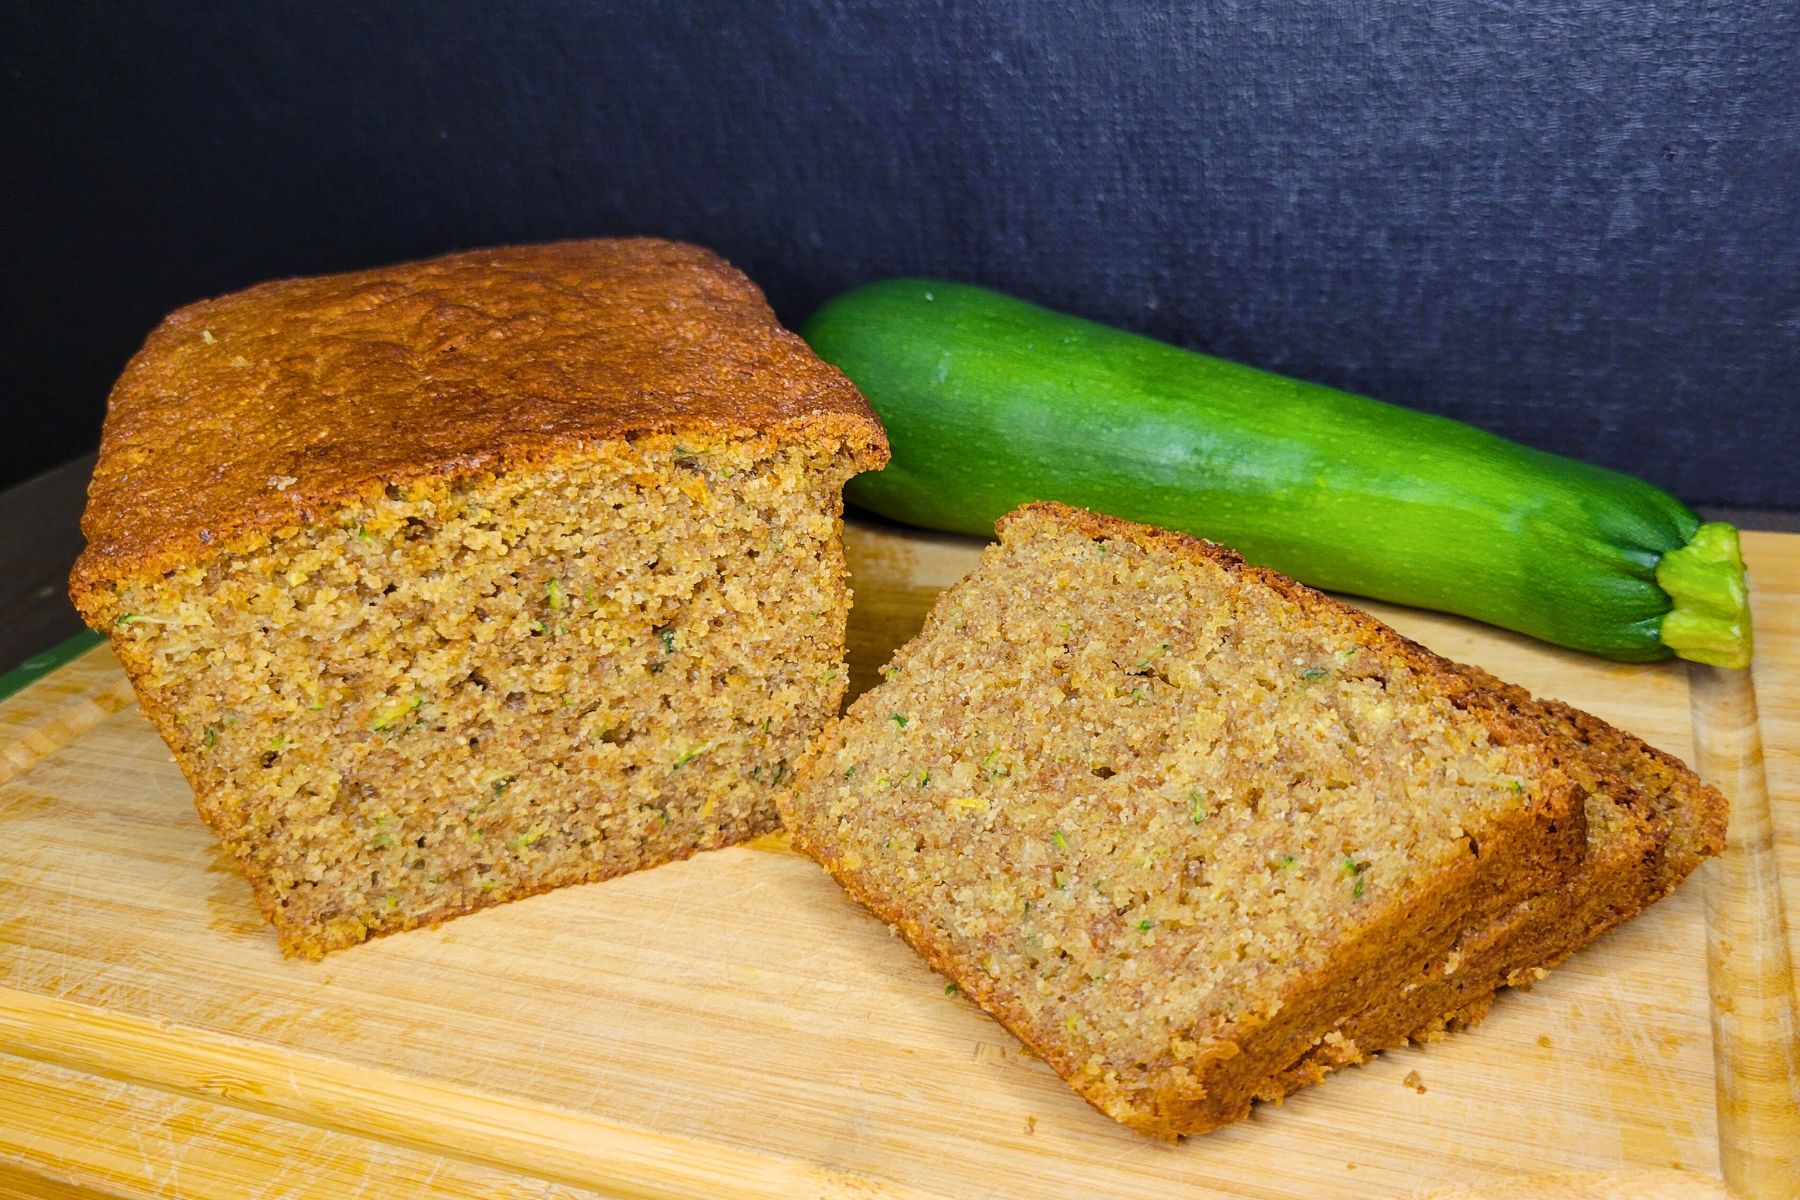
So, because of these reasons, I am sharing an easy bread recipe, with little ingredients to try and help stretch your grocery budget. First, because this recipe is made with Fresh milled Flour, I know that just the bread alone is giving my family 40 out of the 44 essential nutrients that humans need to survive. So, even if I have to trim things we love out of our budget, this recipe will help keep bellies full and food on the table.

Here is a close up of this Vegan Bread! Homemade, Fresh Milled, Soft, & Delicious! This shows you how you can also make Sandwich bread without eggs, milk, or butter in a pinch!
How To Make Fresh Milled Flour Vegan Sandwich Bread
So, in excluding eggs, milk, and butter, doesn’t that mean that this bread recipe is Vegan? Well, yes this recipe does qualify as a vegan recipe. My family is not vegan, but this is a great recipe if you are or are looking to start!

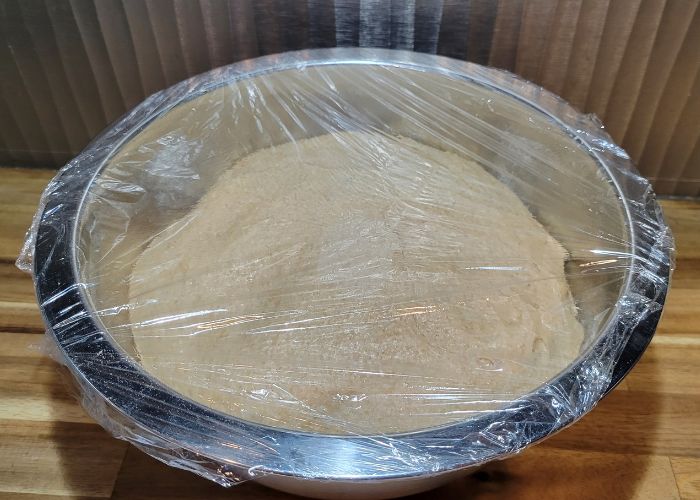
This is my dough before mixing in the yeast. I like to let the freshly milled wheat flour sit with the water, so it can start absorbing the liquid. Since, fresh ground flour can take a bit longer to absorb the liquid and create gluten.
Ingredients How To Make Vegan Sandwich Bread With Fresh Milled Flour
- 3.5 – 4 cups Fresh Milled Flour (485g) (I milled 1&1/3 cup hard white wheat & 1&1/3 cup hard red wheat)
- 1&3/4 cup warm water (410g)
- 3 TBSP Light Extra Virgin Olive Oil
- 3 TBSP Sugar or Honey
- 1&1/4 tsp salt
- 2 tsp instant yeast
That’s it! A super simple ingredient list that most of us already have on hand.

Instructions How To Make Sandwich Bread Without Eggs, Milk, and Butter
- Firstly, Mill the flour
- Warm the water to about 90*F in the microwave is fine.
- Add warm water to stand mixing bowl, then add sugar, olive oil, and salt. Mix to combine.
- Then, add flour to the stand mixer, and start to mix until all the dry flour is gone.
- Cover and let it sit at room temperature for at least 15 minutes, up to 2 hours to allow the fresh milled flour to absorb the liquid.
- Then, add the instant yeast. Start to mix the yeast in until combined.
- Start the kneading process. This could take 25 minutes with fresh milled flour, or less. This varies greatly, so the best way to check if the dough is done being kneaded, is to check for a window pane test. Short Window Pane Test Video HERE
- Once a successful window pane test is done, then, cover the dough and let it rise until doubled. This will typically take 1 to 2 hours.
- After the dough has doubled, on a clean surface, spread a little olive oil with your hands. Then take the dough out, and press the air out.
Shaping The Loaf After The First Rise
10. Then, divide the dough in half if you are making 2 one pound loaves. Press each piece flat, then roll up to shape. Make sure there is some surface tension, see my video for shaping if you are interested HERE
11. Place in a parchment paper lined 4×8 bread pan, and cover for about 40 minutes until puffy looking.
12. Preheat oven to 350*F towards the end of this second rise time.
13. Bake for 30 to 40 minutes until the internal temperature reaches 190*F.
14. Take bread out of the oven, and out of the bread tins right away, and place them on a wire cooling rack.
15. Let cool for at least one hour before slicing.
16. Slice to desired thickness, and enjoy!

Alternative Bread Pan Sizes
My recipes call for the smaller 4×8 bread loaf pans, because I have a tiny oven! lol. Even the 4.5×8.5 pans are a bit larger, crazy how just that half inch each way can make such a difference! So, if you only have the larger pans, I recommend to x1.5 my recipes if you are looking for a large high rise loaf of bread. The large pans will definitely still work, the loafs will just be a bit smaller.
How To Store This Fresh Milled Flour Vegan Sandwich Bread
To store these fresh milled flour vegan sandwich bread loafs, keep in an airtight container, or bag. Then, keep on the counter for 2-3 days. For longer storage, place in a freezer safe bag and freeze for up to 4 months. (Make sure the loaf has cooled completely before freezing, best results to freeze the same day as it is baked.) To thaw, sit on the counter, and let come to room temperature.
If You Want To Learn More About Milling Your Own Flour, I have a Fresh Milled Flour 101 post. I Recommend Starting With That Post.
Shop This Post
Grain Mill Nutrimill (Use Coupon Code: Grainy for $20 Off yours)
Checkout Some Of My Other Recipes
Everyday Sandwich Bread (Non-Vegan)
How To Make Fresh Milled Flour Vegan Sandwich Bread Without Eggs, Milk, or Butter – Cheap & Easy! Video

Vegan Sandwich Bread Made With Fresh Milled Flour Printable Recipe

Vegan Sandwich Bread Made With Fresh Milled Flour
Equipment
- 2 4×8 bread tins
Ingredients
- 4 cups Fresh Milled Flour 485g (I milled 1&1/3 cup hard white wheat & 1&1/3 cup hard red wheat)
- 1&3/4 cup Warm water 410g
- 3 TBSP Light Extra Virgin Olive Oil
- 3 TBSP Sugar or Honey
- 1&1/4 tsp Salt
- 2 tsp Instant yeast
Instructions
- Firstly, Mill the flour.
- Warm the water to about 90*F in the microwave is fine.
- Add warm water to stand mixing bowl, then add sugar, olive oil, and salt. Mix to combine.
- Then, add flour to the stand mixer, and start to mix until all the dry flour is gone.
- Cover and let it sit at room temperature for at least 15 minutes, up to 2 hours to allow the fresh milled flour to absorb the liquid.
- Then, add the instant yeast. Start to mix the yeast in until combined.
- Start the kneading process. This could take 25 minutes with fresh milled flour, or less. This varies greatly, so the best way to check if the dough is done being kneaded, is to check for a window pane test.
- Once a successful window pane test is done, then, cover the dough and let it rise until doubled. This will typically take 1 to 2 hours.
- After the dough has doubled, on a clean surface, spread a little olive oil with your hands. Then take the dough out, and press the air out.
- Then, divide the dough in half if you are making 2 one pound loaves. Press each piece flat, then roll up to shape. Make sure there is some surface tension.
- Place in a parchment paper lined 4×8 bread pan, and cover for about 40 minutes until puffy looking.
- Preheat oven to 350*F towards the end of this second rise time.
- Bake for 30 to 40 minutes until the internal temperature reaches 190*F.
- Take bread out of the oven, and out of the bread tins right away, and place them on a wire cooling rack.
- Let cool for at least one hour before slicing.
- Slice to desired thickness, and enjoy!
Video
Notes
*This post contains affiliate links, which means I make a small commission at no extra cost to you! As an Amazon Associate I earn from qualifying purchases


Please help! This dough is so wet and was too wet to even attempt a window pane test, even after 25 mins of kneading. I put it for its first rise and nothing has happened. Can I add more milled flour at this point or will that ruin it? or is it past any help at all?
I highly recommend watching this video. You can use any bread recipe with the methods, and I show the texture of the dough on every step of the way. It depends on the wheat you are using, and the mixer and mill can play a part in helping diagnose what could have happened. https://youtu.be/VYOZsbspepE
Thank you, I’ve just watched it and my dough doesn’t even look like that after the first mix. Maybe I’m adding too much liquid than is needed?
These are the grains I use which are milled on the finest setting 1 of my mock mill 100.
https://www.buywholefoodsonline.co.uk/organic-wheat-grain.html
Then I use a standard mixer, like a kitchen aid with the dough hook.
Any ideas on what it could be? It’s currently rising in the loaf pan but it’s not a smooth dough as I couldn’t shape it, it was almost like a thick cake batter/cookie dough. I have a picture if needed!
I would try leaving some of the liquid out next time, and see if you get better results. You can always add it in after the autolyse if it looks dry.
I love this recipe! The bread is delicious with just the right amount of sweetness. I have made this twice now along with another recipe for dinner rolls for the last year and a half and this last time is the first time I achieved the window pane. Hallelujah!!! It took 45 mins. after a 2hr. autolyse. I don’t know why it takes me so long. ( I check about every 5 mins) The dough seams quite wet and mainly stays along the bottom of the mixer (Ankarsrum) until about 30 mins then forms into somewhat of a ball. I have bought wheat locally and from two on-line sources. I have gotten the same results with all of them. Being Vegan I just use water to keep my hands from sticking to avoid the extra oil but that is after I dump it out on the counter so that wouldn’t have anything to do with it. Wouldn’t you think I would have an easier time with it after 1-1/2 years?? Anyway the bread does come out totally delicious no matter what happens!!!
Thank you I am glad to hear it! Yes, the Ankarsrum kneads the dough so gently that it can take a bit longer. You can try adding just a tad more hard wheat flour into it, but really it sounds like you have it about perfect. The dough hook may give you slightly faster kneading results. But, really it sounds like you have it about perfect. Thanks for sharing! Happy Baking! 🙂
Please help! Three times now I have made this and the dough is so wet it can’t be handled, even after 25 mins of kneading in a stand mixer. After about 5 mins the dough starts to form a ball and then goes back to being really wet. I add more flour but it doesn’t make a difference and I can’t even attempt a window pane test as it’s so wet nor shape it. I also rehydrate the flour for the max 2 hours. Is there anything you would recommend? It also doesn’t rise either, except for once when I left it on the counter for about 6 hours as I’d given up on it working and it slightly rose. It makes lovely tasting bread but it’s flat and small, so no use as sandwich bread 🙂
I would try leaving some of the liquid out next time, and see if you get better results. You can always add it in after the autolyse if it looks dry. If there is a problem with the rise, I would be concerned there could be an issue with your yeast. You can test your yeast by putting a bit in a bowl of warm water and a pinch of sugar. It should get nice and foamy after about 10-15 minutes, if not, then I would suspect the yeast is the culprit for the rise issue. Also, make sure the water you are using is not too hot, that can kill the yeast and affect gluten formation.
We absolutely love this bread! It has become our staple loaf. I look forward to baking on a Sunday when I make 2 loaves for the week. It just tastes so good! Even with nothing on it! It’s been great from the start. I will be trying out your naan recipe later this week too and am excited for that!
Thanks for sharing your recipes!!
Yay! I am so happy to hear that! My pleasure! Thank you! 🙂
I make the easy sandwich bread recipe and in step 4 (Then, add flour to the stand mixer, and start to mix until all the dry flour is gone.) my dough never pulls clean away from the bowl, even after achieving window pane or close to it. Why can’t I ever get it to pull all off the bowl cleanly? Help 😕
I don’t go by when the dough pulls away from the sides, mine never does either. I think especially with metal bowls, fresh milled flour tends to stick to the sides much easier. I like a wetter stickier dough, so mine rarely will pull away from the sides of the bowl. I just go by the nice stretchy dough, and then move to the rise.
Love your recipes! My dough started splitting during second rise, like a ravine through the top. Any thoughts? Too short first rise? To short knead?
was the dough nice and stretchy? It sounds like the gluten wasn’t fully developed
Love your recipes! During second rise, the dough developed a larger divide on top. Looks like a crack and spread more during baking. Could this be over ptroof in 1st rise?
Thank you! It just sounds like the gluten wasn’t super strong, so the dough ripped a bit. over proofing can cause the gluten to break down a bit, so possibly.
I would like to add an egg how should I adjust the water? Thank yoh
You can add an egg, and hold out about 40-50 grams of water.
Hi! I’m new to the bread making (esp fresh milled flour bread making) process and this recipe looks great! I’m wondering if I need to do anything different if I’m making this in a bread maker?
Usually you will need to put the dough through a double kneading cycle. Just check for the dough to be nice and stretchy, also, often times you will need a shorter second rise, especially if the bread tends to collapse.