100% Fresh Milled Flour Sourdough Bread Made Easy
This fresh milled flour sourdough bread recipe is made with 100% freshly ground wheat, so let me share this easy method with you. This FMF Sourdough bread is made all in one day, and I simplify my original recipe, so this method is great for beginners! Also, to help I have a tutorial video where we can make this together HERE!
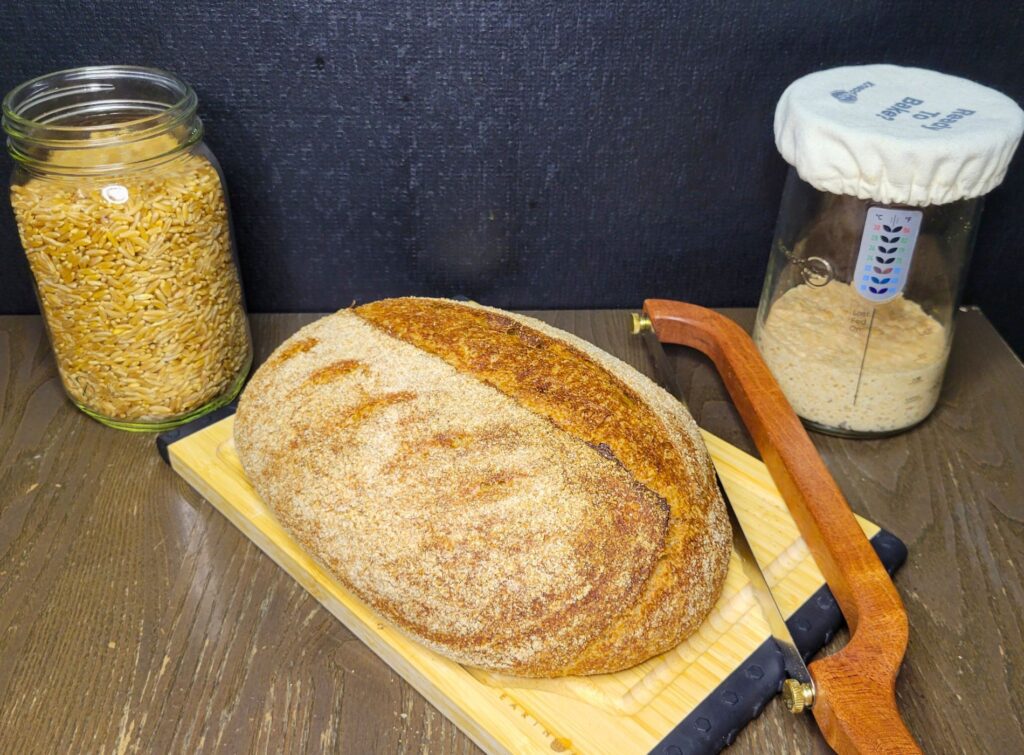
I tried to create this easy to follow recipe without all the terms and overwhelming things. Let’s just go back to the basics. If you are looking for a Fresh milled flour Sourdough recipe that talks about Autolyse, Bulk Fermentation, Bench Rest, etc. I do have that recipe HERE, which is my original Sourdough recipe.
FMF Sourdough Basics
But, to get started making Sourdough, we must first go over some of the basics when it comes to making a nice sourdough loaf.
#1 Your Sourdough Starter Is Important
Firstly, you need to make sure your sourdough starter is nice and strong. A properly cared for sourdough starter will yield you much better results. I like to feed mine the night before I plan to make bread (even if I already fed it that morning) This is because I want my starter to be just to the top of the peak to barely starting to fall when I make bread. Checkout the picture of my starter. This is after my sourdough starter has peaked, and now it is starting to fall. Now, I have made bread successfully with different stages of starter from it still rising a bit, to all the way to completely deflated. However, I just find this stage, when I can catch it, gives me the nicest results but, it is not required.

Ways To Get A Sourdough Starter
If you want to learn how to make a sourdough starter from scratch with Fresh Milled Flour, I have a tutorial video HERE for that. OR you can grab some sourdough discard from a friend, and start feeding it your freshly milled wheat. Also, there is absolutely no shame in purchasing an already thriving Sourdough culture online. I have tried a few, and HERE is my favorite one so far!
How To “Read” Your Sourdough Starter
While rising, your sourdough starter will be domed up, but while falling, it will be concave at the top. Once it falls back to the original height, it is ready to be fed. I LOVE this sourdough jar I have been using, it has been the perfect size and shape, also come with a date/time band, and 2 different tops. You can grab one HERE.
#2 The Time, Temperature, & Method Affects Your Bread Just As Much As The Recipe
Ok, so many people struggle with sourdough, I don’t think anyone could argue with that statement. These struggles cause people to run from recipe to recipe, and then as a result end up totally confused and frustrated. But, I am here to tell you you can do this!
I truly recommend sticking to one recipe, and try switching out your techniques. Often times the time the dough ferments, or the temperature it ferments at, and even your shaping methods can affect a sourdough loaf just as much as the base recipe.
Try not to overthink or overcomplicate things, but I still feel like I need to explain this better. I promise the more you bake the easier it gets, and soon you won’t need a scale or recipe at all! This practice is how you build your skills!
Time
Time greatly affects sourdough, because the whole time it is fermenting the dough. Therefore, the longer the dough is mixed, the more it will ferment. If you think about your sourdough starter, you see it rise, and dome up, then start to fall as I showed in the photo above. Once it starts to fall, it won’t rise again until it is fed. So, apply that thought process to your bread, and if you over-ferment the dough it will collapse just like your starter does.
Temperature
The temperature at which your dough is fermenting/rising makes a huge difference as well. If it tries to rise in an environment that is too cold, it will continue to suffer, because it will continue to get more acidic and not rise much. If you place it in an environment that is too warm, it will ferment much quicker, which isn’t a bad thing, but it won’t have that iconic sourdough flavor yet. (The salt also plays an important role in the dough, as salt will slow the fermentation as well. If you forget the salt, it will ferment faster.)
Let me share an example with you to better explain this. I bake my bread in the summer, and it is 80 degrees F in my kitchen. My dough will ferment at that temperature most likely in about 3 hours with this recipe, on average. I bake the same recipe with the same wheat berries on a winter day and my kitchen is 65 degrees, it will take forever!
How To Warm Your Dough On Cold Days
IF you have a proofer, or a warming pad that does not exceed 80*F you can use those. But, if you don’t have anything like that, then I recommend using a hot bowl or cup of water and placing it in the microwave or oven with the dough inside. This will create a nice warm environment for your dough.
Method
This one is the most open to interpretation. By method I am talking about how you follow the steps, how you stretch and fold, how you shape the loaf, and how you bake the loaf. There are ways to deviate from these methods, but until you are comfortable with how the dough looks and feels, I recommend sticking with the recipe guides here. Once you have learned what the dough looks and feels like, then it is time for you to spread your wings and fly! Use this recipe now as a base, and play with every aspect too tweak it to your liking.
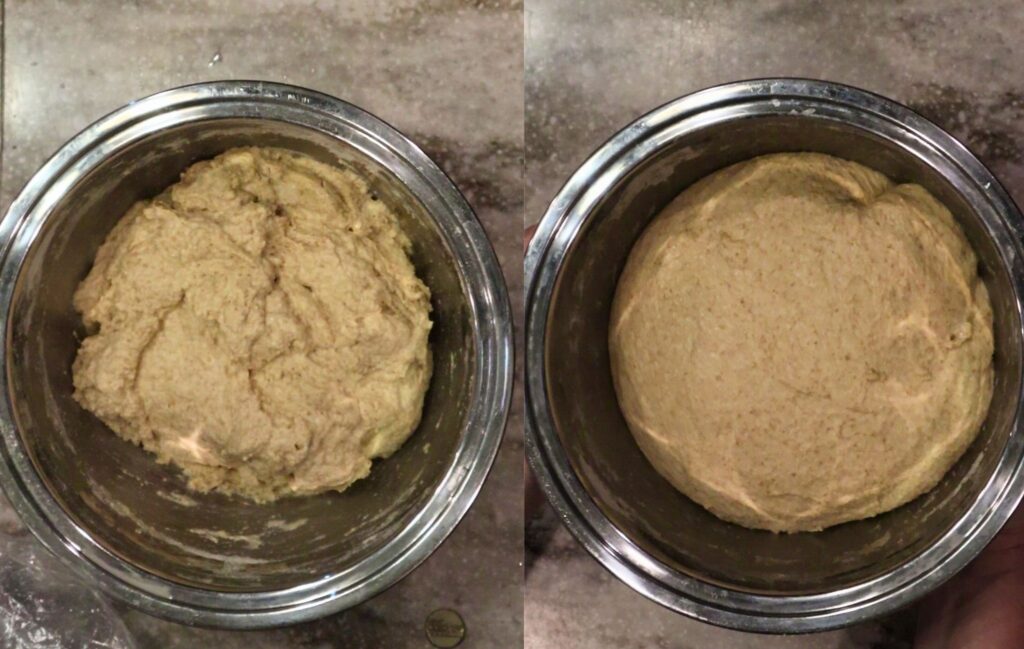
My Fresh Milled Flour Sourdough Won’t Pass The Float Test
If you have done research at all about sourdough, then you know that a common method to see if your starter is ready to bake with is the float test. Essentially the float test is where you place some sourdough starter into water, and it should float. So, then why doesn’t your fresh milled flour sourdough starter float?
This is super common with FMF, because the bran in the flour tends to tear and pop those beautiful air bubbles. Those air bubbles are what causes the starter to float, so without those air bubbles, it won’t float. So, does this mean that your starter is no good or not ready? No, if your starter has been doubling with beautiful bubbles consistently, and your starter has risen, and is just starting to fall, then it is ready to go! Even if it doesn’t float. So go right ahead and bake away!
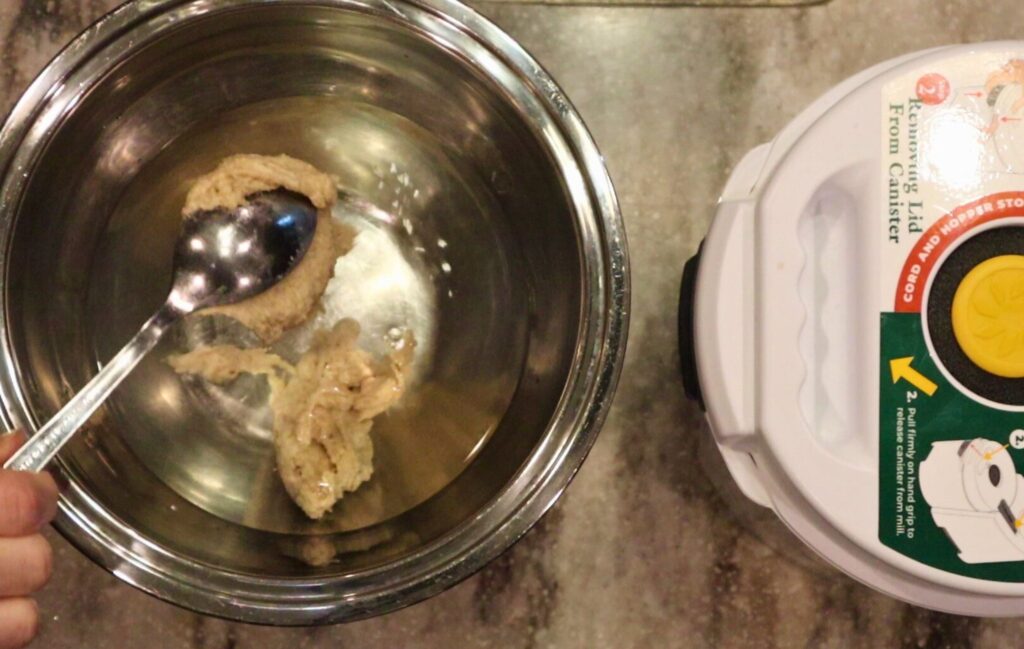
Yes, there are times your starter will pass the float test, but not always! I don’t even test it anymore, and I have absolutely made beautiful FMF sourdough bread with a failed float tested starter. So, go right ahead and bake!
How To Know When Your FMF Sourdough Bread Is Done?
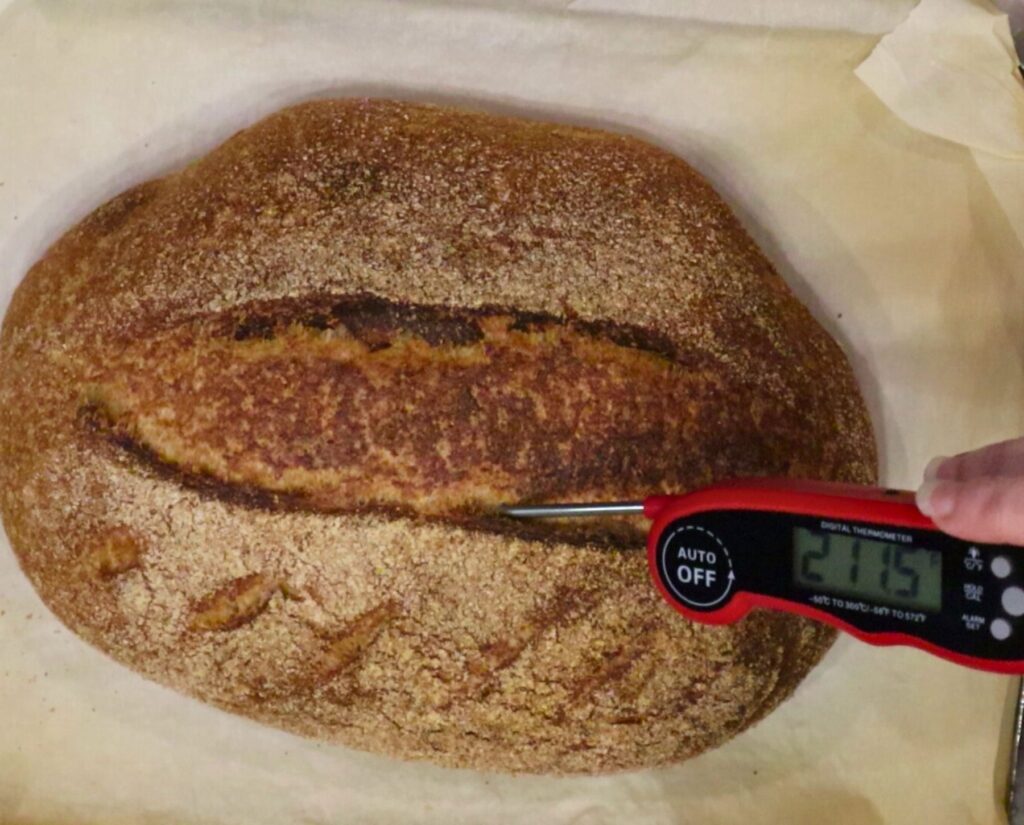
You will be baking your bread for the first half covered to keep the steam in. But, then remove the top and bake the loaf the rest of the way open. Baking times will vary, and I highly recommend you temp your loaf in the center to be sure it is completely cooked throughout. I like to use a digital kitchen thermometer (like the one HERE), and temp to at least 205*F, but really I like to go to 210*F. Then, the hardest part of all, let it cool completely before slicing into it to prevent it from being gummy.
Ingredients To Make Fresh Milled Flour Sourdough Bread
- 500g – 550g Fresh Milled Flour (I recommend hard white or hard red when starting out. *See notes for more wheat varieties)
- 450g Room Temperature Water
- 12g Sea Salt 2 tsp (You can use between 10-15g of salt)
- 115g Bubbly Sourdough Starter 1/2cup (Fed between 8-12 hours ago)
- *Optional- 20g Vital Wheat Gluten (This is not required, but will make a nicer loaf.)
Wheat Berry Varieties
I recommend all hard wheat (white, red, or combo of both) in the beginning. Also, if not choosing to use Vital Wheat Gluten, you will need a hard wheat. If you want to make a loaf with an Ancient Grain (Spelt, Einkorn, Kamut), you can do this with the use of the vital wheat gluten.
Instructions To Make This Fresh Milled Flour Sourdough Bread Loaf
- Firstly, make sure your sourdough starter was fed within 8-12 hours, and is nice an bubbly. I like to use it when the starter is just starting to drop.
- Then, mill your flour.
- In a large mixing bowl, measure out room temperature (non-chlorinated) water.
- Add the sourdough starter to the water. It may float, but if not see my post above about the float test.
- Mix the sourdough starter into the water.
- Then, add the freshly milled flour to the water mixture.
- Add the salt, and if using the vital wheat gluten add that as well.
- Mix all ingredients to combine, making sure there is no dry flour left. This mixture will be lumpy, and shaggy. See video for texture. Cover, and let this sit for about 30 minutes.
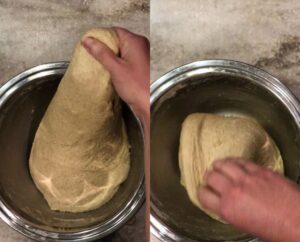
- After 30 minutes, remove cover, then stretch and fold the dough a few times as you turn the bowl a bit with each turn. Cover, and let sit for another 30-60 minutes. Then, do another series of stretch and folds. Be gentle as you go, each time it should feel stretchier and softer. Do these stretch and folds every 30-60 minutes until the dough has risen about 20-30%. It should be stretchy, smooth, and there will be some air bubbles in the dough. This step generally takes only about 3-5 hours. (See the post above about the time/temp variations, and tips)
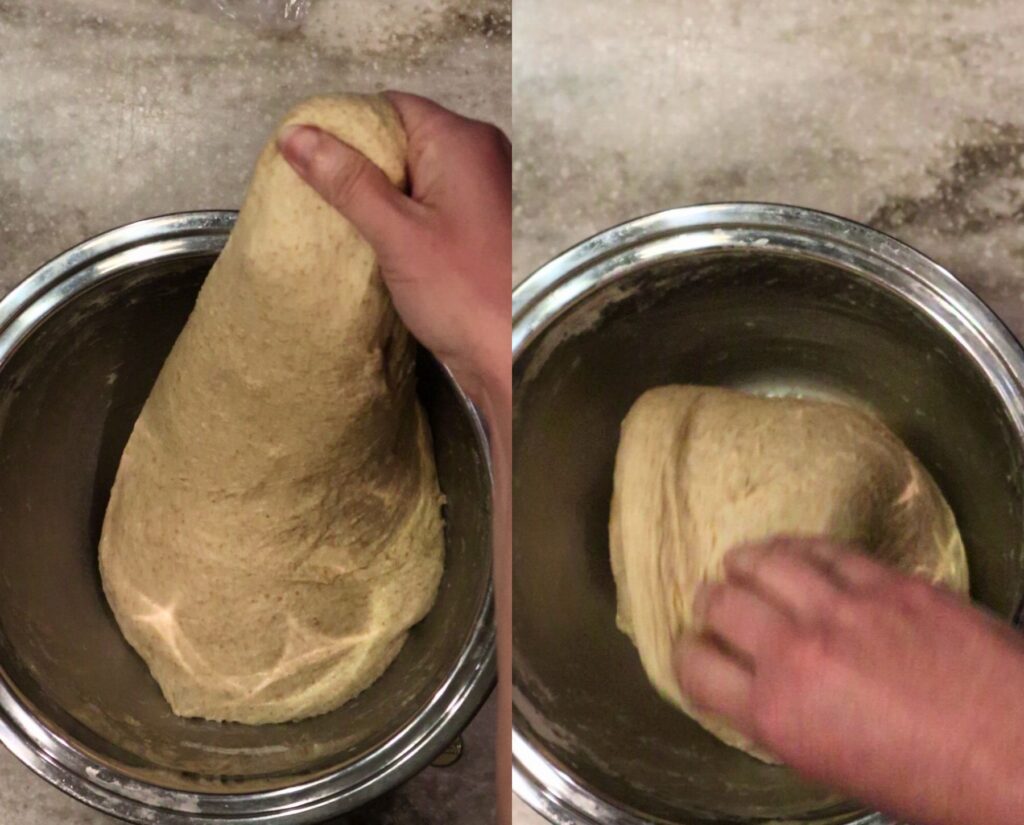
After The Stretch And Folds
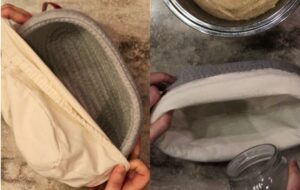
- After the dough has risen a bit, it is ready to shape in your banneton. Lightly spritz your banneton liner cloth with a tiny bit of water, and sprinkle flour into the banneton liner all around. (If making this for someone who is gluten sensitive, make sure to use rice flour for this.)
- Place your sourdough dough on your work surface, and gently stretch it into a loose rectangle, trying not to press the air bubbles out of the dough.
- Then, fold one of the long sides of the dough into the center, and then the other side into the middle meeting edge to edge.
- Gently roll the dough up. (see video for shaping visual)
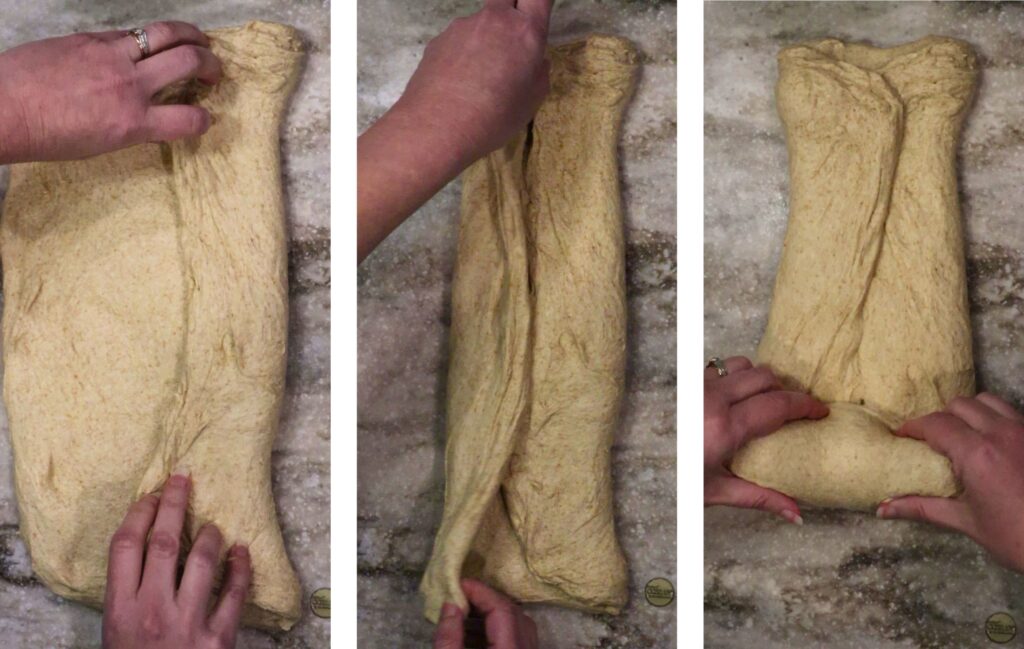
After Shaping
- Place your dough seam side up into the prepared banneton. Pinch the seam together, making sure there is some surface tension on the face of the dough.
- Cover, and place the banneton in the fridge for 1-3 hours. I DO NOT RECOMMEND AN OVERNIGHT FERMENT! An overnight ferment will over-ferment your dough. If you are in a hurry, you can bake it at this step before placing it in the fridge. If you want your bread to be more sour, then leave it in the fridge for 3 hours, I don’t recommend any longer than that.
- Preheat your oven to 480*F. (If using a Dutch oven, preheat it with the lid on during this preheat.) In the video I use a stainless steel baking dish with a lid, and I don’t preheat that pan. HERE is the one I use, and love!
- Place a piece of parchment paper on the counter, and then flip the dough out of the banneton onto the parchment paper.
- Score the dough how you wish.
- Place the parchment paper into your baking vessel, and bake covered for 35 minutes. Then, lower the oven temperature to 450*F and finish baking with the lid off for 20-25 minutes. I like to check the center of the loaf’s temperature to be 210*F.
- Let the loaf cool completely before slicing.
- Lastly, enjoy!
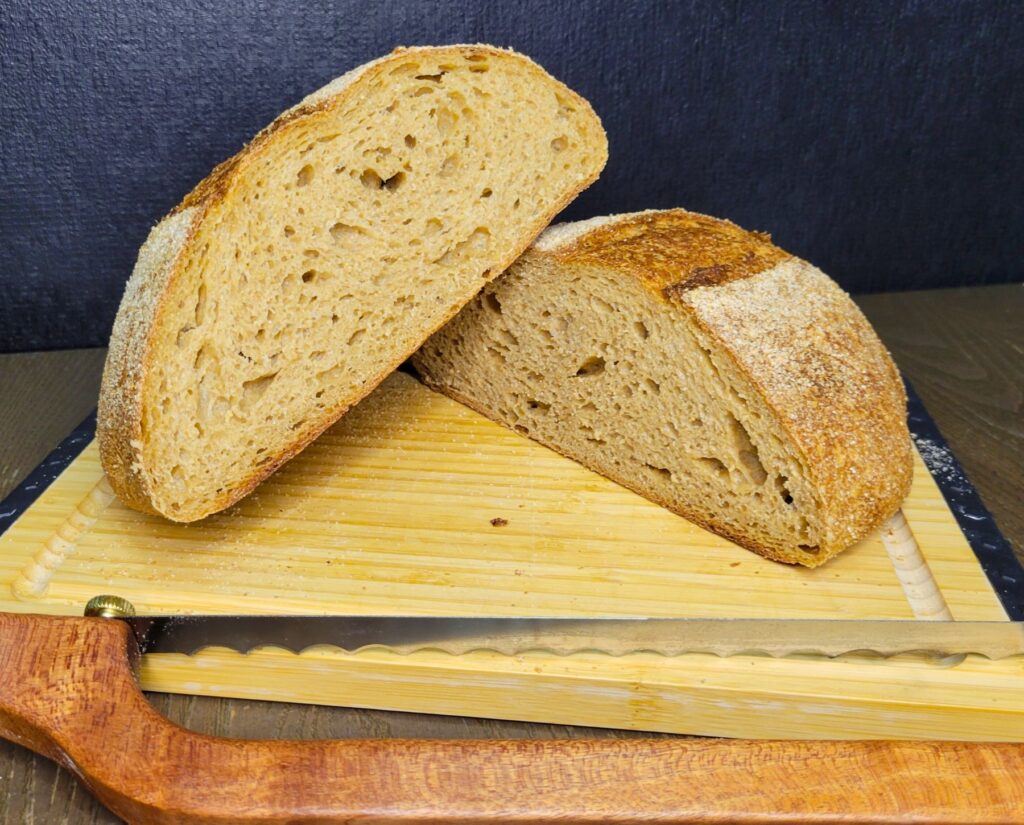
How To Store This Sourdough Bread Made With 100% Fresh Milled Flour
To store this 100% fresh milled flour sourdough bread, I like to keep it at room temperature for up to 3 days. You can wrap the loaf in a cotton or linen bread bag, a clean kitchen towel, or place it in a paper bag. This allows the bread to breathe, preventing it from becoming soggy while maintaining the crust’s crispness.
If you prefer a soft crust, you can store in a plastic or airtight bag/container, as this will hold the moisture in, but also cause it to mold a bit faster.
For long term storage, I like to let the loaf cool completely, and then slice it. Place it in a freezer bag or container. It will last in the freezer for up to 4 months.
Shop This Post
Nutrimill Impact Mill – Save $20 OFF with Coupon Code: grainy
Stainless Steel Baking Pan With Lid
Shop My Site Wheat Berries & Coupon Codes
Baja Gold Salt SAVE 10% OFF with Coupon Code: Grainy
Checkout Some Of My Other Recipe
The BEST sourdough chocolate chip cookies
100% Fresh Milled Flour Sourdough Bread Video
100% Fresh Milled Flour Sourdough Bread Printable Recipe
100% Fresh Milled Flour Sourdough Bread
Equipment
- 1 High Heat Oven safe vessel with lid like a Dutch Oven
Ingredients
- 500 -550 g Fresh Milled Flour I recommend hard white or hard red when starting out. *See notes for more wheat varieties
- 450 g Room Temperature Water
- 12 g Sea Salt (2 tsp) You can use between 10-15g of salt
- 115 g Bubbly Sourdough Starter (1/2 cup) Fed between 8-12 hours ago
- *Optional- 20g Vital Wheat Gluten (2 TBSP) This is not required, but will make a nicer loaf.
Instructions
- Firstly, make sure your sourdough starter was fed within 8-12 hours, and is nice an bubbly. I like to use it when the starter is just starting to drop.

- Then, mill your flour.
- In a large mixing bowl, measure out room temperature (non-chlorinated) water.
- Add the sourdough starter to the water. It may float, but if not see my post above about the float test.
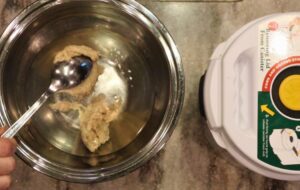
- Mix the sourdough starter into the water.
- Then, add the freshly milled flour to the water mixture.
- Add the salt, and if using the vital wheat gluten add that as well.
- Mix all ingredients to combine, making sure there is no dry flour left. This mixture will be lumpy, and shaggy. See video for texture. Cover, and let this sit for about 30 minutes.
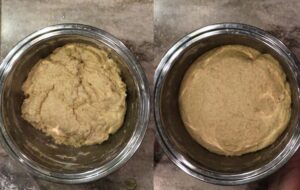
- After 30 minutes, remove cover, then stretch and fold the dough a few times as you turn the bowl a bit with each turn. Cover, and let sit for another 30-60 minutes. Then, do another series of stretch and folds. Be gentle as you go, each time it should feel stretchier and softer. Do these stretch and folds every 30-60 minutes until the dough has risen about 20-30%. It should be stretchy, smooth, and there will be some air bubbles in the dough. This step generally takes only about 3-5 hours. (See the post above about the time/temp variations, and tips)
- After the dough has risen a bit, it is ready to shape in your banneton. Lightly spritz your banneton liner cloth with a tiny bit of water, and sprinkle flour into the banneton liner all around. (If making this for someone who is gluten sensitive, make sure to use rice flour for this.)
- Place your sourdough dough on your work surface, and gently stretch it into a loose rectangle, trying not to press the air bubbles out of the dough.
- Then, fold one of the long sides of the dough into the center, and then the other side into the middle meeting edge to edge.
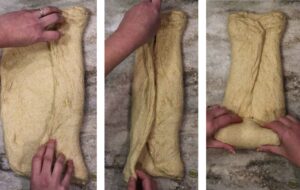
- Gently roll the dough up. (see video for shaping visual)
- Place your dough seam side up into the prepared banneton. Pinch the seam together, making sure there is some surface tension on the face of the dough.
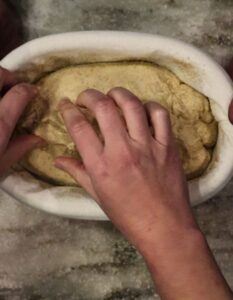
- Cover, and place the banneton in the fridge for 1-3 hours. I DO NOT RECOMMEND AN OVERNIGHT FERMENT! An overnight ferment will over-ferment your dough. If you are in a hurry, you can bake it at this step before placing it in the fridge. If you want your bread to be more sour, then leave it in the fridge for 3 hours, I don’t recommend any longer than that.
- Preheat your oven to 480*F. (If using a Dutch oven, preheat it with the lid on during this preheat.) In the video I use a stainless steel baking dish with a lid, and I don't preheat that pan.
- Place a piece of parchment paper on the counter, and then flip the dough out of the banneton onto the parchment paper.
- Score the dough how you wish.
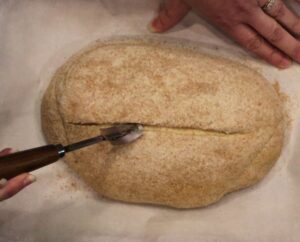
- Place the parchment paper into your baking vessel, and bake covered for 35 minutes. Then, lower the oven temperature to 450*F and finish baking with the lid off for 20-25 minutes. I like to check the center of the loaf’s temperature to be 210*F.
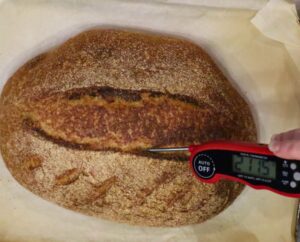
- Let the loaf cool completely before slicing.
- Lastly, enjoy!
Video
Notes
*This post contains affiliate links, which means I make a small commission at no extra cost to you! Also, as an Amazon Associate I earn from qualifying purchases. But, I will only suggest items I actually Recommend!






Can’t wait to try this! I made your fmf sourdough bowl recipe yesterday, but just made it one large loaf instead of the bread bowls. It was the best fmf sourdough loaf I’ve ever made! Interested to see how it compares to this recipe!
Thanks for all your hard work!
Awesome! I am so happy to hear that! Nice job! This new recipe was tweaked from my original recipe, but I think just a little bit better! 🙂 Let me know how it goes. Happy Baking!
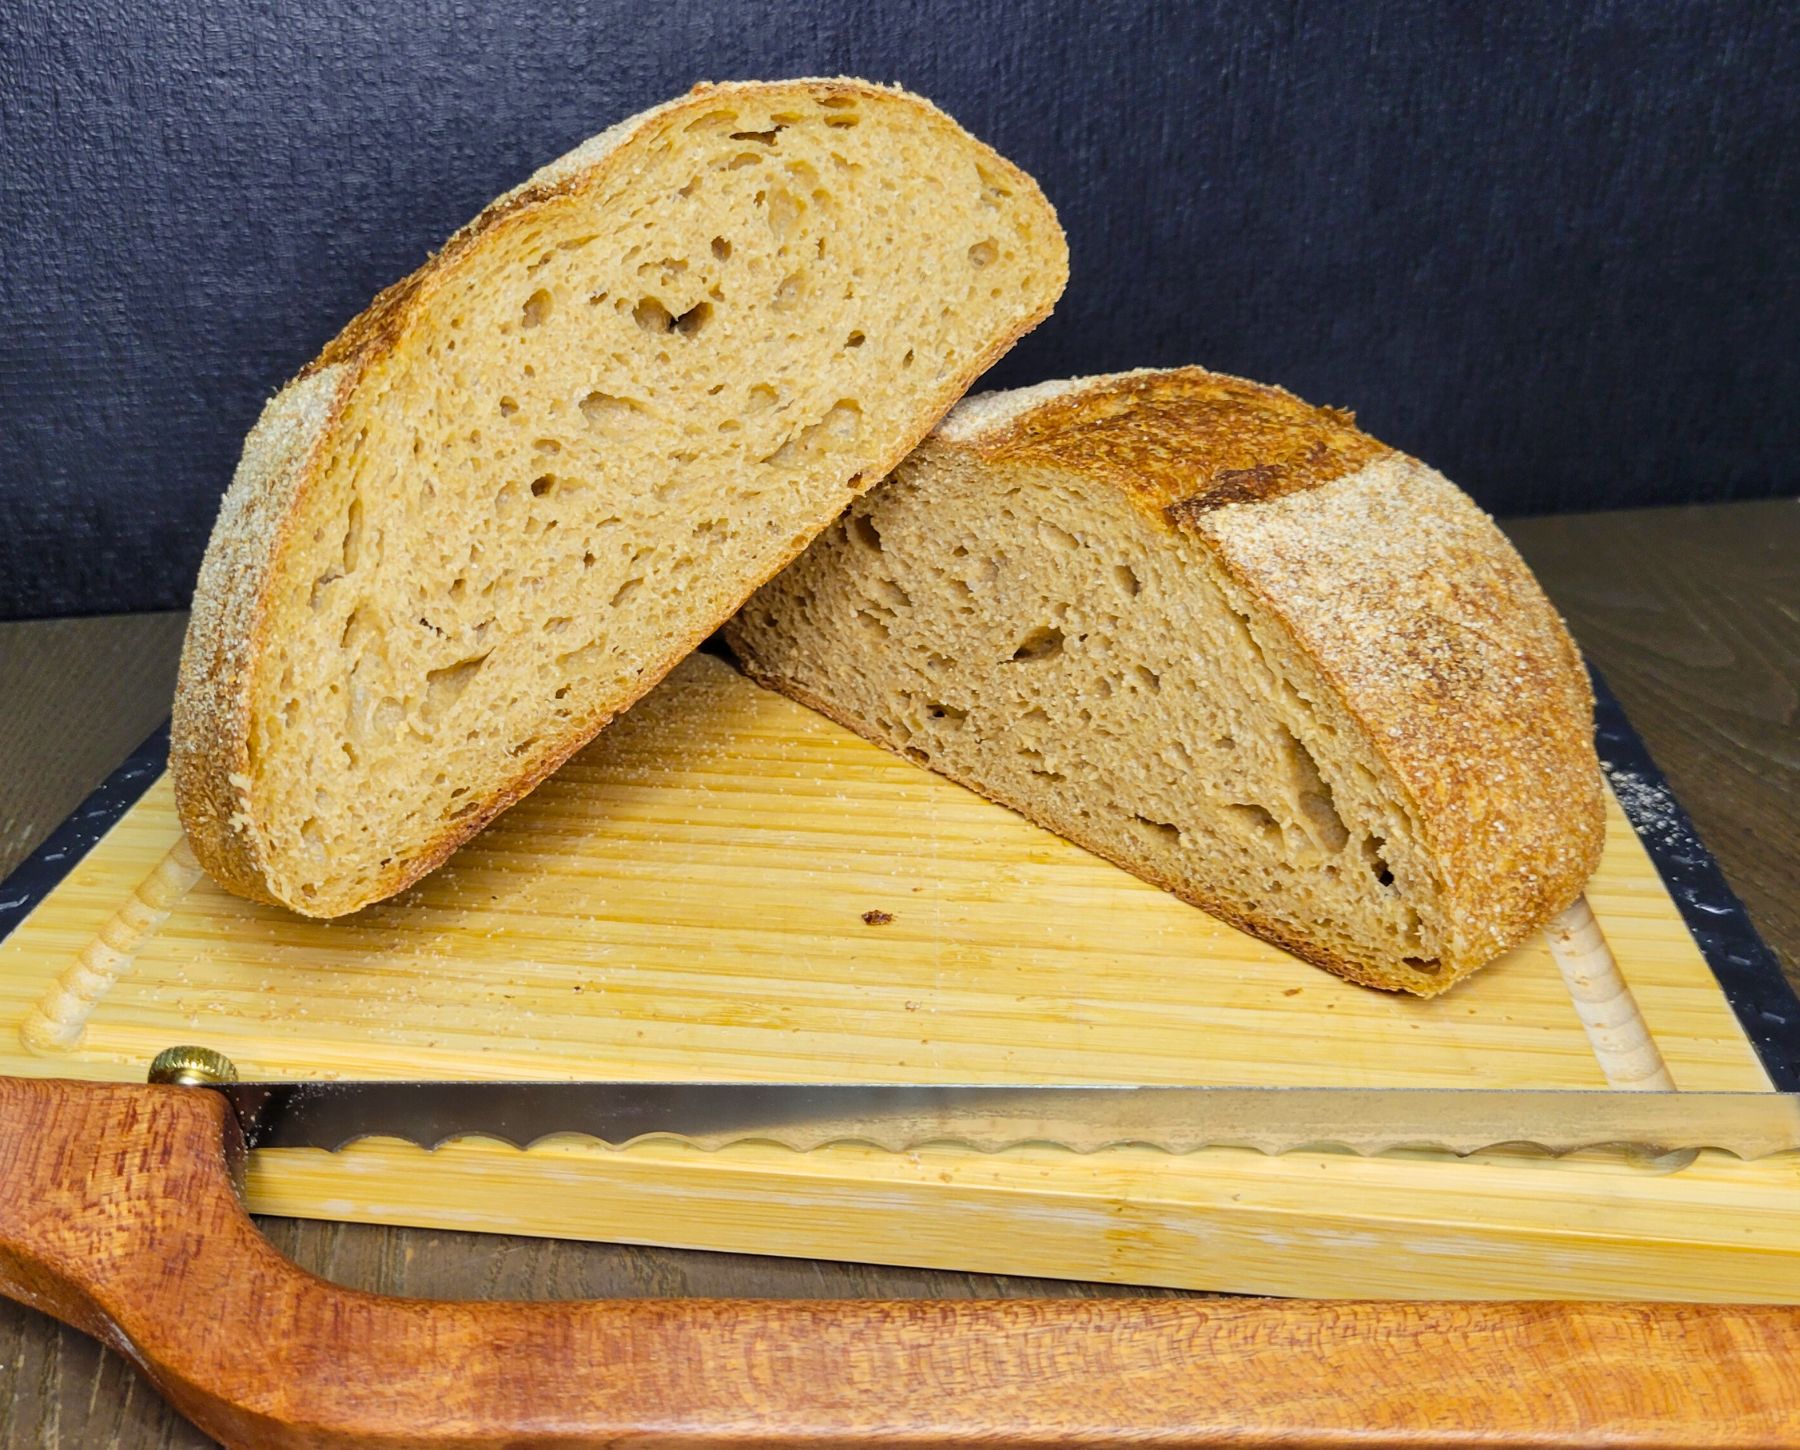
Okay, just made this recipe and it’s AMAZING! Great flavor, I have SO many holes and air bubbles inside. Great chewy crust with a soft inside. The only thing I have to work on is getting it to rise a bit more. My loaf is kinda flat, about 2 inches from top to bottom at its highest point. Any tips on how to help it rise anymore? In between stretch and folds I put it in the oven (that I turn on for about 30 secs to get warm) because our kitchen is cold.
Thank you again!
Awesome! Nice job! the small rise could be due to the shaping, yo may need to get more surface tension. OR if that is not the case, it may need a bit of a shorter proofing time. I find fresh milled flour ferments so quickly with sourdough, I am always surprised that it is ready so quickly. 🙂
Just made it today and it’s incredible! Lofty, soft, chewy, and has a crunchy exterior. I didnt use VWG since I don’t have any, yet it was perfect. Ive made many loaves of sourdough with both AP flour and FMF, yet this is my first success. Plus it’s a same day recipe!
Yay! I am so happy to hear that! Nice job! Thanks 🙂
This recipe did not work at all for me. I make breads and sourdough all the time but new to fresh milled grains. I used hard red, spring water weighed everything and it was way to wet. Thought it was going to come together but it was way to sticky and would not hold any shape. Finally threw it in the trash.
I am not sure what could have happened why it would be so wet, but if too wet next time, just add a bit more flour. I have a video where you can see the texture you are looking for. https://youtu.be/F4nEE9l6uVY
But, every batch and variety of wheat berries can be different, so the hard red wheat may have had a bit more moisture, and just needed a little more flour.
I had the same problem. It acted like it needed double the flour. Equal parts of flour and water doesn’t seem right. Mine went in the trash. Still looking for FMF sourdough recipes.
What wheat were you using? You can see in the video it is a pretty nice texture dough, not watery. Also, there are many others who have also tried this recipe with great success. So, there are a few things it could be. The wheat variety can affect this, and so could the humidity, also how wet your sourdough starter is. If you haven’t had the chance to watch the video that goes with this, I recommend giving it a watch, you can try my methods with another recipe until you find the perfect loaf for you! 🙂
https://youtu.be/F4nEE9l6uVY
Made my first sourdough loaf a couple of weeks ago with store bought flour and it was pretty flat. I tried this recipe with fresh milled hard white wheat flour and it came out great! Nice shape and rise. Just waiting for it to cool so I can slice it 🙂
Yay! I am so happy to hear that! Nice job! Thanks so much! 🙂
I’m trying your recipe right now. When I switched from AP bread flour to fresh milled, nobody told me the dough seems super wet in the beginning. First loaf I baked I added more flour and it came out dense and dry. Next loaf with fresh milled, I left in refrigerator overnight and it wasn’t risen so I’m hoping with your recipe and only a 3 hour refrig time, I’m going to find the perfect loaf with fresh milled flour and the sourdough flavor.
Yes! I do find that an overnight fridge fermentation period will overproof the dough, and make a flat dense loaf. The shorter rise seems to do so well, because fresh milled flour ferments so much faster than white AP flour.
First time I made sourdough with fmf I thought oh way too wet and added more flour but the bread turned out dry. Second time I realized with fmf that it seems wet but during the stretch and folds it absorbs the moisture and my second loaf with this recipe was perfect.
Yes! It takes a bit longer for it all to absorb the liquid. Thanks for sharing! Glad the second one was a hit! 🙂
I had the same issue and just added another 50grams of flour and it was perfect!
Awesome! Thanks for sharing that! 🙂
I had the same problem. I did 450 gr of hard white and 50 of khorasan. I had to add about an extra 80 gr. of hard white.
It was still a bit sticky during stretch and fold but by the time I shaped it for the banner on it was perfect. I did put some olive oil in my hands.
Waiting to bake now🙏
Yes, Olive oil does help with shaping if it is sticky, but the dough should be wetter and stickier than you might think at the beginning. This is because fresh milled flour absorbs moisture much slower than white flour, so it is continuing to absorb liquid all the way through the process even up until baking.
Have you tried the sift and scald method? I’m curious to try it with a fmf sourdough. Thanks!
No I have not. Let me know how it goes if you give it a try. 🙂
This is DELICIOUS. I love high hydration loaves. It’s so soft with a good, crunchy crust. Thank you!
Awesome! I am so happy to hear it was a hit! Yes, super yummy! Thanks so much! 🙂
Making this now! So excited! How do you feed the starter, I usually do 1-1-1 by weight but I saw on. One of your other recipes you do less SD and more water and flour. I’ve already started this time but for future, should I feed different?
I normally feed 1:1:1, but if it was in the fridge, or it seems sluggish, I will feed a higher ratio like 1:2:2
Could I put this in a sandwich loaf pan and make sandwich bread? Would I need to alter the recipe?
You can bake it in a loaf pan, but it won’t be as soft and squishy as a sandwich bread. I do have a sourdough sandwich bread however if interested. https://grainsinsmallplaces.net/sourdough-sandwich-bread/
I made this as my first sourdough bread recipe and it is WONDERFUL!!! Nice airy crumb – chewy crust – amazing flavor. Thank you, once again, for an awesome recipe that just worked! Even though I messed up and let it “rise” after it was shaped instead of putting it in the fridge. Then, I forgot to score the loaf once I realized I had left it sitting out instead of in the fridge. I put it in the fridge while the oven and Dutch Oven preheated. I went ahead and baked it. I wasn’t expecting it to be good – and it is better than good!
I am so happy to hear it was a hit! Nice job! 🙂
I actually did put mine in the fridge overnight and it turned out great! I used a mix of hard white and turkey red wheat berries. Thanks for the simple recipe!
That’s great to hear! Thanks! 🙂
First time making FMF sourdough. I’m super bummed but I echo what some said earlier. Wet dough that I was sure would come together and never did. I used 550g of hard white berries. I will leave it proofing and see if there’s any way to recover it, but it may be a loss. I’m sure we will still eat it…just may not have a particular shape. Hopefully next time it will come out well.
Fresh milled flour ferments very quickly, and can go to overproofed quite quickly. I only let it go about 3-5 hours, and it is done. If overproofed it can loose all of it’s strength. Try shortening your ferment time and see how it goes. If it is super wet still after the first rest period, you can add a little bit of flour in that first hour.
So I was googling due to only a few of us having this issue and I’m wondering if all of us with the issues are using water softeners. I know we do and apparently that can cause some differences in terms of water absorption and rise. Anyway, I’m not exactly sure what the solution is, BUT I think that’s the issue. It still tasted good, though.
This is interesting to me, and definitely makes me think. Because I have been hooked up this week to a place that has softened water, and have had some weird issues with my breads too. Hmmmmm
Also, you may want to try with some bottles spring water and see if it changes things for you. Let me know. This is very interesting, and something I would like to experiment more on.
Kara, thank you for this recipe! I recently got a NutriMill Impact grain mill and my first 100% fmf whole wheat sourdough loaf was a little disappointing. But I just tried your recipe and took the loaf out of the oven, and it looks beautiful! I haven’t cut into it yet but I bet the crumb will be amazing. I’ve baked quite a few nice sourdough loaves before with *mostly* whole wheat in a loaf pan, but since your recipe uses a banneton, I finally decided to go through the trouble of flouring a clean tea towel and placing the dough in a colander. Also, I had seen the tension techniques before, but it finally clicked with me and I really made an effort. I wish I could post a picture because I couldn’t be any happier! Definitely printing out this recipe and praying for many more successes.
That is so wonderful to hear! Nice job! I love to hear these success stories! Thanks so much for sharing! 🙂
I love this recipe! But I always overnight ferment. It’s never sour enough otherwise. Just incase anyone agrees!
Thanks for sharing! 🙂
I have been making FMF yeast bread for many years, but have not had good luck making sourdough. My loaves are always dense. This recipe is what I have needed all along! It came out SO well! The crust was crunchy, but the inside soft with lots of air bubbles! My husband said I don’t need to look any further; this is a keeper! Thank you so much, Kara!
Yay! That is so great to hear! Nice job! Thanks so much 🙂
I have made this loaf twice now (my second one is cold proofing now). First time was really good! Nice rise, crust, flavor. My only difference is that in your video, your dough seemed to stretch out better on the stretch and folds and especially when shaping into the rectangle to shape it.
Mine was pretty stiff and I had to work with it more to stretch it out. The result was more of a balled up batard which baked into more of a boule. It was still good but I’m wondering why it didn’t stretch better. Maybe I should shorten the ferment time?
If it didn’t stretch much, that can be a few things. It could be not enough moisture, so too much flour added or not enough water added. OR different wheat berries can affect, you want a high protein hard wheat for the best stretch.
Kara,
I have gluten sensitive friends that have been able to enjoy fresh milled flour baked goods without any dietary issues. So awesome!
Do you have any testimonials or experience from gluten sensitive folks on how they fair with vital wheat gluten added to freshly milled flour baked goods? I’m wondering if the whole grain goodness would offset their original sensitivity to the added gluten.
So enjoying your content and I use it and share it often, thank you!!
Yay! That is so awesome to hear! Results are all over the place. Some can handle the small amount, and others can’t even handle the bread at all. I think it mostly depends on each individual person.
I never have good sourdough bread. I am about to stop trying. The starter was awesome, but the dough isn’t anything like yours. It’s tough and not very pliable. I have a Wonder Mill and mill my flour on the “bread setting”. I am thinking perhaps I should change the setting to being closer to the pastry setting. Any thoughts or suggestions? Thank you.
Yes, I mill my flour on the finest setting. If the dough is tough and not pliable, it sounds like it may be too dry. Checkout this video I made and see if that helps. https://youtu.be/F4nEE9l6uVY?si=_xigvvV9aN4RjGKF
Let me know how it goes. 🙂
I’m crying happy tears! I’m still an FMF newbie, but I’ve been making sourdough forever – and it’s a big exercise in trial and error and sooo time consuming. I was really scared to try FMF sourdough and have that ADDED layer of complexity, but I began my starter a couple of weeks ago and decided today was the day. I followed this recipe and instructions to the letter, and from the moment I measured out my ingredients this morning till now, it has been about 6 hours 45 minutes…and I just pulled a beautiful tall loaf of bread out of the oven! How is it so fast?! And the rise was beautiful! I have definitely baked my fair share of puny loaves that didn’t get that “oven spring” but this one sprang up nicely! I think this is actually EASIER than regular sourdough. Thanks for this recipe. If it’s not obvious, I’m kind of giddy about it.
Yay! I am so happy to hear that! Yes, I think it is easier too, as long as we forget all the tried and true tricks with regular sourdough. Thanks so much, and nice job! 🙂
Thank you for helping my first attempt at sourdough be successful! I didn’t know what to expect, but followed the recipe (using 350gm hard white and 150gm hard red, went closer to 60 mins between stretch and folds for 5 hrs and proofed for about 1.5 hrs) and the result was beautiful! The texture of the bread was amazing! My bottom was a little overcooked, so I’m going to move my Dutch oven up a rack in the oven and see how that goes. The bread itself wasn’t at all sour, so I may try a longer proof to see if that helps get a liiitle more of that classic flavor. My kids—who don’t care for regular sourdough—kept asking for more! (I had to cut them off so we’d have enough for breakfast!) Thanks again for all of your work on this site—I’m most definitely a beneficiary of your efforts and generosity with your experience!
Yay! I am so happy to hear it was a hit! For a stronger sourdough flavor, you can shorten the time at room temperature, so you can lengthen the time in the fridge just a bit. But, fresh milled flour tends to ferment at a much faster rate than white flour with sourdough, so too long of a proof or rise time will result in over proofed dough. I hope that helps! Let me know how it goes next time! Happy Baking! 🙂
You can actually put a cookie sheet below where your bread is cooking so it doesn’t burn on the bottom just letting you know.
I’m so glad you are so responsive to the comments, because I am new to sourdough and have a few questions!
I followed your sourdough starter recipe and it looks great. My friend used some of the discard to make flat great and says it tastes wonderful. A couple of things before I try to do this recipe…
1. Can I use the discard to make this bread? All of the discard is in the fridge and it is only from past day 14, so I was thinking it could be used for bread but am not sure if I have to use it from the starter itself (which is at room temp) for the bread.
2. When you get past day 14, do you still have to discard? Or can you just keep feeding the sourdough in its container and using it for recipes from there?
Hopefully these make sense. Thanks in advance!
Hi! yes, you can use this to make bread as long as it has been doubling consistently. But, you want to feed it the night before and use it when it’s active in the morning. You do need to discard each time you feed it. But, you don’t have to throw the discard away, you can use it in a recipe instead now.The reason you need to discard or use it in the recipe is because the starter would just keep growing because you need to feed the same weight of flour and water as the starter. I hope that makes sense. 🙂
My FMF sourdough starter is finally ready to use!! I am anxious to try this recipe. I don’t have a banneton. Any suggestions?
Yay! It is so exciting! It’s ok if the first loaf doesn’t turn out perfectly, that is pretty normal. You can use a tea towel lined in a medium size bowl, and dust the towel pretty heavily it with rice flour so it doesn’t stick to the towel. (you can mill the dry rice for this, you could use more fresh milled flour, but it tends to stick more)
But, I don’t recommend leaving it in for too long, because fresh milled flour sourdough ferments pretty quickly.