
Sourdough Sandwich Bread Made With Fresh Milled Flour
This Sourdough Sandwich Bread loaf is perfectly soft, slightly sweet, and tangy at the same time. It holds up nicely to slicing, and spreads to make the perfect sandwich bread, and it is made with 100% fresh milled flour, unsifted, and leavened with a pure sourdough starter, and no yeast.
Equipment
- 2 4x8 bread pans *See Notes for Larger Bread Pan Ingredient List
- 1 digital thermometer to check to see when the loaves are done
Ingredients
- 4&1/2 cups Fresh Milled Flour 560g My favorite is 450g hard white wheat & 110g Kamut
- 1&1/2 cup Room temperature water 360g
- 3 TBSP Melted butter OR Olive Oil 42g
- 3 TBSP Sugar 36g OR Honey 60g
- 1&1/2 tsp Salt 9g
- 1 Egg, room temperature
- 1/2 cup Sourdough Starter 115g
- *optional egg wash 1 egg+1 tsp water for topping bread before baking
Instructions
- Firstly, make sure that you feed your sourdough starter the night before you want to bake with it. (Even if you already fed it in the morning. You want it nice and strong the night before.)

- Then, mill the flour. I like to use mostly hard white wheat with a little Kamut (Khorasan Wheat). Just make sure to use mostly hard wheat of some sort for this recipe. Otherwise, it will not develop the gluten enough to have a nicely risen loaf of bread.
- In a stand mixer, add water, melted butter (or oil), sugar (or honey), salt, and egg. Mix all these ingredients to combine.
- Then, add the freshly milled flour to the stand mixer, and start to mix slowly until all the dry flour is completely incorporated.
- Add the sourdough starter into the dough, and mix until incorporated. (The dough will seem very wet at this stage.)

- Cover, and let the dough sit at room temperature for a minimum of 15 minutes, or up to 1 hour. This resting time is important, It allows the fresh milled to start absorbing the liquid, and the bran to start softening. This is the Autolyse step.
- After the dough has had time to Autolyse, then start the kneading process. This kneading process could take anywhere between 7 to 30 minutes. This time varies greatly, so the best way to tell if the dough is done being kneaded is to check the dough itself. You want a nice stretchy dough that wants to stay together. This is a wet dough, so try to resist adding flour to it. See video for the desired texture of dough that you are looking for.

- Once kneaded, cover the dough and let it rise until doubled. This can take anywhere from 2 to 8 hours depending on your sourdough starter, and how warm it is in your kitchen. (Other variables I mentioned above in my blog post can affect this rise time as well.) Mine generally takes about 3- 4 hours for example.
- Prepare bread loaf pans with parchment paper.
- After the dough has doubled in size, then on a lightly oiled surface, cut the dough in half. This will make 2 small 1 pound loafs. See notes for other size bread pans. I use small 4x8 bread pans.
- Press each piece flat, then roll to shape, I show one shaping technique option in my video. But, make sure there is some surface tension, and no air pockets while rolling. it will be sticky so I recommend oiling your hands as well as the work surface.
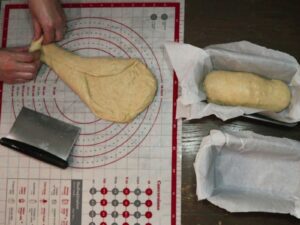
- Place each loaf in the lined bread tin, and cover. Let rise this second time for 2-3 hours, or until it has risen and looks puffy. (Times may vary greatly, so make sure to check your dough occasionally during this second rise time.)
- During the end of this second rise preheat oven to 375*F.
- Once the loafs have risen and look puffy, you can brush with an egg wash to make the loaf shiny and more browned. This step is optional.

- Bake loaves for 35-40 minutes until the internal temperature of the center of the loaves are 205-210*F. If they are below this temp, the loaves may be gummy.
- Take bread out of the oven when the bread reaches that temp range. Then, remove them from the baking pans to a wire rack to cool. (The parchment papers can be used as handles so you don't burn yourself.)
- Let the loaves cool completely before cutting into them! If you cut into them before they cool completely, they may be gummy on the inside.
- Once cooled completely, then slice to desired thickness, and enjoy!

Video
Notes
*Bread Pan Size Tips: My recipes call for the smaller 4×8 bread loaf pans, because I have a tiny oven! lol. Even the 4.5×8.5 pans are a bit larger, crazy how just that half inch each way can make such a difference! So, if you only have the larger pans, I recommend to x1.5 my recipes (except the sourdough starter, leave that the same) if you are looking for a large high rise loaf of bread. The large pans will definitely still work with this recipe as written, the loafs will just be a bit smaller.
*Larger Bread Pan Ingredient Amounts:
For Medium Bread Pan Size 4.5 x 8.5
-
- 7 cups Fresh Milled Flour 840g (I like to mill 700g hard white, and 140g Kamut)
-
- 2&1/4 cup Room temperature water 540g
-
- 4.5 TBSP Melted butter OR Olive Oil 63g
-
- 4.5 TBSP Sugar 60g OR Honey 90g
-
- 2&1/4 tsp Salt 13g
-
- 2 Eggs, room temperature
-
- 3/4 cup Sourdough Starter 174g
-
- *optional egg wash 1 egg+1 tsp water for topping bread before baking
For Large Bread Pan Size 5 x 9
-
- 9 cups Fresh Milled Flour 1,120g (My favorite is 900g hard white wheat & 220g Kamut)
-
- 3 cups Room temperature water 720g
-
- 6 TBSP Melted butter OR Olive Oil 84g
-
- 6 TBSP Sugar 72g OR Honey 120g
-
- 3 tsp Salt 18g
-
- 2 Eggs, room temperature
-
- 1 cup Sourdough Starter 230g
-
- *optional egg wash 1 egg+1 tsp water for topping bread before baking